
Technology
Managing Virtual desktops in Windows 11 – A Complete Guide

An Introduction to Virtual desktops in Microsoft’s New Operating System
By the launch of the latest version of Windows, Microsoft introduced implemented notable advancements to the Virtual desktops display areas functionality. Digital workspaces permit users to build isolated work zones, each having a collection of active apps. This enables it more convenient to control tasks and increase efficiency. In this tutorial, we will examine how to create the maximum benefit from virtual screens within Windows 11. I will acquire the knowledge to apply them effectively to the maximum extent.
Ways to Generate and Access Virtual Workspaces
To get to and control virtual workspaces on Windows 11, you are able to utilize the Desktops symbol on the toolbar. This is shown by two grey quadrilaterals. In another option, it is possible to employ the combination of Windows key and Tab. The perspective shows the programs you have running in addition to virtual desktop environments you have established.
To generate another virtual desktop, just click the button labeled “New desktop”. The process will place another workspace to the roster. This will enable people to categorize mobile applications based on diverse projects or intentions. The brand-new PC is going to be vacant. However, any running applications from the earlier monitor will continue to be reachable.
Customizing Virtual Desktops: Renaming, Re-ordering, and Backgrounds
Arranging your digital workspaces will assist you keep an eye on your assignments and maintain concentration. In order to prevent misunderstanding, it is possible to change the name active desktops by selecting the default name (like Desktop 1, Desktop 2) and inputting a new name that mirrors its purpose.
Moreover, when using multiple desktops, modifying their arrangement might be necessary. You can easily arrange available desktops by moving them in your desired sequence from the bottom menu or by using a desktop’s right-click option and selecting “Shift to the right.” You can also use the the hotkey Win + Ctrl + Left/Right Arrow to move across the available screens. Moreover, it is possible to utilize Option + Modify Arrow to the Left/Right to relocate them.

To create a clearer visual distinction among virtual desktops, The option is available to set a customized background to every single one. Click with the right mouse button on the computer screen then choose “Pick background” to view the Backgrounds menu. In this place, you have the ability to decide from pre-established choices or import your personal background picture.

https://azure.microsoft.com/en-us/products/virtual-desktop
Optimizing Multitasking: Arranging Desktop Windows and App Administration
By default, applications are isolated on every virtual screen. This enables you to change among different tasks with efficiency. Nevertheless, there could be cases in which you desire particular software windows or applications to be accessible on several desktops.
In order to accomplish this, access the Desktops view, use the right-click function on the desired app, and pick “Show this window on every desktop.” Alternatively, opt for “Enable windows from this app on all desktops.” This will implement the identical configuration to all instances of the app.
One can additionally move active programs on the same screen to a different active workspace, facilitating easy rearrangement. In case you turn off a desktop having running applications, the programs will automatically be transferred to the next desktop that is free.
Advanced Toolbar Options for Virtual Screens on Windows 11
Microsoft’s latest operating system offers extra personalization choices within the taskbar configuration for a smooth virtual desktop environment. If you want running applications on the taskbar to show windows from all your desktops upon clicking them, navigate to Options > Computer System > Task Management > Screen Areas. On the desktop toolbar, reveal all the active windows. In this place, you are also able to configure the keyboard combination Alt+Tab to show every window from all virtual desktops.
Put or Delete the Computer Icon
The upgraded Windows introduces the Desktops icon within the taskbar as a default setting. Nevertheless, if you would rather to conserve space or struggle to locate it, you are able to personalize the taskbar preferences. Just right-click on the bottom bar, access Taskbar settings. Utilize the switch adjacent to the “Task View” option for removing or adding the symbol. Remember the key combinations will still function, irrespective of the visibility of the Desktops icon.
Conclusion
Digital workspaces on the Windows 11 platform provide a robust feature for people to strengthen their multitasking capabilities. These also support users maintain organization. Through following the provided instructions within this manual, you can effectively handle virtualized desktop environments, generate individual work zones, and enhance general efficiency in the next-generation operating system from Microsoft. Welcome the advanced virtual desktop adventure in the latest Windows operating system. Assume authority regarding your job flow unlike ever.
Author


The nutraceutical industry is experiencing explosive global growth as consumer demand for health-focused products continues to climb. Consequently, manufacturers, ingredient suppliers, distributors, and brand owners are rapidly expanding into new territories. However, this fast-moving environment makes identifying truly qualified prospects through traditional methods increasingly difficult.
Manual research, outdated contact databases, and disconnected market information frequently slow down vital business development efforts. To overcome these challenges, forward-thinking companies are adopting AI-powered lead generation software. When integrated with a specialized nutraceutical data platform, this software streamlines prospecting, improves market visibility, and accelerates business growth. By combining artificial intelligence with industry-specific business intelligence, organizations can discover the right opportunities faster and make highly informed decisions.
The Major Obstacles in Finding Qualified Leads
Generating high-quality B2B leads in this sector requires much more than just collecting company names and basic email addresses. Sales and marketing teams need deep, actionable insights into manufacturer capabilities, current product portfolios, regulatory certifications, and key decision-makers. Traditional prospecting methods create severe challenges that hinder business growth.
For instance, sales teams frequently lose valuable hours dealing with outdated company information and time-consuming manual web research. These inefficient methods produce low-quality leads, incomplete supplier data, and very limited visibility into emerging international markets. Ultimately, these obstacles reduce daily productivity, drain corporate resources, and make it incredibly difficult to build a strong, predictable sales pipeline.
What Is AI-Powered Lead Generation Software?
AI-powered lead generation software utilizes advanced artificial intelligence to analyze massive volumes of B2B data, helping organizations identify high-value prospects based on highly specific business criteria. Instead of forcing employees to manually review countless company websites, the AI automatically flags businesses that perfectly match your ideal customer profile.
The software introduces several intelligent capabilities into your daily operations. These features include automated lead qualification, AI-powered predictive search, smart data filtering, and automated opportunity prioritization. The system also delivers predictive business insights based on real-time market shifts. This technology allows sales teams to spend their time having meaningful conversations with hot prospects instead of hunting for data.
Why a Specialized Nutraceutical Data Platform Matters
While artificial intelligence greatly accelerates data discovery, true success ultimately depends on the quality and reliability of the underlying industry data. A generic business directory simply cannot provide the deep technical insights required in the health and wellness sector. A dedicated nutraceutical data platform solves this issue by providing a centralized source of verified business intelligence. These platforms are explicitly designed for the nutraceutical, dietary supplement, functional ingredient, and functional food industries.
These specialized databases contain connected industry information from a single, trusted source. They offer fully verified company profiles, exhaustive ingredient databases, active product portfolios, and verified manufacturer details. Users also gain instant access to global supplier networks, complex compliance certificates, and deep market intelligence. This centralized structure eliminates the need to cross-reference multiple disjointed websites.

Better Prospecting Through Connected Intelligence
The greatest advantage of combining artificial intelligence with a nutraceutical data platform is the ability to uncover highly relevant business opportunities instantly. Sales professionals can filter their searches using precise, industry-specific criteria rather than generic categories.
-
Product and Ingredient Specialization: You can easily search for companies based on specific product formats like gummies, softgels, or powders. You can also filter by ingredient categories such as botanical extracts, probiotics, or marine oils.
-
Geographic and Scale Metrics: The platform allows teams to pinpoint targets by geographic location, corporate size, and specific industry segments.
-
Compliance and Certification Status: Teams can instantly filter prospects by their verification status, such as USDA Organic, Non-GMO Project Verified, or GMP compliance.
The underlying AI rapidly analyzes these filtered layers to surface the exact companies that match your active business objectives. This automated matching process helps teams prioritize high-value opportunities while completely eliminating manual data gathering.
Supporting Smarter Strategic Business Decisions
Beyond simple daily lead generation, modern businesses require highly reliable intelligence to support long-term corporate growth strategies. A unified nutraceutical data platform enables organizations to monitor shifting market trends and discover reliable new ingredient suppliers before shortages occur. It also allows firms to research competitor product lines and identify lucrative corporate partnership opportunities early. Furthermore, executives can track emerging ingredient categories and evaluate the viability of entering new geographic markets. Having instant access to connected market intelligence allows leadership teams to make faster, highly confident strategic decisions.
Improving Collaboration Across Disconnected Teams
Sales, marketing, procurement, and research departments frequently rely on completely different data sources. This separation creates severe information inconsistencies, introduces friction, and causes duplicated work across the organization. An integrated B2B platform solves this internal issue by providing a single, shared source of verified truth for every employee.
This unified database delivers consistent business data to all departments simultaneously. As a result, marketing teams can design better campaign targeting, while sales reps experience faster lead qualification. Concurrently, procurement teams enjoy improved supplier research, and research departments can track ingredient viability easily. This structured alignment increases overall operational efficiency and drives down administrative overhead.
Driving Sustainable Long-Term Growth
Companies that enthusiastically embrace AI-driven business intelligence gain a massive, lasting competitive advantage in the global marketplace. Instead of constantly reacting to sudden market changes, these firms can proactively identify emerging opportunities. They can build stronger customer relationships and expand into new territories with absolute confidence.
By pairing AI-powered lead generation software with a robust nutraceutical data platform, organizations dramatically improve lead quality. They also successfully shorten complex sales cycles, streamline scientific and corporate research, and make data-driven decisions that support sustainable business growth.
Final Thoughts
Success in today’s highly competitive nutraceutical industry depends entirely on data accuracy and intelligent automation. AI-powered lead generation software helps businesses identify the right buyers and partners faster than ever before. Simultaneously, a dedicated nutraceutical data platform provides the verified business intelligence needed to understand complex products, suppliers, and global market trends. Together, these advanced digital solutions empower organizations to improve prospecting, strengthen sales strategies, and accelerate business development. Organizations that invest in connected intelligence today will be perfectly positioned to capture global market share tomorrow.
Author
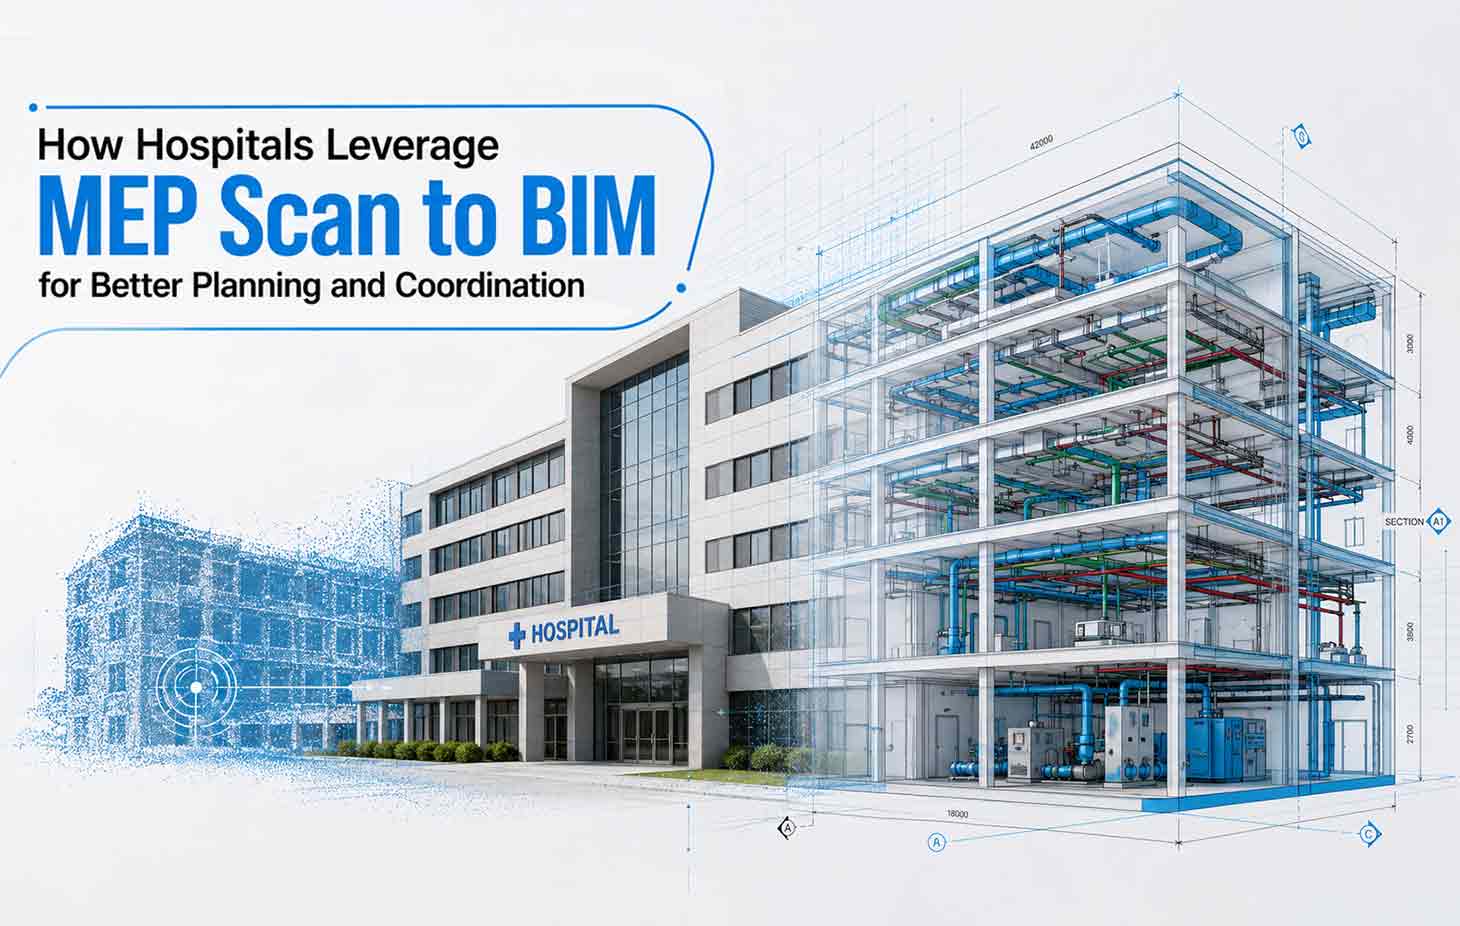
Modern hospital buildings carry immense spatial complexity that far exceeds conventional commercial structures. Surgical theaters, isolation rooms, and critical care wings demand concentrated medical gas distribution lines. They also require specialized HVAC filtration arrays and redundant emergency power backup circuits.
Engineering teams must route all of these intricate systems through ceiling plenum spaces. These tight zones feature extremely narrow physical clearance tolerances.
Over decades of extensive renovation cycles, original paper drawings naturally accumulate massive field deviations. Workers frequently introduce rerouted duct segments, relocated valve assemblies, and spliced conduit paths. They often do this without capturing the updates in existing asset documentation.
Consequently, facility directors inherit incomplete, highly inaccurate records. Actual physical conditions inside the walls diverge sharply from archived floor plans. This discrepancy creates measurable financial exposure every single time a capital improvement project enters a functioning clinical environment.
Planning and Coordination Matter in Healthcare
Geometric conflicts inside surgical suites or isolation room ceilings carry direct, severe consequences for hospital safety. They also threaten operational continuity. A misallocated fire suppression head or an unmapped structural element above an intensive care bed can easily trigger mandatory building code remediation sequences. These unexpected compliance issues halt clinical operations across an entire ward.
Therefore, facility management teams require confirmed routing geometry for every single mechanical, electrical, and plumbing path. This data allows them to maintain strict regulatory compliance. Furthermore, rigid NFPA 99 accreditation audits demand exactly that level of documented spatial proof.
Project teams that deploy specialized Scan to BIM services gain highly accurate, georeferenced parametric models. Through this process, every single clearance path receives complete verification against actual field geometry. This reality capture workflow arms facility directors with confirmed spatial data. They get this information long before a single work order or construction tool touches a live, high-stakes clinical zone.

Understanding MEP Scan to BIM Workflows
The highly specialized conversion workflow begins directly on-site. Terrestrial LiDAR scanners capture millions of raw spatial coordinates across each ceiling cavity, mechanical plant room, and electrical switchgear corridor. Technicians take these highly detailed, field-captured datasets. Then, they save the point cloud data as RCP or E57 files directly into building design software like Autodesk Revit.
Once inside the digital modeling environment, experts meticulously perform coordinated registration. They work one discipline layer at a time to ensure complete systemic alignment across the project.
During the coordinate registration phase, every unique scanner position merges seamlessly into one shared spatial dataset. This crucial step allows the entire physical building to read as a single, absolute coordinate reference. Technicians then perform thorough as-built verification. They walk each duct assembly, conduit run, and fire protection network directly over the scanned point geometry to identify structural anomalies.
The final parametric model delivery reaches an exceptional level of development, typically ranging from LOD 300 to LOD 400. Each digital element within this file is permanently tied to the exact field coordinates that the scanner captured on-site. This method completely eliminates speculative design intent in favor of absolute, real-world data. Industry professionals who engage these MEP Scan to BIM services walk away with robust parametric models. Real field conditions take absolute precedence over whatever the historic, outdated drawings originally stated.
Renovation Challenges in Older Clinical Wings
Retrofitting older clinical wings presents a distinct, highly frustrating category of spatial intelligence challenges for engineering teams. Many healthcare facilities built before 1990 contain unmapped overhead structural beam alterations. They also hide complex plenum obstructions and legacy pneumatic tube infrastructure that existing paper blueprints omit entirely.
Common site challenges encountered during field surveys include unmapped structural beam modifications from prior renovation cycles. Teams also routinely find abandoned high-voltage conduit bundles concealed inside suspended ceiling plenum spaces. Furthermore, legacy pneumatic tube networks frequently intersect active mechanical duct routes. Missing isolation valve location records also sit buried deep inside heavily congested utility shafts.
Point cloud to BIM workflows eliminate this operational blindness entirely. The process feeds raw scanner geometry directly into queryable, interactive datasets. This workflow ensures that every single buried or hidden element is fully accounted for long before a demolition team arrives on site. Field installation teams get instant, definitive answers to complex clearance questions. Traditional floor plans are simply mathematically incapable of answering these complex questions.
How Reality Capture Improves Hospital Planning
Converting verified spatial coordinate datasets into architectural modeling parameters gives facility directors incredible control. They gain the ability to plan heavy medical equipment replacements along precise, pre-verified physical clearance paths. For example, a facility director planning a major MRI suite expansion can use the model to measure exact bore clearances. They can also check gantry rotation radii and RF shielding penetration points directly inside the digital workspace.
Teams using Scan to BIM for hospitals routinely extract dimensional clearance data for complex equipment loading paths. They also establish code-compliant egress widths and precise overhead lighting grid positions. Managers double-check all spatial values against real-world field geometry before procurement orders are finalized. They verify everything before equipment leaves the factory. Critical scope changes that once surfaced as costly surprises mid-installation are now caught and corrected early at the digital model stage.
Enhancing Coordination Across Construction Disciplines
Architectural partition layouts, structural concrete frame geometry, and heavy utility networks all land inside a single, federated digital workspace. Once these independent discipline models sit side by side within the coordination software, hidden geometric intersections and spatial clashes surface automatically. This early detection occurs long before design development locks in. It also happens well before components move to fabrication.
During interference analysis, software flags physical collisions automatically. For instance, a major mechanical HVAC supply duct might conflict with a structural steel transfer beam. The internal clash detection engine in Navisworks flags this collision before fabrication shop drawings ever release to the manufacturing floor.
Ceilings in hospital operating rooms carry an incredibly strict, dual compliance burden. ASHRAE 170 strictly governs ventilation clearances. Meanwhile, NFPA 13 controls critical sprinkler obstruction geometry.
MEP BIM coordination teams work both sets of complex regulatory rules into a single model pass. This ensures that the ceiling routing satisfies every single field inspector on the exact same drawing package. VDC engineers work methodically through every geometric clash inside the parametric model. Resolving conflicts at this digital stage keeps fabrication drawings clean. It also protects the master project schedule from expensive field rework on a live construction site.
Supporting Safe Hospital Expansion Projects
Verified spatial maps of existing utility routes protect highly sensitive, live clinical zones from unexpected, catastrophic utility shutdowns during adjacent building expansions. Often, a hospital adds a new patient tower immediately next to an occupied medical building. The shared utility corridors carry active power feeds, chilled water mains, and critical medical gas headers that serve both structures simultaneously.
MEP Scan to BIM for healthcare facilities provides project managers with highly detailed, georeferenced utility routing data. This spatial intelligence directly informs safe isolation valve sequencing. It also aids temporary bypass connection design and phased utility transfer schedules that actively protect patient health.
Recording complete building geometry in a single, non-invasive scanning phase removes the necessity of opening up ceilings for manual inspections during preconstruction planning. Healthcare Scan to BIM workflows convert captured geometry into structured parametric models that facility planners can query easily. They quickly check verified overhead dimensions for above-ceiling routing. They also confirm floor-level clearances for large medical device installations and verify geometry against NFPA, ASHRAE, and FGI Healthcare Guidelines.
A peer-reviewed case study focusing on the Camino Medical Group project in Mountain View, California, documented the clear financial value of this approach. BIM-assisted MEP coordination on a $96.9M healthcare facility delivered massive labor savings of 20% to 30% across all MEP subcontractors. Furthermore, it resulted in less than 0.2% total rework for the mechanical subcontractor. It also successfully slashed six months off the overall construction schedule.
Creating Lifecycle As-Built Models for Operations
The seamless transition from construction delivery files to active maintenance maps marks the most consequential, long-term output of the scan-to-model workflow. As-built MEP models generated from field-captured spatial data display exact pipe diameters at every single branch point. They show precise valve location coordinates tied directly to building grid references. They also embed crucial equipment serialization data within each parametric family element.
Facility management teams pull these models up inside their Computer-Aided Facility Management (CAFM) platforms. From there, they run preventive maintenance work orders directly from confirmed valve location data. The same model handed over by the construction team drives long-term asset schedules. It also manages service interval tracking and isolation valve safety inspections.
When a capital replacement cycle eventually comes up, facility directors pull the parametric model first. This gives them a single source of truth for equipment clearances and load path geometry. They also secure scope-of-work documentation verified against what the scanner actually found on site.
The Role of BIM in Hospital Digital Twins
Feeding verified spatial models into cloud-hosted digital twin platforms provides the mathematical baseline required for real-time asset tracking. It also supports highly accurate, predictive facility maintenance cycles. A hospital digital twin ingests the parametric MEP model as its absolute spatial foundation. Then, it layers live IoT sensor telemetry from HVAC control nodes onto geospatially correct equipment coordinates. It also tracks electrical submeter feeds and medical gas pressure transducers.
MEP coordination services that produce field-verified parametric models give digital twin platforms accurate anchor geometry. This setup enables predictive maintenance algorithms to generate automated work orders. These orders include precise physical access coordinates for field technicians. Substituting speculative manual measurements with advanced reality capture workflows positions modern healthcare facilities for safer, legally defensible asset management across their entire lifecycle.
Author

Every single time you visit a website, your web browser runs tiny pieces of hidden code. These scripts control how dropdown menus slide open. They dictate how web videos play. They also manage how digital forms process your personal data. This background code definitely makes the modern internet look beautiful and fluid. However, this exact mechanism also provides the most common pathway for hackers to unmask your real identity. Many investigators routinely exploit these scripts when you are actively trying to remain hidden online. Suppose you use the Tor Browser to secure your digital privacy. Leaving these automated scripts active completely defeats your core purpose. It mirrors the mistake of wearing a physical mask while pinning a bright name tag directly to your shirt.
Understanding the Role of JavaScript in Anonymity
JavaScript functions as a highly powerful programming language that lives directly inside your web browser application. This language can actively demand highly specific configuration details from your computer. These requests go far beyond what a basic text-based webpage actually requires to display information. In the high-stakes realm of anonymous web browsing, this immense power operates as a classic double-edged sword. You enjoy a highly functional, interactive website. At the exact same time, you hand that destination a tool to peer right behind the protective curtain of the Tor network. Consequently, many prominent cybersecurity experts suggest a specific remedy. They argue that turning off these scripts represents the single most critical change you can make to your personal security settings.
When you route your traffic through the Tor network, your data travels through three distinct volunteer servers. This specialized routing path deliberately hides your true IP address from the destination. However, JavaScript executes locally on your physical machine. This local execution means the code can completely bypass the strict rules of the network. A malicious script can command your web browser to ping an external server directly. This action immediately broadcasts your true home IP address to the individual running the website. Therefore, the code instantly destroys all the hard work that Tor nodes perform to keep you invisible.

Furthermore, trackers frequently deploy these automated scripts for a tracking method called fingerprinting. This stealthy technique allows a website to gather minute details about your current computer setup. For instance, the script checks your exact screen resolution. It logs the specific fonts you have installed. It even reads your current battery percentage. While these individual facts seem completely harmless on the surface, they combine to form a digital signature. This unique signature identifies you across completely different websites over time. If you want to remain an anonymous face in the digital crowd, you must stop your browser from broadcasting these unique hardware details. Following a dedicated, privacy-focused browsing manual can help you understand how to lock down these vulnerable vectors efficiently.
The Hidden Vulnerabilities of Script Execution
Security researchers frequently uncover dangerous zero-day vulnerabilities within the software engines that process browser code. These flaws represent hidden holes that the software creators have not discovered yet. Sophisticated hackers actively use these software holes to inject malicious software. They also use them to seize total control of a user’s operating system. Because JavaScript relies on highly complex architecture, it presents a massive attack surface for these digital exploits. By completely disabling script execution, you remove the primary highway that cybercriminals use to breach your defenses.
The history of online unmasking operations confirms this exact danger. In multiple high-profile criminal investigations, international law enforcement agencies deployed script-based exploits to identify specific users on the dark web. These investigators did not break the core encryption of the Tor network itself. Instead, they simply used tailored JavaScript code to force the target’s browser to communicate outside the encrypted tunnel. This historical reality explains why advanced users prefer to maximize their security settings when visiting text-only onion websites.
Executing scripts introduces three major categories of risk. First, it causes immediate IP leaks. Malicious code forces your computer to bypass proxies and reveal its true physical location. Second, it streamlines exploit delivery. Attackers deliver the vast majority of modern malware through automated browser scripts that run without your explicit permission. Third, it drains your system resources. Disabling these scripts regularly makes webpages load significantly faster and uses far less CPU power.
Steps to Deactivate Scripts in Tor Browser
Fortunately, the Tor Browser allows you to manage these digital risks with relative ease. You do not need deep coding knowledge to defend your privacy effectively. The simplest defense mechanism involves the built-in Security Level slider. You can access this tool easily by clicking the small shield icon located next to your main URL bar. Moving this slider directly to the “Safest” setting automatically deactivates JavaScript on all non-HTTPS websites. It also heavily restricts code execution on secure sites. This single action provides the most reliable protection for average users because it avoids the need to edit complex configuration files manually.
If you require highly granular control over your browsing environment, you can utilize the pre-installed NoScript extension. This tool allows you to whitelist specific, trusted domains while blocking code from every other source. However, you must remember a vital rule of digital security. Every single website you choose to trust creates a potential hole in your defensive armor. You should always ask yourself if a webpage genuinely requires active scripts to deliver the specific information you need.
How Disabling Scripts Changes Your Online Experience
You must prepare yourself for a vastly different internet experience once you turn off scripts. Many modern web platforms rely entirely on JavaScript to display their core content. When you disable this code, interactive buttons will no longer click. Image carousels will stop sliding. In fact, some pages will appear completely blank. This disruption represents the direct price you pay for maximum digital security. On the positive side, you will quickly notice that the annoying clutter of the web completely vanishes. Pop-up advertisements disappear entirely. Tracking pixels can no longer monitor your movements. Annoying, auto-playing videos stop distracting you during your reading sessions.
For users who frequent dark web networks, many services explicitly build their platforms to operate without these scripts. These specialized developers understand that their core audience values total privacy far over flashy visual design. You will find that privacy-centric forums, marketplaces, and directory links load almost instantly. They work perfectly even when you activate the “Safest” browsing mode. This layout creates a clean, text-heavy experience that mirrors the early days of the internet. This elegant simplicity functions as a powerful protective feature for security-conscious individuals.
Combining Script Control with Other Safety Layers
While controlling script execution marks a massive leap forward, it constitutes just one phase of a complete security strategy. You must also monitor how your baseline connection to the Tor network performs over time. Local internet service providers or restrictive governments often attempt to block your initial entry point into the network. In these challenging scenarios, deploying operational Tor bridges can help you maintain a reliable connection. These bridges function as unlisted entry points that disguise your Tor traffic. They make your secure data look like standard web traffic to outside monitors.
Furthermore, you must establish a strict habit of updating your software immediately. Even when you deactivate scripts, other components of the browser software might contain bugs that require patches. The Tor Project issues official updates frequently to neutralize newly discovered threats. When you combine a strict scripts-off policy with a regular update habit, you transform yourself into a highly difficult target for trackers. Always maintain your curiosity, exercise deep caution, and prioritize your digital safety over website aesthetics.
Frequently Asked Questions
-
Will disabling JavaScript break every website? No, but it will break many of them. Many informational sites and text-based blogs will work fine. Social media platforms and complex web apps usually require scripts to function at all.
-
Is Tor Browser safe if I leave JavaScript enabled? It is safer than a standard browser, but you remain vulnerable to fingerprinting and script exploits. Turn it off for true anonymity.
-
Can I turn JavaScript back on for just one site? Yes. Use the NoScript icon in the toolbar to select “Temporarily Trust” for a specific page during that session.
-
Does the “Safest” setting hide my IP address better? It does not alter how Tor routes your traffic, but it stops malicious code from escaping the browser to leak your real IP address to third parties.
Author


Readymade Saree with Blouse Online for Effortless Elegance

Hair Fillers Treatment in Dubai for Stronger, Fuller Hair

Online Marketplace in Nigeria: Safer Buying and Selling Guide

Trapstar London: Build a Modern Streetwear Wardrobe

Sp5der Hoodie: Premium Streetwear Style and Buying Guide

Copa Airlines Flight Change: Easy Guide to Modify Your Booking

Brown Adson Forceps: Precision Surgical Tool for Tissue Handling

Trendy Coord Sets for Women: Stylish Looks for Every Occasion

Corteiz: Streetwear Brand Redefined Modern Fashion Culture

Scarless Hair Transplant in Dubai for Natural Hair Restoration

Cybersecurity Consulting Company SequelNet Provides Critical IT Support Services to Medical Billing Firm, Medical Optimum

Meet the Megalodon: The Shark Star of ‘Meg 2’

Reduce Video Game Lag: Level Up Your Gaming Performance
Balancing India’s Entertainment: Cricket vs. Bollywood

Jetsetter’s Secrets: Unveiling Our Favorite Travel Hacks for a Seamless Adventure

The 5 Best Live Sports Streaming Sites: Legal and Exciting!

Hollywood Labor Unrest: The Impact of ‘What About Us?’ Strikes

Unveiling the Magic of Dream Fulfillment at the Late NBA Draft

Illuminate Your Skin: Dr. Axe Unveils Natural Remedies for Lightening Knees and Elbows

Bright Choices: Navigating the Pros and Cons of Skin Whitening Creams with Dr. Axe
-

 Business3 years ago
Cybersecurity Consulting Company SequelNet Provides Critical IT Support Services to Medical Billing Firm, Medical Optimum
-
Entertainment3 years ago
Meet the Megalodon: The Shark Star of ‘Meg 2’
-
Entertainment3 years ago
Reduce Video Game Lag: Level Up Your Gaming Performance
-
 Sports3 years ago
Balancing India’s Entertainment: Cricket vs. Bollywood
-
Entertainment3 years ago
Jetsetter’s Secrets: Unveiling Our Favorite Travel Hacks for a Seamless Adventure
-
Productivity3 years ago
The 5 Best Live Sports Streaming Sites: Legal and Exciting!
-
Art /Entertainment3 years ago
Hollywood Labor Unrest: The Impact of ‘What About Us?’ Strikes
-
Sports3 years ago
Unveiling the Magic of Dream Fulfillment at the Late NBA Draft


