
Technology
How to Install iOS 17 Beta: Download and Install Developer Beta on Your iPhone for Free

Introduction:
Year after year, devoted fans of Apple anxiously anticipate the release of the latest iOS version. With iOS 17 finally here, people are ecstatic with joy. Historically, Apple only granted early access to beta versions to individuals who were paying members of the Apple Developer Program. Nonetheless, in an extraordinary action, It is now possible for individuals holding an Apple ID to effortlessly acquire and install the iOS 17 developer beta at no cost. Whether you possess coding skills or simply have a curiosity, Below, we present step-by-step instructions on acquiring iOS 17 before it becomes officially available.
Check Device Compatibility
In preparation for exploring iOS 17, it’s essential to verify that your device is compatible. The compatibility of iOS 17 extends to iPhone XS and more recent models. However, it no longer offers support for iPhone 8, iPhone 8 Plus, and iPhone X. Here’s a list of iPhone models compatible with iOS 17:
iPhone 14
iPhone 14 Plus
iPhone 14 Pro
iPhone 14 Pro Max
iPhone 13
iPhone 13 mini
iPhone 13 Pro
iPhone 13 Pro Max
iPhone 12
iPhone 12 mini
iPhone 12 Pro
iPhone 12 Pro Max
iPhone 11
iPhone 11 Pro
iPhone 11 Pro Max
iPhone XS
iPhone XS Max
iPhone XR
iPhone SE starting from 2nd generation
Precautions Before Installing iOS 17 Beta
Apple advises against installing the iOS 17 beta on your primary iPhone due to its nature as beta software. Beta versions often contain bugs, performance problems and additional glitches potentially disturbing regular device operations or causing data loss. If feasible, it would be advisable to employ a backup device, Or else, take care while installing it on your primary device.
To protect your data, be certain to make an archived backup of your iOS device before proceeding with the beta installation.

Here’s how you can do it:
1.Plug your iPhone into your Mac employing the supplied cable.
2.Click “Allow” in the dialog prompt to enable the accessory connection.
3.Open a Finder window To trigger opening of a new window, employ your mouse and select/click on the Finder icon residing within your Dock.
4.Click your iOS device’s name in the sidebar.

Image by: https://www.macrumors.com/
5.In case this is the initial connection between your device and Mac, “Trust” should be clicked in the Finder window.
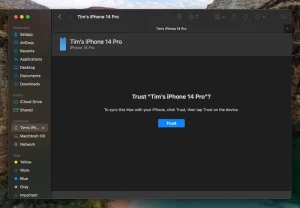
Image by: https://www.macrumors.com/
6.When prompted, tap the option “Trust” on your device, Afterwards, input your passcode to finalize the confirmation.
7.On the General page, choose the circle adjacent to “Backup all iPad data to this Mac.”
8.If you desire to encrypt the backup, mark the box adjacent to “Encrypt local backup” and input a password to secure your data.
9.If creating an encrypted backup is not your preference, or if encrypted backups have already been configured, click “Back Up Now.”
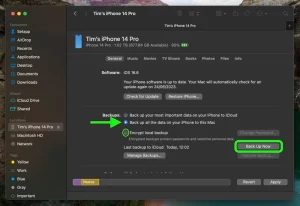
Image by: https://www.macrumors.com/
Obtaining and installing the iOS 17 Developer Beta
Now that you’ve taken the necessary precautions, you can proceed with downloading and installing the iOS 17 developer beta:
1.Access Safari on your iPhone open developer.apple.com.
2.Tap the menu icon in the top-left corner of the page, then tap “Account.”
3.Under “Sign in to Apple Developer,” enter and submit your Apple ID and password using the arrow buttons. Please enter the authentication code that was sent to your devices.
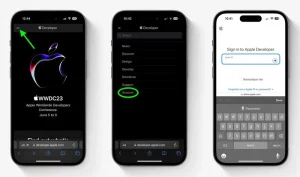
Image by: https://www.macrumors.com/
4.Tap the top-left menu icon again, proceed by tapping on ‘Account.’
5.By scrolling down and confirming with a checkmark before tapping “I Agree,” you are acknowledging your acceptance of all legal terms stated in Apple Developer Agreement.

Image by: https://www.macrumors.com/
6.Make sure your iPhone is running iOS 16.4 or later by going to Settings Access the Software Update option by following the path: Settings -> General. In the event it is so, and you’ve recently finalized steps 1-5 in order to sign up for a developer account, proceed to restart your iPhone. In case it isn’t, proceed with downloading and installing the most recent update for your device, Subsequently, give it some time to restart properly
7.Head back to Settings and then General and finally Software Update.
8.Select “Beta Updates.” In case you cannot find the option, consider turning off “Download iOS Updates” (Automatic Updates -> Download iOS Updates). Then tap “Back” and it should appear.
9.Opt for “iOS 17 Developer Beta” from the available choices, then tap “Back.”
10.Wait for the Software Update screen to check Apple’s servers. “Download and Install” should be tapped when iOS 17 Developer Beta becomes available. Next, adhere to the provided instructions and patiently wait until installation finishes.

Image by: https://www.macrumors.com/
An array of thrilling functionalities awaits users in iOS 17, ensuring an improved user experience. Notable highlights include:
Customization options are available in iOS 17, enabling users to make each call visually unique, Creating a more engaging atmosphere for conversations through customized caller appearances.
StandBy Feature: When placed horizontally, an iPhone transforms into a little home hub displaying information like the calendar, time, home controls, and more. Accessing essential data becomes more convenient with this.
Enhanced Widgets: Interactive widgets on the home screen enable users to perform tasks like checking off items on a to-do list or controlling smart home devices without opening specific apps.
Improved AirDrop and NameDrop: AirDrop has received significant improvements, and Quickly share contacts using NameDrop. allows for quick sharing of contacts. Moreover, holding two iPhones together initiates a SharePlay session, which now works with CarPlay as well.
Conclusion
A multitude of fresh features and enhancements are anticipated with the arrival of iOS 17. to the iPhone experience. Apple’s sudden choice to provide free access to the developer beta means that more users can now experience it without any cost, Users will have more opportunities than ever before to get a glimpse into what awaits them with the upcoming operating system. A fantastic opening for users to explore new features and contribute valuable opinions to Apple. Remember, beta software comes that can pose certain dangers. Backing up your data is crucial Consider utilizing a second device if it’s an option Doing this ensures that you can enjoy the new features without impacting the stability of your primary device
Author


n today’s digital world, even a minor software vulnerability can expose an entire organization to serious cyber threats. A single insecure line of code can put millions of users and critical data at risk. Because of this growing threat landscape, cybersecurity is no longer just about protecting networks and systems from the outside; it has become a fundamental part of how software itself is built.
The old practice of developing software first and adding Security later is no longer effective. In fact, it often creates more risks than solutions. With major cyber incidents such as the SolarWinds supply chain attack and vulnerabilities like Log4j, organisations have realized that Security must be embedded throughout the entire development process. Secure Software Lifecycle Management (SSLM) is essential in contemporary cyber defense.
The Shift-Left Approach: Integrating Security from the Start
Traditionally, security checks were performed only after software development was complete. This meant vulnerabilities were discovered late in the process, making them expensive and difficult to fix.
Today, organisations are adopting the Shift-Left security approach, integrating security practices into the earliest stages of the Software Development Life Cycle (SDLC). By incorporating security considerations into the planning, design, and coding phases, teams can identify potential weaknesses before they become real problems.
This proactive approach not only reduces costs but also ensures that Security becomes a core part of the software rather than an added feature.
Connecting Development Teams and Security Experts
One of the biggest challenges in modern IT environments is the communication gap between developers and security teams. Developers often prioritize performance, functionality, and speed, while security professionals focus on minimizing risks and vulnerabilities.
Secure Software Lifecycle Management helps bridge this gap by creating a structured framework that enables both teams to collaborate effectively. Certifications such as the Certified Secure Software Lifecycle Professional (CSSLP) equip professionals with the knowledge and methodology to manage Security throughout the software lifecycle—from planning and development to deployment and eventual retirement.
Rather than focusing solely on writing secure code, the approach emphasizes managing the entire ecosystem that produces and maintains software.
Securing the Modern Software Supply Chain
Most modern applications are not built entirely from scratch. Developers rely heavily on open-source libraries, third-party frameworks, and external APIs. While these resources accelerate development, they can also introduce hidden security risks.
Secure Software Lifecycle Management ensures that every component used in software development is carefully reviewed, tracked, and monitored for vulnerabilities. Without proper oversight, a single compromised dependency can weaken the Security of the entire application.
By implementing structured processes, organisations can maintain greater visibility and control over their software supply chain.
Developing the Next Generation of Security Professionals
As organisations place greater emphasis on secure software development, the demand for skilled cybersecurity professionals continues to grow. Certifications like CSSLP are becoming increasingly valuable for professionals who want to demonstrate expertise in secure software lifecycle practices.
However, mastering the multiple domains covered in the certification requires both theoretical knowledge and practical preparation. Many candidates enhance their preparation through simulation tools that replicate the structure and pressure of the real exam environment.
Practice platforms, whether desktop or web-based, allow candidates to test their understanding, identify knowledge gaps, and build confidence before taking the actual certification exam.
Building Skills for Secure Software Development
As organisations place greater emphasis on secure development practices, the demand for professionals with specialized knowledge continues to grow. Preparing for certifications like CSSLP requires both conceptual understanding and practical exam readiness.
Many candidates improve their preparation by practicing with tools designed to simulate real exam scenarios. For example, using CSSLP Desktop Practice Software allows learners to practice offline in an environment that closely resembles the actual certification exam. This helps them understand the exam structure, manage time effectively, and strengthen their confidence.
At the same time, professionals who prefer flexibility often rely on a CSSLP Web-Based Practice Test, which enables them to practice from any device and continue learning wherever they are. Combining these preparation methods often helps candidates develop a stronger understanding of secure software lifecycle principles.
Security, Compliance, and Business Trust
Secure Software Lifecycle Management is not only important for protecting applications but also for meeting regulatory requirements. Laws and regulations around data protection continue to evolve, and organisations are expected to demonstrate responsible security practices.
Companies that implement secure development processes show customers and partners that they take cybersecurity seriously. In the digital economy, trust plays a major role in long-term business success, and strong security practices help organisations maintain that trust.
Final Thoughts
Cyber defense today starts long before software is deployed. It begins during design discussions, development planning, and coding itself. Organisations that integrate security throughout the entire software lifecycle are better equipped to prevent vulnerabilities and protect their systems from evolving threats.
For developers, security engineers, and project managers, understanding secure software lifecycle management is becoming an essential skill. By prioritizing security from the beginning and continuously improving development practices, organisations can build software that is both innovative and resilient.
Author

At Effective Lab India, we recognize that environmental failures represent a silent thief of corporate profits. Every year, issues like corrosion, premature aging, and weathering cost manufacturers millions in warranty claims, product recalls, and damaged reputations. However, the most successful companies don’t just react to these problems after they occur. Instead, they embrace proactive testing. By using specialized laboratory equipment for salt spray, ozone aging, and xenon arc weathering, your quality control team can simulate years of environmental stress in just a few days. This strategic approach allows you to identify weak points before your product ever reaches a customer.
This guide explores the three essential pillars of accelerated environmental testing. We will explain how this equipment works, which industries rely on it, and why sourcing your tools from a dedicated manufacturer like Effective Lab India gives your lab a distinct edge.
1. Mastering Accelerated Corrosion Testing
Corrosion remains the single greatest threat to the lifespan of metal components, automotive parts, and industrial coatings. To address this, engineers utilize a salt spray chamber. This machine, often called a salt fog or salt mist chamber, replicates the destructive effects of coastal air and road salt. It works by exposing test samples to a continuous, controlled mist of sodium chloride at high temperatures.
How a Salt Spray Chamber Operates
Initially, the chamber creates a stable environment by maintaining a temperature of exactly 35°C. Next, the system atomizes a 5% salt solution into a fine fog. This fog settles uniformly over the test specimens to stimulate the oxidation process. Depending on the material, operators can choose between continuous fog, cyclic corrosion, or copper-accelerated tests (CASS).
Our chambers utilize fiber-reinforced plastic (FRP) to resist chemical damage over long periods. Furthermore, we include a transparent lid so your team can view the specimens without interrupting the test. Digital displays allow for constant monitoring of the fog collection rate, ensuring that every test remains scientifically valid.
Industry Applications and Global Standards
Many diverse sectors rely on salt spray testing to validate their products. Specifically, automotive manufacturers test fasteners and body panels to ensure vehicles don’t rust on salted winter roads. The aerospace industry uses it for structural alloys, while electronics companies test the durability of PCB surface finishes.
To remain compliant, these tests must follow international benchmarks. Our equipment meets the following standards:
-
ASTM B117: The gold standard for salt spray apparatus operation.
-
ISO 9227: International guidelines for corrosion in artificial atmospheres.
-
IS 11864: The Indian standard specifically for paints and varnishes.

2. Combatting Ozone Degradation in Polymers
Rubber and elastomeric materials—such as seals, tires, and hoses—face a unique threat from the atmosphere. Even tiny amounts of ozone can attack the chemical bonds in unsaturated rubber. This leads to surface cracking, loss of flexibility, and eventual mechanical failure. An ozone test chamber accelerates this natural degradation, providing results in days that would normally take years of outdoor exposure.
The Mechanics of Ozone Testing
First, our chambers generate ozone internally using either a UV lamp or a corona discharge generator. Then, the system maintains a precise concentration of ozone, typically between 25 and 200 parts per hundred million. The chamber stays at a stable 40°C to simulate warm, high-ozone environments.
To get the most accurate results, technicians mount specimens on a rotating holder. Some tests require the rubber to stay under static or dynamic strain. This method exposes the specific points where cracking is most likely to occur. A built-in sensor monitors the air quality constantly, so the machine requires very little human intervention during a run.
Vital Sectors for Ozone Testing
Many critical industries cannot function without these tests. In the automotive world, door seals and fuel hoses must resist ozone to prevent leaks. Cable manufacturers test EPDM and neoprene jackets to ensure electrical safety. Even the medical field uses these chambers to test the integrity of silicone seals and diaphragms.
We build our ozone chambers with high-grade stainless steel to ensure longevity. Additionally, we include safety interlocks that vent all residual ozone before an operator can open the door. This keeps your staff safe and ensures you meet all Indian factory health regulations.
3. Simulating Sunlight with Xenon Arc Weathering
Sunlight, moisture, and heat are a destructive trio for plastics, textiles, and adhesives. Over time, colors fade, surfaces turn chalky, and mechanical strength drops. A xenon arc test chamber acts as a “weatherometer.” It reproduces the full spectrum of sunlight—including UV, visible, and infrared light—alongside moisture cycles to simulate rain and dew.
How Xenon Weathering Works
The heart of the machine is a xenon arc lamp. When filtered through quartz glass, it produces a light spectrum that almost perfectly matches natural solar radiation. During a test, the machine cycles between dry periods of light and wet periods of water spray.
Furthermore, a digital PLC (Programmable Logic Controller) manages key variables like irradiance levels and relative humidity. This precision ensures that the test environment remains consistent. Whether you use a flat array or a rotating rack configuration, the goal is to provide uniform exposure to every square inch of the sample.
Broad Industry Reach
From dashboards to solar panels, xenon testing is everywhere. The textile industry uses it to check color fastness in outdoor fabrics. Construction companies test window sealants and architectural coatings to ensure they won’t fail after a few years in the sun. Crucially, our equipment complies with standards like ISO 4892-2 and ASTM G155. Every chamber we sell includes automatic irradiance control. This feature compensates for the natural aging of the lamp, keeping your dose levels stable for the duration of the test.
Why Partner with Effective Lab India?
Choosing a manufacturer is just as important as choosing the equipment itself. Effective Lab India is a premier manufacturer and exporter based in Faridabad. We have spent over 15 years perfecting the science of environmental testing. When you choose us, you are not just buying a machine; you are investing in a partnership.
We offer several distinct advantages:
-
Direct Manufacturer Pricing: By skipping the distributor, we pass the savings directly to your budget.
-
NABL-Traceable Calibration: We supply every instrument with a certificate that meets strict laboratory standards.
-
Total Support: Our team provides on-site installation and comprehensive operator training with every order.
-
Long-Term Reliability: We offer Annual Maintenance Contracts (AMC) with a 48-hour response guarantee to keep your lab running.
Ultimately, our engineering team is here to advise you on the best chamber size and test methods for your specific product. Whether you are building a new lab or seeking NABL accreditation, we provide the tools you need to succeed. Contact Effective Lab India today to secure your product’s future in an unpredictable world.
Author
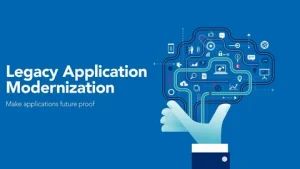
In 2026, the global business landscape is moving faster than ever. To remain competitive, organizations must innovate at the speed of thought. However, many companies find themselves held back by a silent enemy: legacy systems. These aging applications are often the backbone of an enterprise, yet they act as anchors. They limit scalability, drain budgets, and create massive security risks. This is why application modernization services have become a strategic necessity for survival.
Modernization is not just a simple software update. It is a comprehensive reimagining of how your business software functions, integrates, and delivers value. By transforming outdated code into agile, cloud-ready solutions, you can finally unlock the true power of your digital assets.
Understanding Application Modernization Services
At its core, application modernization involves updating legacy software to align with contemporary infrastructure and business needs. This process often focuses on moving monolithic applications toward microservices and cloud environments like Microsoft Azure.
In the past, companies viewed modernization as a “technical chore.” Today, it is a business driver. It allows you to adopt Agentic AI, real-time data analytics, and high-performance edge computing. Without a modern foundation, these advanced tools remain out of reach.
Why Modernization is a Mechanical Necessity
The “if it isn’t broken, don’t fix it” mentality is dangerous in 2026. Legacy systems are often “broken” in ways that aren’t immediately visible. Here is why you must prioritize modernization today:
-
Eliminating Performance Bottlenecks: Older systems cannot handle the massive data loads required by modern users. Modernized apps can scale dynamically, ensuring a smooth experience during peak traffic.
-
Hardening Security: Hackers target legacy systems because they often lack modern encryption and “Zero Trust” protocols. Modernizing your stack allows you to implement the latest security standards.
-
Cost Realignment: Maintaining “on-premise” servers is expensive. Cloud solutions like app modernization Azure allow you to pay only for what you use, drastically reducing hardware overhead.
-
Accelerating Time-to-Market: Modern architectures support DevOps and continuous delivery. This means you can release new features in days rather than months.
The Four Pillars of Modernization Strategy
Not every application requires a total rewrite. Depending on your goals and budget, you can choose from four primary approaches:
1. Rehosting (Lift and Shift) This is the fastest path to the cloud. You move your application to a new environment with minimal changes. While it doesn’t solve internal code issues, it reduces immediate hardware costs.
2. Replatforming In this scenario, you make small code adjustments so the application can better utilize cloud features. For example, you might move a local database to a managed service like Azure SQL.
3. Refactoring Refactoring involves modifying the application’s internal structure to improve performance. This is the “sweet spot” for many businesses. It allows you to take full advantage of cloud-native features without rebuilding everything from scratch.
4. Rebuilding If an application is too far gone, you must rebuild it. By using microservices and containerization, you create a modular system that is easy to update and scale for the next decade.
The Role of Microsoft Azure in 2026
Microsoft Azure has become the preferred ecosystem for enterprise modernization. Its flexibility and enterprise-grade security make it a natural fit for complex transformations. Solutions like Azure app and data modernization allow companies to update their software and their databases simultaneously.
Azure provides a suite of high-performance tools, including:
-
Azure Kubernetes Service (AKS): The industry standard for managing containers.
-
Azure DevOps: A platform that automates the software development lifecycle.
-
Azure App Services: A managed environment that lets developers focus on code instead of servers.
By using these tools, organizations in the USA and across the globe are turning brittle legacy apps into resilient, cloud-native powerhouses.
Data Modernization: Feeding the AI Engine
An application is only as good as the data it processes. Therefore, data modernization is a critical, yet often overlooked, component of the process. Legacy databases are often siloed, making it impossible to gain a “single view” of the customer.
Azure data modernization involves migrating these isolated databases to unified cloud platforms. This shift enables real-time insights and advanced business intelligence. In the era of AI, having clean, accessible data is the difference between leading the market and falling behind.
Overcoming the Challenges of Change
Modernization is rewarding, but it is not without hurdles. Organizations must prepare for several common challenges:
-
Complex Dependencies: Legacy apps are often “spaghetti code.” Untangling these connections requires expert guidance and thorough planning.
-
Skill Gaps: Your team may be experts in old languages but lack experience in cloud-native practices. Training or partnering with specialists is essential.
-
Data Integrity Risks: Moving massive amounts of data is risky. You must ensure that no information is lost or corrupted during the migration.
This is why partnering with experienced providers of application modernization services is vital. They provide the roadmap and the safety net needed for a successful transition.
Best Practices for a Successful Journey
To maximize your return on investment, follow these industry-standard best practices:
-
Start with an Assessment: Audit your entire portfolio. Determine which apps provide the most value and modernize those first.
-
Define Clear KPIs: What does success look like? Whether it is 20% faster load times or a 30% reduction in hosting costs, set measurable goals.
-
Choose the Right Approach: Don’t rebuild every app. Use “lift and shift” for simple apps and save “refactoring” for your core business tools.
-
Prioritize Security: Do not treat security as an afterthought. Build it into the architecture from day one.
-
Implement Automation: Use CI/CD pipelines to ensure that every update is tested and deployed automatically.
The Future: AI and Beyond
Looking ahead, application modernization will continue to evolve. We are already seeing the integration of AI agents directly into modernized architectures. These agents can self-heal code, optimize resource usage, and provide proactive support to users. Organizations that embrace modernization today will be the first to benefit from these future innovations.
With platforms like Azure leading the way, the possibilities are endless. You can build resilient, intelligent, and scalable applications that don’t just “keep up”—they lead.
Conclusion: Break Free from the Past
Application modernization services empower your organization to break free from the limitations of the past. By moving away from legacy debt and embracing the cloud, you create a more agile and efficient future.
Whether you are adopting Azure application modernization or a full Azure app and data modernization plan, the goal is the same: continuous innovation. The cloud offers a level of security and performance that on-premise systems simply cannot match.
If you are ready to transform your legacy systems and accelerate your digital journey, now is the time to act. Partner with experts who understand the complexities of Azure and can guide you through a smooth, successful transition. Your legacy systems served you well in the past—but your future belongs in the cloud.
Author


Ear Reshaping Surgery in Dubai: Bat Ear Correction & Procedure

Secure Software Lifecycle Management: Approach to Cybersecurity

Corteiz Clothing: Hoodies, Tracksuits, Cargos & Streetwear Style

House and Land Packages in NSW: Complete Guide for Buyers

Houston Local SEO That Connects Businesses with Customers

Burberry Shirt US: Authentic Styles, Fit Guide & Online Store

Green Ammonia Market Growth: Trends, Technology & Outlook

Best Health Insurance Plan in India List Triggers Debate

Large Cap Funds: Benefits, and How They Build Long-Term Wealth

Why Sp5der Shorts Are Dominating Modern Streetwear Trends

Cybersecurity Consulting Company SequelNet Provides Critical IT Support Services to Medical Billing Firm, Medical Optimum

Team Communication Software Transforms Operations at Finance Innovate

Project Management Tool Transforms Long Island Business

How Alleviate Poverty Utilized IPPBX’s All-in-One Solution to Transform Lives in New York City

Breast Cancer: The Imperative Role of Mammograms in Screening and Early Detection

Unstoppable Collaboration: D.C.’s Citi Open and Silicon Valley Classic Unite to Propel Women’s Tennis to New Heights

Embracing Renewal: Sizdabedar Celebrations Unite Iranians in New York’s Eisenhower Park

The Benefits of Starting a Side Hustle for Financial Freedom

New Blood Donation Screening Questions What You Need to Know

Stylishly Timeless: The 5 Types of Sandals You Need in Your Closet
-

 Business3 years ago
Cybersecurity Consulting Company SequelNet Provides Critical IT Support Services to Medical Billing Firm, Medical Optimum
-
Business3 years ago
Team Communication Software Transforms Operations at Finance Innovate
-
Business3 years ago
Project Management Tool Transforms Long Island Business
-
Business3 years ago
How Alleviate Poverty Utilized IPPBX’s All-in-One Solution to Transform Lives in New York City
-
health3 years ago
Breast Cancer: The Imperative Role of Mammograms in Screening and Early Detection
-
Sports3 years ago
Unstoppable Collaboration: D.C.’s Citi Open and Silicon Valley Classic Unite to Propel Women’s Tennis to New Heights
-
Art /Entertainment3 years ago
Embracing Renewal: Sizdabedar Celebrations Unite Iranians in New York’s Eisenhower Park
-
Finance3 years ago
The Benefits of Starting a Side Hustle for Financial Freedom


