
Construction
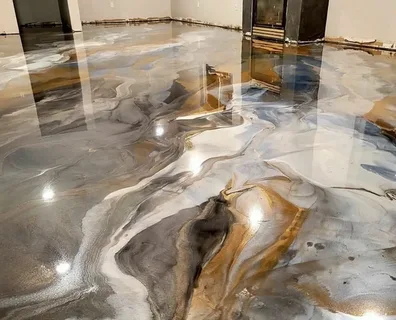
Epoxy Flooring: Durable, Stylish, and Easy-to-Maintain
Choosing the right flooring for your garage can be a challenging decision, but it’s one that can significantly impact the functionality and longevity of your space. A garage is no longer just a spot to park your car; it often doubles as a workshop, storage area, or even a hobby zone. Cars drive in and out, heavy tools move across the floor, and oil or chemical spills occur, constantly wearing down the flooring.
That’s why selecting a durable, easy-to-clean, and visually appealing option is crucial. Concrete floors, epoxy coatings, interlocking tiles, and rubber mats are among the most popular choices, each offering unique benefits in terms of resilience, maintenance, and aesthetics. By carefully considering your garage’s primary use, climate conditions, and budget, you can choose a flooring solution that not only protects your space but also enhances its overall usability and appearance for years to come.
That’s where epoxy flooring comes in. This type of flooring offers not only durability but also a stylish upgrade for your garage. It’s a great solution for homeowners looking for long-lasting floor protection.
What is Epoxy Flooring?
Epoxy flooring is a combination of resin and hardeners. When these materials are mixed, they create a strong and durable surface. This type of flooring is designed to resist stains, spills, and wear.
Benefits of Installing Epoxy Flooring
There are several reasons why epoxy flooring is becoming a popular choice among homeowners. Here are some key benefits:
- Durability
- Easy Maintenance
- Non-Slip Surface
- Aesthetic Appeal

Why Custom Epoxy Flooring?
Custom epoxy flooring allows homeowners to personalize their garage space. It enables you to select colors that match your home or choose a design that fits your style. Whether you want a solid color, a flake finish, or a metallic look, custom options ensure your floor is truly unique.
Not only can custom epoxy make your garage look better, but it also increases the value of your home. A well-finished garage is an attractive feature for potential buyers. Many buyers look for quality residential garage floor installations, which can make your home more appealing in the market.
The Installation Process
Installing epoxy flooring is a process best left to professionals. First, the concrete floor must be cleaned and prepped. Any cracks or damage should be repaired.
Then, the epoxy mixture is applied in several layers. Once applied, it needs to cure. The curing time can vary, but typically it takes a few days before you can walk on it or return items to the garage.

Maintaining Your Epoxy Floors
One of the best parts of epoxy flooring is its low maintenance needs. Regularly sweep away dirt and debris to prevent scratches. Mop with a mild cleaner to maintain the shine.
Use mats or rugs at entry points to trap dirt before it hits the floor. By following these maintenance tips, you can enjoy the benefits of your epoxy flooring for many years. Regular care helps maintain its durability and appearance and makes it easy to spot any potential damage early.
Is Epoxy Flooring Right for Your Garage?
Considering all the benefits, epoxy flooring can be a perfect choice for your garage. It combines durability, ease of maintenance, and aesthetic appeal. Additionally, having a well-finished garage can enhance the overall look of your home while boosting its value.
If you’re tired of dealing with cracks and stains or are simply looking for an upgrade, it might be time to consider epoxy flooring for your garage.
Strong, Stylish, and Lasting Garage Surfaces
Epoxy flooring offers a robust solution for homeowners looking to improve their garage spaces. With its long-lasting properties and appealing designs, it’s a worthy investment. You not only protect your garage but also create a space that you can be proud of. Consider contacting a professional today to get started on transforming your garage!
For more helpful tips, check out the rest of our site today.
Author

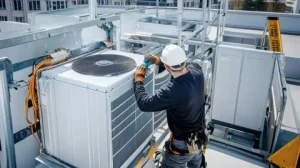
A dependable source of hot water enhances daily living. People use hot water for showers, cleaning, laundry, and kitchen tasks. A well-installed system helps families enjoy convenience while managing energy costs. It also decreases the likelihood of unexpected failures and costly repairs. A Water Heater provides an important service in every modern home. However, the quality of installation plays a major role in its performance. A proper setup requires careful planning, the right equipment, accurate connections and detailed testing. When homeowners follow the correct process, they can enjoy better efficiency and a longer system lifespan.
Choosing the Right System for Your Home
Selecting the right unit is the first step toward a successful installation. Every household has different hot water needs. The number of family members, daily usage habits, available space, and energy source all influence the final choice. Before purchasing a Water Heater, homeowners should evaluate their regular hot water demand. A small unit may struggle to supply enough hot water during busy hours. Conversely, a larger unit might use excess energy and raise monthly costs.
Conventional storage systems continue to be favored as they maintain an available stock of hot water within a tank.
These models work well for many families because they offer consistent performance and come in different sizes. However, storage systems must maintain water temperature even when people do not use hot water. This process can increase energy use over time. For homeowners who want improved efficiency, tankless models offer another solution. These units heat water only when someone needs it, which can help lower energy consumption.
Heat pump systems also provide an energy-saving option. Instead of producing heat directly, they collect heat from the surrounding air and transfer it to the water. Although these models may require a higher initial investment, they can deliver long-term savings. Choosing the right option before installation helps prevent performance problems and creates a more efficient home system.
Preparing the Installation Area
Proper preparation creates a safer and smoother installation process. The installation area should provide enough room for the unit, future maintenance, and proper airflow. A professional technician usually checks the existing plumbing before replacing an old unit. They inspect pipes, valves, and connections to identify possible damage. Fixing these issues before installation helps prevent leaks and additional repair costs. The energy source also requires careful attention. Gas-powered models need proper ventilation because they release exhaust during operation. Installers must follow safety guidelines to ensure the system removes harmful gases correctly.
Electric models require a suitable electrical connection. The wiring and electrical panel must support the unit’s power requirements. A technician checks these components to reduce safety risks and improve reliability. A prepared installation area allows the installer to complete the work efficiently. It also helps the equipment operate at its best after installation.
Understanding the Installation Process
The installation process begins with placing the unit in the correct location. Technicians position the equipment on a stable surface and follow the manufacturer’s instructions. Proper placement makes future inspections and repairs easier. Next, the installer connects the cold-water supply line and the hot water outlet. They use strong fittings and secure connections to prevent leaks. Careful connection work improves the overall performance of the system. A Water Heater installation also requires attention to safety features. Gas models need secure gas connections and proper ventilation. Technicians inspect the gas line carefully and confirm that the system works safely. Electric models require accurate wiring and component checks. Installers verify electrical connections to ensure the unit gets consistent power. After completing the connections, the technician fills the tank or activates the system. They check for leaks, adjust temperature settings, and test performance. This final inspection ensures that everything functions correctly before homeowners begin regular use.

Benefits of Professional Installation
Many homeowners consider installing a unit themselves to save money. However, installation involves plumbing, electrical work, and sometimes gas connections. A small mistake can create safety concerns or cause expensive damage. Professional installers have the necessary skills and tools to complete the work correctly. They understand safety standards and local requirements. Their experience helps them avoid common installation mistakes.
A qualified technician can also help protect the equipment warranty. Many manufacturers require professional installation to maintain warranty protection. Choosing expert service gives homeowners confidence and peace of mind. It ensures the system operates safely and efficiently from the beginning.
Maintaining Your System After Installation
Regular maintenance helps keep the equipment reliable for many years. Simple inspections can prevent small issues from becoming major problems. Homeowners should check for leaks, inspect visible connections, and monitor temperature settings. These steps help identify early signs of trouble. Mineral buildup can affect performance in traditional tank models, especially in areas with hard water. Flushing the tank removes deposits and allows the system to work more efficiently.
A Water Heater also needs regular care to maintain strong performance. Tankless models require cleaning and inspection to remove mineral buildup from internal parts. Following the manufacturer’s maintenance schedule helps extend the life of the equipment. Consistent maintenance improves efficiency and reduces unexpected repair needs. It also helps homeowners get better value from their investment.
Avoiding Common Installation Mistakes
Incorrect installation can create several problems. One common mistake involves choosing the wrong size unit. Homeowners need equipment that matches their daily hot water requirements. Another issue involves poor connections. Loose fittings, incorrect wiring, and improper ventilation can reduce performance and create safety concerns. Ignoring local installation rules can also cause problems. These regulations exist to protect homeowners and ensure safe operation. Working with trained professionals helps maintain compliance. A Water Heater requires proper setup from the beginning. Careful installation prevents unnecessary issues and supports dependable performance.
Conclusion
A successful installation improves comfort, efficiency, and reliability. Homeowners should focus on choosing the right system, preparing the installation area, and using professional services. A Water Heater can provide years of dependable service when people install and maintain it correctly. Regular care, proper usage, and timely inspections help control energy costs and prevent breakdowns. Whether you replace an old unit or install a new one, quality workmanship matters. A careful approach creates a safer system and ensures your home receives hot water whenever you need it. With the right planning and professional support, your Water Heater system can deliver excellent performance for many years. A smart installation decision today can provide comfort, savings, and reliability for the future.
Author
Author
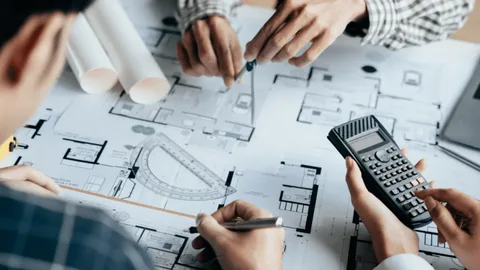
Small contractors face an intense operating environment defined by tight profit margins, aggressive deadlines, and relentless competition. Winning profitable projects requires much more than exceptional technical workmanship or superior field skills. It demands meticulous cost planning and financial forecasting long before a formal bid is submitted. Reliable estimating helps contractors understand labor rates, material price fluctuations, equipment rentals, and overhead expenses while minimizing the risk of costly miscalculations.
Partnering with an experienced estimating team allows growing businesses to shift their valuable time and energy back toward field operations, crew management, and project execution rather than spending late nights crunching numbers behind a desk.
The Financial Imperative of Accurate Cost Planning
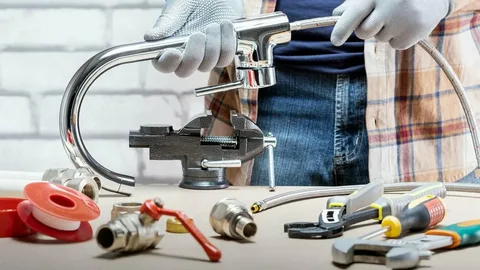
Every successful plumbing installation begins with rigorous financial planning. A well-prepared estimate helps contractors avoid the devastating trap of underpricing, protects profit margins, and maintains operational confidence throughout the entire construction lifecycle. Whether a company is working on custom residential renovations, multi-family apartment complexes, or complex commercial retrofits, detailed calculations provide superior control over both project budgets and strict construction schedules.
When small businesses search for reliable plumbing estimating services, choosing a trusted industry partner ensures local projects receive accurate pricing that supports competitive, sustainable, and profitable bidding. Without this foundation, unexpected expenses can quickly erode earnings and jeopardize company stability.
Elevating Bid Accuracy Through Expert MEP Support
Professional estimating extends far beyond simply adding together material costs from a supplier catalog. It requires deep industry knowledge, up-to-date regional pricing data, precise labor-unit calculations, and a comprehensive understanding of intricate mechanical and plumbing specifications. Professional estimators analyze architectural drawings and engineering blueprints thoroughly to prepare detailed cost reports that contractors can trust implicitly.
Working with MEP Estimating gives independent contractors direct access to seasoned professionals who produce reliable, line-by-line estimates while saving countless hours during the high-pressure bidding window. This level of precision ensures that bids are neither artificially inflated—which loses contracts—nor dangerously low—which guarantees financial loss.
Streamlining Material Procurement and Waste Reduction
Accurate material calculations eliminate unnecessary bulk purchases and prevent crippling material shortages during active construction phases. Proper pre-planning also helps contractors streamline project scheduling and minimize material waste on site.
Utilizing professional plumbing takeoff services provides contractors with comprehensive material quantity reports that simplify procurement, curb theft, and support efficient inventory management. These detailed reports improve critical communication and coordination between project managers, material suppliers, and on-site field teams, ensuring that the right pipes, valves, fixtures, and fittings arrive precisely when needed.
Reclaiming Time to Focus on Core Construction
Preparing accurate estimates consumes hours of administrative focus that contractors could otherwise spend managing field crews, inspecting work quality, or meeting with prospective clients. Outsourcing estimating functions allows business owners to concentrate entirely on project execution and company growth while industry professionals handle the heavy data analysis.
An experienced plumbing estimating company generates comprehensive reports using industry-standard digital software and proven estimating methodologies. This dedicated support enables contractors to submit professional bids much faster without ever sacrificing accuracy or missing submission deadlines.
Supporting Diverse Plumbing Project Typologies
Small contractors manage a diverse array of plumbing jobs throughout the year, ranging from rapid service calls to large structural installations. Professional estimating services scale effortlessly to support a wide variety of project types, including:
- Single-family residential custom homes and luxury renovations
- Multi-family apartment buildings and residential complexes
- Commercial office build-outs and corporate retrofits
- Retail spaces, restaurants, and shopping center suites
- Educational facilities, schools, and university buildings
- Healthcare clinics, dental offices, and medical facilities
- Mixed-use urban developments and community spaces
Regardless of project scale or structural complexity, detailed estimates establish a robust financial foundation before construction ever begins.
Mitigating Financial Risk Before Breaking Ground
Unexpected expenses can rapidly erode project profit margins and strain client relationships. Professional estimating helps identify potential financial liabilities early in the design phase, giving contractors the opportunity to plan ahead and make informed value-engineering decisions. Furthermore, accurate estimates improve overall client communication by presenting clear, transparent, and realistic project budgets from day one.
Choosing experienced plumbing estimating services helps contractors reduce financial uncertainty while elevating bid quality and project scheduling from the very beginning of the sales cycle.
Why Contractors Choose MEP Estimating
At MEP Estimating, we understand the unique daily challenges small contractors face in a fluctuating economy. Our dedicated team delivers accurate estimates, detailed quantity takeoffs, and dependable cost analysis tailored specifically to each project’s distinct structural requirements.
Clients partner with us because we provide:
- Fast, reliable turnaround times on all competitive bids
- Highly experienced MEP estimating professionals
- Accurate, line-by-line material quantity takeoffs
- Competitive, transparent pricing models for our services
- Detailed digital reports compatible with major software
- Responsive, reliable customer support throughout the project
- Estimates prepared using current regional market pricing
Our primary goal is to help contractors submit stronger bids, maximize operational profitability, and complete construction projects with absolute confidence. Accurate estimating represents one of the most valuable investments a modern contractor can make, paving the way for sustainable long-term growth.
Author


Temp Clothing Outfits: Work From Day to Night in Modern Style

Teeth Whitening: How Long Do Professional Results Really Last

Mommy Makeover Scar Care: Smooth Healing After Surgery

Yoga School in Rishikesh: Choosing the Right Training

Self Confidence: Best Ways to Build Inner Strength and Self Love

Property in Pune: Best Locations, Buying Tips & Investment

Baddie Hub Fashion: Trendy Style Ideas for Modern Fashion Lovers

LED Grow Light China Manufacturer for Commercial Farming

Laser Cleaner Machine for Fast Industrial Metal Surface Cleaning

Side by Side Door Refrigerator Better Than a French Door

Cybersecurity Consulting Company SequelNet Provides Critical IT Support Services to Medical Billing Firm, Medical Optimum

Meet the Megalodon: The Shark Star of ‘Meg 2’

Reduce Video Game Lag: Level Up Your Gaming Performance
Balancing India’s Entertainment: Cricket vs. Bollywood

Jetsetter’s Secrets: Unveiling Our Favorite Travel Hacks for a Seamless Adventure

The 5 Best Live Sports Streaming Sites: Legal and Exciting!

Hollywood Labor Unrest: The Impact of ‘What About Us?’ Strikes

Unveiling the Magic of Dream Fulfillment at the Late NBA Draft

Illuminate Your Skin: Dr. Axe Unveils Natural Remedies for Lightening Knees and Elbows

Bright Choices: Navigating the Pros and Cons of Skin Whitening Creams with Dr. Axe
-

 Business3 years ago
Cybersecurity Consulting Company SequelNet Provides Critical IT Support Services to Medical Billing Firm, Medical Optimum
-
Entertainment3 years ago
Meet the Megalodon: The Shark Star of ‘Meg 2’
-
Entertainment3 years ago
Reduce Video Game Lag: Level Up Your Gaming Performance
-
 Sports3 years ago
Balancing India’s Entertainment: Cricket vs. Bollywood
-
Entertainment3 years ago
Jetsetter’s Secrets: Unveiling Our Favorite Travel Hacks for a Seamless Adventure
-
Productivity3 years ago
The 5 Best Live Sports Streaming Sites: Legal and Exciting!
-
Art /Entertainment3 years ago
Hollywood Labor Unrest: The Impact of ‘What About Us?’ Strikes
-
Sports3 years ago
Unveiling the Magic of Dream Fulfillment at the Late NBA Draft


