
Computer Electronic
Norton 360 with LifeLock: Your Essential Guide to Cybersecurity

In today’s digital world, cybersecurity and identity protection are no longer optional—they are essential. With cyber threats, data breaches, and identity theft on the rise, having a comprehensive security solution can give you peace of mind.
Norton 360 with LifeLock is one such all-in-one protection suite designed to safeguard your devices, personal data, and identity. This article explains what Norton 360 with LifeLock offers, how to buy a new subscription, and how to renew an existing one with the help of customer support.
What Is Norton 360 with LifeLock?
Norton 360 with LifeLock is a premium security solution that combines Norton’s powerful antivirus and online protection tools with LifeLock’s identity theft monitoring services. Unlike basic antivirus software, this package goes beyond malware protection to help secure your personal information, monitor suspicious activities, and provide recovery assistance if your identity is compromised.
Key Features Include:
- Immediate threat defense: Shields against viruses, malware, spyware, and ransomware
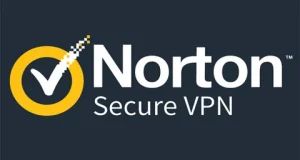
- Secure VPN: Encrypts your internet connection to protect your online privacy, especially on public Wi-Fi.
- Password Manager: Helps you create, store, and manage strong passwords.
- Dark Web Monitoring: Alerts you if your personal information appears on the dark web.
- LifeLock Identity Theft Protection: Monitors your Social Security number, financial accounts, and personal data for suspicious activity.
- Identity Recovery Support: Dedicated specialists assist you in restoring your identity if theft occurs.
These features make Norton 360 with LifeLock a strong choice for individuals and families looking for comprehensive digital and identity protection.
Why Choose Norton 360 with LifeLock?
The main advantage of Norton 360 with LifeLock is its all-in-one approach. Instead of using separate tools for antivirus, VPN, and identity monitoring, you get everything in a single subscription. This not only simplifies protection but also ensures seamless integration between security layers.
Other reasons users prefer Norton 360 with LifeLock include:

- Security for various devices (computers, Mac systems, mobile phones, and tablets)
- Regular updates to combat the latest threats
- Easy-to-use dashboard for managing security and identity settings
- Trusted brand with years of experience in cybersecurity
How to Buy Norton 360 with LifeLock
Buying Norton 360 with LifeLock is a straightforward process. You can purchase it online, through authorized retailers, or with the assistance of customer support.
Step-by-Step Buying Process:
- Choose the Right Plan: Norton offers several plans under the Norton 360 with LifeLock umbrella, such as Select, Advantage, and Ultimate Plus. Each plan varies in device coverage and identity protection limits.
- Visit the Official Platform or Retailer: You can buy directly from Norton’s website or from a trusted online or physical retailer.
- Create or Sign In to Your Norton Account: If you’re a new user, you’ll need to create an account. Existing users can sign in with their credentials.
- Complete Payment: Enter your billing details and complete the purchase securely.
- Download and Install: After purchase, download the software on your devices and activate it using your account.
If you prefer guidance during the purchase process or have questions about which plan suits you best, contacting support can be helpful. You can reach assistance by calling 1-833-800-3030 to get step-by-step help with buying the right subscription.
How to Renew Norton 360 with LifeLock Subscription
Renewing your Norton 360 with LifeLock subscription on time is crucial to avoid interruptions in protection. Norton typically sends reminders before your subscription expires, but it’s still good to know your renewal options.
Automatic Renewal:
Many users choose automatic renewal, where the subscription renews itself before expiration using your saved payment method. This ensures continuous protection without manual effort.
Manual Renewal Steps:
- Sign in to your Norton account.
- Go to the “My Subscriptions” section.
- Select Norton 360 with LifeLock.
- Click on “Renew” and follow the payment instructions.
- Confirm renewal and check the new expiration date.
Renewing with Support:
If you face issues such as payment errors, expired subscriptions, or confusion about renewal plans, customer support can assist you. Speaking with a representative can help ensure that your subscription is renewed correctly and that you’re on the most suitable plan for your needs. For renewal assistance, you can contact support at 1-833-800-3030 and get real-time guidance.
Common Issues During Purchase or Renewal
While buying or renewing Norton 360 with LifeLock is generally smooth, some users may encounter issues such as:
- Incorrect login credentials
- Payment or billing errors
- Subscription not updating after renewal
- Confusion between different LifeLock plans
- Transferring protection to a new device
In such cases, support agents can help troubleshoot problems quickly, verify your account details, and ensure your protection is active without delays.
Tips to Get the Most Out of Your Subscription
Once you’ve purchased or renewed Norton 360 with LifeLock, consider these tips:
- Enable all security features, including VPN and dark web monitoring.
- Regularly update your software to ensure maximum protection.
- Add all eligible devices to your subscription.
- Review identity monitoring alerts promptly.
- Keep your account information and recovery contacts up to date.
These steps help you fully utilize the value of your subscription and maintain strong digital security.
Final Thoughts
Norton 360 with LifeLock is a powerful solution for anyone seeking comprehensive protection against cyber threats and identity theft. Whether you are buying a new subscription or renewing an existing one, the process is simple and user-friendly. With multiple plans to choose from and helpful support available, you can confidently secure your devices and personal information.
If you ever feel unsure about choosing a plan, completing a purchase, or renewing on time, reaching out to customer support can make the process easier and stress-free. Investing in Norton 360 with LifeLock means investing in your digital safety and peace of mind in an increasingly connected world.
Author


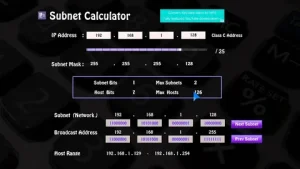
A Subnet Calculator simplifies complex IP addressing tasks. Instead of manually performing binary calculations, users can instantly generate accurate subnet information. This is particularly beneficial when creating efficient networks or diagnosing connectivity problems.
It is commonly used in:
- Network planning and design
- Cloud infrastructure setup (AWS, Azure, Google Cloud)
- VLAN and firewall configuration
- IP address management
- Networking certification practice
Because it reduces human error and saves time, it has become an essential tool for modern IT environments.
How a Subnet Calculator Works
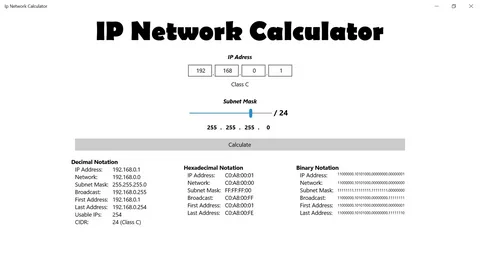
A Subnet Calculator works by taking an IP address and applying a subnet mask or CIDR prefix. It then performs binary calculations to determine how the network is structured. Once the input is provided, the tool calculates key network values automatically. These include network boundaries, usable host ranges, and total address availability.
Below are the most important parameters it generates:
- Network Address: The first address in the subnet
- Broadcast Address: The last address in the subnet
- Subnet Mask: Defines network and host portions
- CIDR Notation: Short form like /24
- Usable Host Range: Valid IPs for devices
- Total Hosts: Total IP addresses in subnet
- Usable Hosts: Assignable addresses excluding reserved ones
- Wildcard Mask: Inverse of subnet mask used in routing rules
These outputs help engineers design accurate and efficient networks with ease.
CIDR Subnet Reference Chart Explained
CIDR notation simplifies IP addressing by representing subnet masks in a compact format. A Subnet Calculator often includes a reference chart for quick lookup.
Some commonly used CIDR values include:
- /8 – Very large networks with millions of IPs
- /16 – Medium enterprise networks
- /24 – Standard small networks
- /25 to /30 – Subnetting for smaller segments and point-to-point links
- /32 – Single host address
Each CIDR value defines how many IP addresses are available and how many can be assigned to devices. This reference helps professionals quickly plan network structures without manual calculations.
Who Uses a Subnet Calculator?
Subnet calculators are widely used across multiple industries. They are not limited to network engineers alone.
Here are the main users:
Network Engineers and Architects
They design IP structures for large enterprise networks and data centers.
System Administrators
They configure VLANs, routing policies, ACLs, and security rules.
Cloud Engineers
They allocate subnets in cloud environments like AWS, Azure, and Google Cloud.
Students and Certification Candidates
They use it for learning subnetting concepts and preparing for exams like CCNA and Network+.
Internet Service Providers (ISPs)
They manage large IP blocks and distribute them to customers.
Security Professionals
They analyze network structures and configure firewall rules using wildcard masks.
Because of its versatility, the subnet calculator has become a standard tool in IT workflows.
Benefits of Using a Subnet Calculator
A Subnet Calculator provides several advantages that improve network planning and management.
1. Saves Time
Manual subnet calculations can be complex and time-consuming. The calculator provides instant results.
2. Reduces Errors
Binary calculations are prone to mistakes. Automation ensures accuracy.
3. Improves Efficiency
Engineers can focus on design instead of repetitive calculations.
4. Supports Learning
Students can understand subnetting concepts more easily by seeing real-time outputs.
5. Enhances Network Planning
Overall, it simplifies a technical process into an easy, user-friendly experience.
Key Use Cases in Real-World Networking
Subnet calculators are not just educational tools. They are widely used in real-world environments. For example, enterprises use them to divide large networks into smaller segments. This improves performance and security. Cloud engineers use them to allocate IP ranges efficiently across virtual networks. ISPs rely on them for IP distribution, while security teams use them for access control configurations.
Because modern networks are becoming more complex, accurate subnetting is more important than ever.
Why Subnetting Skills Matter Today
Even though automation tools exist, understanding subnetting remains essential. It helps professionals understand how networks function at a deeper level.
Good subnetting knowledge improves:
- Network troubleshooting
- IP address planning
- Cloud architecture design
- Security configuration
A Subnet Calculator supports this learning by providing instant validation of results.
Final Thoughts
A Subnet Calculator is one of the most valuable tools in networking. It simplifies IP address management, reduces errors, and improves productivity for professionals and students alike. From small home networks to large enterprise infrastructures, subnet calculators play a critical role in ensuring smooth and efficient network design.
Author


Author


Author


Botox in Dubai: The “Lunch Break” Guide to Natural-Looking Skin

Realism Hoodie and Realism Jumper: Australian Streetwear

Rhude: Luxury Hoodies, Shirts, Jackets, and Quality

Rhinoplasty in Dubai: Achieving Safe, Natural, and Beautiful Result

Lip Augmentation: The Science Behind Natural Facial Harmony

Nike UAE: Exploring Premium Sportswear & Air Force 1 Trends

AMI Paris: The Perfect Blend of Parisian Elegance

Nano Paints and Coatings Market: Trends & Regional Insights

Treasure Orbit: A Leading FMCG Distributor in Dubai

Urban Khaleej: Simplifying UAE News, Jobs, and Lifestyle Updates

Cybersecurity Consulting Company SequelNet Provides Critical IT Support Services to Medical Billing Firm, Medical Optimum

Team Communication Software Transforms Operations at Finance Innovate

Project Management Tool Transforms Long Island Business

How Alleviate Poverty Utilized IPPBX’s All-in-One Solution to Transform Lives in New York City

Breast Cancer: The Imperative Role of Mammograms in Screening and Early Detection

Unstoppable Collaboration: D.C.’s Citi Open and Silicon Valley Classic Unite to Propel Women’s Tennis to New Heights

Embracing Renewal: Sizdabedar Celebrations Unite Iranians in New York’s Eisenhower Park

The Benefits of Starting a Side Hustle for Financial Freedom

New Blood Donation Screening Questions What You Need to Know

Stylishly Timeless: The 5 Types of Sandals You Need in Your Closet
-

 Business3 years ago
Cybersecurity Consulting Company SequelNet Provides Critical IT Support Services to Medical Billing Firm, Medical Optimum
-
Business3 years ago
Team Communication Software Transforms Operations at Finance Innovate
-
Business3 years ago
Project Management Tool Transforms Long Island Business
-
Business3 years ago
How Alleviate Poverty Utilized IPPBX’s All-in-One Solution to Transform Lives in New York City
-
health3 years ago
Breast Cancer: The Imperative Role of Mammograms in Screening and Early Detection
-
Sports3 years ago
Unstoppable Collaboration: D.C.’s Citi Open and Silicon Valley Classic Unite to Propel Women’s Tennis to New Heights
-
Art /Entertainment3 years ago
Embracing Renewal: Sizdabedar Celebrations Unite Iranians in New York’s Eisenhower Park
-
Finance3 years ago
The Benefits of Starting a Side Hustle for Financial Freedom


