
Technology
Fix Wireless Network Adapter Not Working on Mac
Introduction
If you’re using a Mac and encountering issues with your wireless network adapter, such as being unable to connect to Wi-Fi or experiencing slow internet speeds, don’t worry! In this comprehensive guide, we’ll walk you through troubleshooting steps to fix the wireless network adapter not working on your Mac. These practical solutions can help you get your network adapter up and running smoothly again, ensuring you stay connected to the internet without any hassle.
Troubleshooting Steps
-
Restart Your Mac
One of the simplest and most effective troubleshooting steps is to restart your Mac. This basic action can resolve temporary glitches or conflicts that may be affecting the performance of your Mac’s wireless network adapter. To restart your Mac, follow these steps:
- Look for the Apple logo in the top-left corner of the screen, usually located in the menu bar.
- Click on the Apple logo to open a drop-down menu.
- In the drop-down menu, select “Restart” to initiate the shutdown process.
- After the Mac completely shuts down, it will automatically start up again.

Image by:https://www.businessinsider.com/
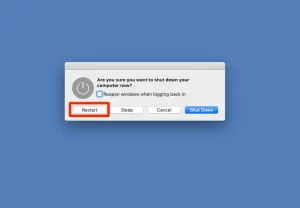
Restarting your Mac refreshes the system and clears temporary files or settings that might be causing issues with the wireless network adapter.
-
Check Airplane Mode
Airplane Mode is a feature available on many devices, including Mac computers. When Airplane Mode is turned on, it disables all wireless communication features on your Mac, including Wi-Fi. To ensure that Airplane Mode is turned off and enable Wi-Fi connectivity, follow these steps:
- Look for the Wi-Fi icon in the top-right corner of the menu bar, resembling a series of curved bars.
- Click on the Wi-Fi icon to open a drop-down menu.
- In the drop-down menu, check if the “Turn Wi-Fi Off” option is unchecked or does not have a checkmark next to it. This indicates that Airplane Mode is turned off, and your Wi-Fi should be enabled.

Image by:https://www.netbooknews.com/
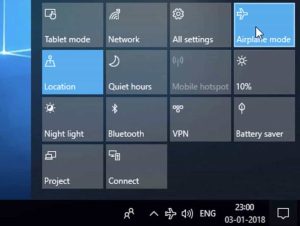
By making sure that Airplane Mode is turned off, you allow your Mac to search for and connect to available Wi-Fi networks.
-
Verify Wi-Fi Settings
To ensure that your Wi-Fi settings are correctly configured on your Mac, follow these steps:
- Click on the Apple menu in the top-left corner of the screen, resembling the Apple logo.
- From the drop-down menu, select “System Preferences” to open the System Preferences window.
- In the System Preferences window, locate and click on the “Network” icon, represented by a globe with a network cable.
- From the list on the left, select “Wi-Fi” to show the Wi-Fi settings for your Mac.
- Make sure the checkbox next to “Wi-Fi” is checked, indicating that Wi-Fi is turned on.
- Check if your network is selected from the list of Wi-Fi networks. If not, click on the network name and then click on the “Connect” button to establish the connection.
Verifying Wi-Fi settings ensures that Wi-Fi is enabled and your Mac is correctly connected to the network. Misconfigured or corrupted network settings can lead to issues with the wireless network adapter.
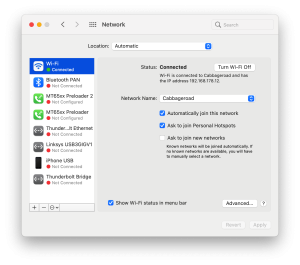
Image by:https://cleanmymac.com/
-
Reset the SMC
The System Management Controller (SMC) manages various hardware functions on your Mac, including the wireless network adapter. Resetting the SMC can often help resolve issues with the adapter. The steps to reset the SMC depend on your Mac model. For most MacBooks with a non-removable battery, you can follow these steps:
- Shut down your Mac completely and make sure it is turned off.
- Plug in the power adapter to a power source.
- Press and hold the left Shift key, Control key, and Option key on the built-in keyboard.
- While holding these keys, press the power button.
- Release all keys and the power button simultaneously.
- Press the power button again to turn on your Mac.
For other Mac models, the steps may vary slightly. If you are unsure, consult Apple’s support website or contact Apple directly for assistance.
Resetting the SMC can help resolve various hardware-related issues, including problems with the wireless network adapter. It’s a safe procedure that does not affect your personal files or data.

Image by:https://macresearch.org/
Reset the NVRAM/PRAM
The NVRAM (non-volatile random-access memory) or PRAM (Parameter RAM) on your Mac stores certain settings, including Wi-Fi preferences. Resetting the NVRAM/PRAM can help resolve network-related problems. To reset the NVRAM/PRAM, follow these steps:
- Shut down your Mac completely by selecting “Shut Down” from the Apple menu.
- Once your Mac is off, locate the Command (⌘), Option, P, and R keys on your keyboard.
- Press and hold the Command (⌘), Option, P, and R keys simultaneously.
- While holding these keys, turn on your Mac by pressing the power button.
- Keep holding the keys until you hear the startup sound for the second time or see the Apple logo appear and disappear for the second time.
- After the second startup sound or the Apple logo disappears and reappears, you can release the keys.
Resetting the NVRAM/PRAM clears and resets certain settings, including Wi-Fi preferences. This can help resolve network-related problems, including issues with the wireless network adapter.

Image by:https://www.easeus.com/
After resetting the NVRAM/PRAM, your Mac will start up normally. You may need to reconfigure some settings, such as display resolution or time zone, as they will revert to their default values. However, your personal files and data will not be affected.
If the wireless network adapter issue persists after resetting the NVRAM/PRAM, it’s recommended to contact Apple support or visit an Apple Store for further assistance.
Update macOS
Updating your macOS to the latest version can help resolve compatibility issues and provide bug fixes, which may address problems with your wireless network adapter. To check for and install available updates, follow these steps:
- Click on the Apple menu in the top-left corner of the screen.
- From the drop-down menu, select “System Preferences” to open the System Preferences window.
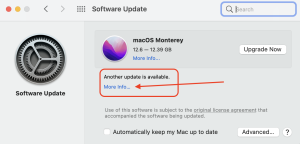
- In the System Preferences window, locate and click on the “Software Update” icon, resembling a blue circle with a white “A” inside.
- The Software Update window will open, displaying information about the latest macOS updates available for your Mac.

Image by:https://support.blakeschool.org/
- Click on the “Check for Updates” button to check for any available updates.
- If updates are found, they will be listed. Click on the “Update Now” button to begin the installation process.
- Follow the on-screen instructions to download and install the updates. Your Mac may need to restart during the process.
If you still facing issues, contact Apple support.
Author


Author
Mumbai never sleeps. Deadlines come fast. Pitches happen tomorrow. Presentations need finishing by morning. Innovation waits for no one. Whether you edit videos as a freelancer, tackle design projects as a student, or manage a corporate team scaling up temporarily, you need a reliable laptop. But what if buying a high-end machine does not make sense right now? That is where renting a MacBook in Mumbai changes the game.
What You Can Rent Today
Rental services offer a wide selection of Apple MacBook’s. You can choose the MacBook Pro with the powerful M4 Max or M4 Pro chip. These machines handle heavy creative workloads with ease. Alternatively, pick a MacBook Pro with M2 or M3 chips. These work great for developers, video editors, and multitaskers. Need something portable yet powerful? The latest MacBook Air and Pro models serve students and professionals equally well.
You select based on your performance needs and budget. Rental platforms keep their prices and available models updated regularly.
Flexible Rental Terms Fit Your Schedule
You can rent a MacBook for a single day. You can keep it for a week. A month works too. Longer terms are also available. Whatever your project timeline demands, you will find a rental plan that matches.
Many rental services also support bulk hires. Corporate events, workshops, boot camps, and film shoots often need multiple devices. Rental providers deliver them without hassle.
Why Renting a MacBook Makes Sense
Cost-Effective Solution
You avoid a huge upfront cost. Pay only for what you actually need. Freelancers, startups, and students benefit the most from this approach.
Access to Latest Technology
Get cutting-edge MacBooks with M-series chips. You enjoy premium performance without committing to a full purchase.
Hassle-Free Setup and Support
Rental companies deliver the device to your door. They set it up for you. They can even install specific software or add peripherals upon request.
Scalable for Businesses
Temporary manpower increases happen often. Short-term projects come and go. Events need extra gear. Renting scales up and down easily.
Try Before You Buy
Testing different MacBook models helps you decide. Use a machine for a few weeks. See if it fits your workflow. Then make a confident purchase decision later.
Local Rental Options Across Mumbai
Several trusted providers offer MacBook rentals in Mumbai. Here are some names you can check.
ABCOM Private Limited carries a variety of computer and MacBook rentals. AAA RENTAL LLP receives high ratings for tech gear rental services. IT Rental Mumbai operates out of Santacruz East. Global Systems serves Malad West with laptops and devices.
Trend Vision LLP Laptop & Desktop Rental has excellent customer reviews for rental support. Rank Computers Pvt. Ltd. brings years of experience to IT rental services. IVM Technologies LLP specializes in Apple device rentals in Andheri East. Laptop Rental serves the Lower Parel area as a small office rental resource.
Always check directly with these vendors. MacBook availability varies. Confirm stock and pricing before placing your order.

Who Benefits from Renting a MacBook
Students use rented MacBook’s for projects, online classes, and video editing. Freelancers rely on them for client work without large upfront investments. Startups equip their teams temporarily while conserving cash. Corporate offices handle seasonal workload spikes efficiently. Event organizers power exhibitions and product launches. Film crews edit on location with high-performance machines.
Getting Your MacBook Delivered
Most rental services offer doorstep delivery across Mumbai. Andheri, Bandra, Powai, Navi Mumbai, Thane, and surrounding areas all receive quick delivery and pickup. Same-day or next-day delivery is often available depending on stock and order confirmation time.
What Comes with Your Rental
Your rental includes the original charger and adapter. Need extra accessories? External keyboards, mice, hubs, and monitors can be provided upon request. The MacBook arrives with macOS pre-installed. Need specific software like Final Cut Pro, Adobe Suite, or Xcode? Rental providers can install these depending on license availability.
Technical Support During Your Rental
Rental companies provide remote and on-call technical support throughout your rental period. if something goes amiss, assistance is merely a phone call away Normal wear and tear stays covered. Accidental or physical damage may incur charges according to your rental agreement.
Extending or Changing Your Rental
Need more time? Rental extensions are allowed subject to availability. Simply inform your provider before your rental period ends. Want to switch to a different MacBook model? Upgrades or changes may be possible based on stock availability and revised rental charges.
Documents and Payment
Basic documentation includes a government-issued ID like Aadhaar, PAN, or passport. Address proof is also required. Corporate clients need company documents. Payment methods include UPI, bank transfer, and online payments. Corporate clients can request invoicing and GST billing.
A refundable security deposit applies. The amount depends on the MacBook model, rental duration, and your client profile as an individual or corporation.
Final Thoughts
Renting a MacBook in Mumbai offers a cost-smart, flexible, and efficient solution. Whether you need a powerful laptop for video editing, software development, business presentations, or academic work, rental providers deliver premium Apple technology without the financial strain of purchasing. Choose your model. Select your rental duration. Power your work with professional-grade performance. Mumbai runs fast. Your laptop should keep up.
Author

You install Norton Antivirus to protect your computer. You expect it to work quietly in the background. But sometimes things go wrong. The software stops scanning. Updates fail repeatedly. A confusing error message pops up for no clear reason. Do not panic. Most Norton issues have simple fixes. I will guide you through the typical issues and how to resolve them.
Installation Gets Stuck or Fails Completely
You try to install Norton Antivirus on a new computer. The progress bar moves slowly. Then it stops altogether. Nothing happens for twenty minutes.
This usually happens because of leftover files from previous antivirus software. Old programs leave traces behind. These traces conflict with Norton during installation.
What you can do:
- First, download the Norton Removal Tool from the official website. This tool wipes out all Norton files cleanly. Run it even if you have never installed Norton before. It also removes files from other security software.
- Second, restart your computer. A fresh start clears out temporary files that might block the installation.
- Third, disable other security software temporarily. Windows Defender sometimes interferes. Turn it off just during the Norton setup. Don’t forget to switch it on again later if you require it.
- Fourth, check your internet connection. A weak or unstable connection interrupts the download. Use a wired connection if possible.
Activation Says Your Product Key Is Invalid
You type in your product key carefully. You double-check every letter and number. Norton still rejects it. This frustrates many users. The issue frequently depends on the location where you obtained the key. Third-party sellers sometimes sell used or fake keys. Always buy directly from Norton or authorized retailers.
What you can do:
Log into your Norton account on their website. Check if the product key already links to your account. At times, there’s no need to input it by hand. Simply log in, and Norton starts up on its own.
If that fails, examine your key carefully. The digit 0 and the character O appear alike. The digit 1 and the letter I can also create confusion. Try swapping them. If nothing works, request a refund from where you bought the key. Then purchase a new one directly from Norton.
Norton Says “Your System Is Not Protected”
You open Norton. A big red X appears. The message says your system is at risk. You feel a wave of worry. Take a breath. This message usually means one of three things. Your virus definitions are outdated. Real-time protection turned off accidentally. Or your subscription expired.
What you can do:
Click the Fix or Fix Now button inside Norton. The software often resolves the issue automatically. If that fails, open Norton and go to Security. Turn on Real-Time Protection manually.
Next, run Live Update manually. Click Live Update, then wait for it to download and install all updates. Restart your computer after the updates finish. Check your subscription status. Open your Norton account online. If your subscription expired, renew it. Norton will return to full protection immediately after renewal.

Live Update Keeps Failing
You run Live Update. It starts downloading. Then it stops with an error. You try again. Same result. This often happens due to network issues or corrupted update files.
What you can do:
Restart your computer first. A simple restart clears many temporary problems. If the problem continues, reset Norton’s update components. Open Norton, go to Help, then select About. Look for a Reset or Repair option.
Norton Slows Down Your Computer
Your computer feels sluggish after installing Norton. Programs open slowly. Booting takes forever. Norton should protect you without slowing you down. When it does, something is wrong.
What you can do:
Open Norton and go to Settings. Look for Idle Time Scans. Turn this feature off. It runs scans when you are not using your computer, but sometimes it runs at the wrong times. Schedule scans for when you sleep. Set Norton to scan at 2 AM instead of during your workday.
Exclude trusted programs. If you know a program is safe, add it to Norton’s exclusion list. Norton will stop scanning that program repeatedly. Check your computer’s RAM. Norton needs at least 2GB to run smoothly. Older machines with less memory struggle.
You Cannot Log Into Your Norton Account
You enter your email and password. Norton says the information is wrong. You know you typed it correctly.
What you can do:
Click Forgot Password. Norton will send a reset link to your email. Look in your spam folder if the email isn’t in your inbox after five minutes. Empty your browser cache. Previously saved passwords can occasionally lead to issues. Log in using an incognito or private browsing window.
Try a different browser. Chrome might have issues while Firefox works fine. If you have two-factor authentication enabled and lost your phone, contact Norton through their official website chat support. They will confirm your identity and assist you in recovering access.
Norton Blocks a Program You Trust
You try to run a program. Norton stops it. You know the program is safe. Norton disagrees.
What you can do:
Open Norton and go to History. Find the blocked program in the list. Click Restore or Allow. Add the program to Norton’s exclusions. Go to Settings, then Antivirus, then Scans and Risks. Find Low Risks and Exclusions. Add the program’s folder there.
Be careful with this feature. Only exclude programs you trust completely. Excluding the wrong program creates a security risk.
When to Reinstall Norton Completely
Some problems resist all fixes. When nothing else works, a clean reinstallation often saves the day.
Follow these steps:
Download the Norton Removal Tool from Norton’s official website. Run it as administrator. Restart your computer. Download a fresh copy of Norton from your account page. Install it using your product key or by signing into your account. Run Live Update repeatedly until no more updates remain. Restart your computer one final time.
Final Thoughts
Norton issues feel stressful. Your computer’s security matters. But most problems have straightforward solutions. Work through the steps above methodically. You will likely fix the issue yourself without needing to call anyone.
Remember to keep your software updated. Run weekly manual scans. Back up important files regularly. A little maintenance goes a long way toward keeping Norton running smoothly. If you truly cannot resolve the problem after trying everything, visit Norton’s official website. Their support page offers chat and email options. Avoid calling random numbers you find online. Many of those belong to scammers who charge hundreds of dollars for free fixes. Stay safe. Keep your antivirus running. And do not let small technical glitches ruin your peace of mind.
Author


Children’s Trampolines: Safe, Fun & Active Play Equipment

Dermatologist: Expert Skin Care & Cosmetic Treatments

CRS Profile Validity in Express Entry: 12-Month Window

Seborrheic Keratosis Treatment: Causes, Solutions & Expert Care

Skin Pigmentation Treatment: Causes, Solutions & Expert Tips

US-Iran Peace Deal: Impact on Oil Prices, Trade & Global Markets

Stussy Hoodie: Streetwear History, Logos & Global Popularity

Drop Dead Clothing: Alternative Streetwear Brand Founded

Europe Trip Packages for Corporate Retreats: Tours & Travel

Dynaclean Sweeper Machines: Industrial Cleaning Equipment

Cybersecurity Consulting Company SequelNet Provides Critical IT Support Services to Medical Billing Firm, Medical Optimum

Meet the Megalodon: The Shark Star of ‘Meg 2’

Reduce Video Game Lag: Level Up Your Gaming Performance
Balancing India’s Entertainment: Cricket vs. Bollywood

Jetsetter’s Secrets: Unveiling Our Favorite Travel Hacks for a Seamless Adventure

The 5 Best Live Sports Streaming Sites: Legal and Exciting!

Hollywood Labor Unrest: The Impact of ‘What About Us?’ Strikes

Unveiling the Magic of Dream Fulfillment at the Late NBA Draft

Illuminate Your Skin: Dr. Axe Unveils Natural Remedies for Lightening Knees and Elbows

Bright Choices: Navigating the Pros and Cons of Skin Whitening Creams with Dr. Axe
-

 Business3 years ago
Cybersecurity Consulting Company SequelNet Provides Critical IT Support Services to Medical Billing Firm, Medical Optimum
-
Entertainment3 years ago
Meet the Megalodon: The Shark Star of ‘Meg 2’
-
Entertainment3 years ago
Reduce Video Game Lag: Level Up Your Gaming Performance
-
 Sports3 years ago
Balancing India’s Entertainment: Cricket vs. Bollywood
-
Entertainment3 years ago
Jetsetter’s Secrets: Unveiling Our Favorite Travel Hacks for a Seamless Adventure
-
Productivity3 years ago
The 5 Best Live Sports Streaming Sites: Legal and Exciting!
-
Art /Entertainment3 years ago
Hollywood Labor Unrest: The Impact of ‘What About Us?’ Strikes
-
Sports3 years ago
Unveiling the Magic of Dream Fulfillment at the Late NBA Draft


