
Beauty Fitness
Beauty from the Inside Out: How Nutrition and Self-Care Can Enhance Your Glow

Introduction
Welcome to the ultimate guide on how to enhance your natural glow from the inside out! While makeup and skincare products can certainly help, true radiance comes from taking care of yourself both physically and mentally. In this post, we’ll explore the powerful connection between nutrition and self-care practices that can transform your skin, hair and overall well-being. Ready to unleash your inner glow? Let’s dive in!
What is beauty from the inside out?
There’s more to beauty than meets the eye. In fact, what you eat and how you care for yourself can have a big impact on your appearance. If you want to look your best from the inside out, start with these tips:
1. Eat a nutritious diet.
Beauty starts with good nutrition. Eating plenty of fruits, vegetables, and whole grains gives your skin essential vitamins and minerals that keep it looking healthy and radiant. Protein-rich foods like lean meats, fish, and beans provide the building blocks for strong hair and nails. And don’t forget the importance of healthy fats! Olive oil, avocados, nuts, and seeds are all great sources of antioxidants that help protect your skin from damage.
2. Stay hydrated.

Drinking plenty of water is key to maintaining healthy skin, hair, and nails. It helps flush out toxins and keep your cells hydrated so they can function properly. Aim for 8 glasses of water per day to stay properly hydrated.
3. Manage stress levels.
Too much stress can take a toll on your appearance by causing premature wrinkles, acne breakouts, and dull skin. Make time for relaxation practices like yoga or meditation to help keep stress levels in check and promote a sense of calm. Taking care of yourself mentally will show up in your beauty routine as well!
The benefits of beauty from the inside out
When it comes to beauty, we often focus on what we can do externally to improve our appearance. However, true beauty starts from within. Nourishing your body with healthy foods and drinks and taking care of yourself emotionally and mentally can help you radiate confidence and inner peace, which are the most attractive qualities of all.
Here are some specific ways that taking care of yourself from the inside out can enhance your beauty:
1. Eating a nutritious diet helps your skin look its best.
Giving your body the nutrients it needs through a healthy diet has countless benefits, including improving the appearance of your skin. Foods like fruits and vegetables are packed with antioxidants that can help protect your skin from damage, while omega-3 fatty acids found in fish and nuts can help keep your skin hydrated and supple.
2. Drinking plenty of water keeps your skin looking healthy and radiant.
Your skin is made up mostly of water, so it’s no surprise that staying hydrated is essential for maintaining a healthy complexion. When you’re properly hydrated, your skin looks plumper and more radiant, while dehydration can make your skin look dull and lifeless. Aim to drink eight glasses of water per day to keep your skin looking its best.
3. Getting enough sleep improves the appearance of your skin.
Sleep is important for overall health, but it also does wonders for the appearance of your skin. When you don’t
The best foods for beauty from the inside out
Beauty truly does come from the inside out. Eating a nutritious diet and taking care of your body through self-care practices can enhance your natural beauty and help you radiate confidence.
There are certain foods that are particularly beneficial for skin, hair, and nails. These include foods rich in omega-3 fatty acids, like salmon, avocado, and nuts; antioxidant-rich foods, like berries, dark leafy greens, and green tea; and collagen-boosting foods, like bone broth and leafy greens.
In addition to eating a nutritious diet, it’s important to stay hydrated by drinking plenty of water throughout the day. And be sure to get enough sleep! Getting adequate rest helps reduce stress levels, which can impact your skin’s appearance.
Finally, self-care practices like taking time for yourself each day, investing in quality skincare products, and exercising regularly can also help you look and feel your best. When you take care of yourself both inside and out, it shows in your radiant appearance.
The best self-care practices for beauty from the inside out
There are a lot of things you can do to take care of your skin, hair, and nails, but true beauty starts from the inside out. That’s why the best self-care practices for beauty focus on both internal and external health.
To start, eat a healthy diet that’s rich in vitamins, minerals, and antioxidants. These nutrients are essential for keeping your skin looking its best. Make sure to include plenty of fruits, vegetables, whole grains, and healthy fats in your diet.
In addition to eating right, you also need to take care of your skin from the outside. Use gentle cleansers and moisturizers, and protect your skin from the sun with sunscreen. exfoliate regularly to remove dead skin cells and give your skin a radiant glow.
Finally, don’t forget about self-care practices that nurture your soul as well as your body. Take time for yourself every day to do things that make you happy. Get regular exercise, spend time with loved ones, and pursue hobbies and interests that bring you joy. When you feel good on the inside, it will show on the outside too!
Conclusion
Overall, it’s important to remember that beauty starts from within. Taking the time to practice good self-care, such as exercising regularly and eating a balanced diet with plenty of fruits, vegetables and lean proteins can make a big difference in how you look and feel. Achieving true beauty isn’t just about what you put on your skin or do with your hair; it’s also about taking care of yourself physically and emotionally so that both your mind and body can shine.
Author

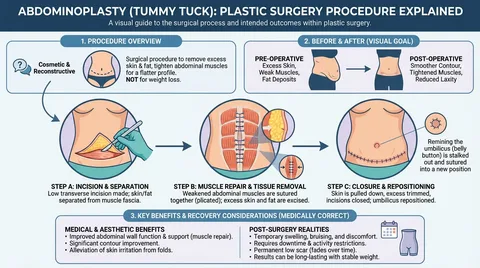
Cosmetic surgery is often surrounded by misconceptions, and tummy tuck procedures are no exception. Many people hesitate to explore this option due to myths that create confusion or unrealistic expectations. If you are considering a Tummy Tuck in Islamabad, it’s important to separate fact from fiction so you can make an informed decision.
In this blog, we’ll debunk common myths and present the real facts about tummy tuck surgery to help you better understand the procedure.
What is a Tummy Tuck?
Why Do Myths Exist?
Misinformation about cosmetic procedures often spreads through social media, word of mouth, or outdated information. These myths can lead to fear, unrealistic expectations, or poor decision-making. Understanding the truth helps you approach the procedure with clarity and confidence.
Common Myths and Facts
Myth 1: A Tummy Tuck is a Weight Loss Procedure
Fact:
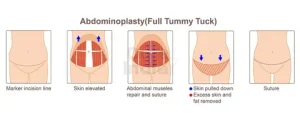
A tummy tuck is not meant for weight loss. It is a body contouring procedure designed to remove excess skin and improve abdominal shape.
Myth 2: Results Are Instant and Require No Recovery
Fact:
While results are noticeable after surgery, full results take time as swelling subsides. Recovery is an essential part of the process and requires patience.
Myth 3: Only Women Get Tummy Tucks
Fact:
Men can also benefit from tummy tuck procedures. Many male patients opt for this surgery to achieve a more defined abdominal profile.
Myth 4: The Results Are Not Long-Lasting
Fact:
Results can last for many years if you maintain a stable weight and healthy lifestyle.
Myth 5: Tummy Tuck Leaves Highly Visible Scars
Fact:
Scars are usually placed below the bikini line and fade over time with proper care.
Myth 6: It’s an Extremely Risky Procedure
Fact:
When performed by qualified surgeons in reputable clinics, tummy tuck surgery is generally safe with minimal risks.
Myth 7: You Can Skip Exercise After Surgery
Fact:
A tummy tuck is not a substitute for a healthy lifestyle. Regular exercise and a balanced diet are essential to maintain results.
Myths vs Facts Overview
| Myth | Fact |
|---|---|
| It’s a weight-loss surgery | It’s a body contouring procedure |
| No recovery needed | Recovery is essential |
| Only for women | Suitable for both men and women |
| Results are temporary | Long-lasting with proper care |
| Scars are very noticeable | Scars fade and are strategically placed |
| Highly risky | Safe with experienced surgeons |
| No need for lifestyle changes | Healthy habits are still required |
Benefits of Knowing the Facts
Understanding the truth about tummy tuck procedures helps you:
- Make informed decisions
- Set realistic expectations
- Reduce unnecessary fear
- Choose the right surgeon and clinic
- Achieve better overall results
Who Should Consider a Tummy Tuck?
You may be a good candidate if you:
- Have loose or sagging abdominal skin
- Have undergone significant weight loss
- Experience muscle separation after pregnancy
- Are in good overall health
- Have realistic expectations
Tips to Avoid Misinformation
- Always consult a qualified surgeon
- Rely on trusted medical sources
- Avoid believing everything on social media
- Ask questions during consultations
Why Islamabad is a Reliable Choice
Islamabad has become a popular destination for cosmetic procedures due to:
- Skilled and experienced surgeons
- Modern medical facilities
- Affordable treatment options
- High standards of patient care
These factors contribute to safer procedures and better outcomes.
Final Thoughts
Their expert team provides personalized treatments, ensuring safety, comfort, and outstanding outcomes for every patient. In addition, they focus on understanding each patient’s unique needs and medical history before recommending any procedure. This patient-centered approach helps in creating treatment plans that are both effective and realistic. The clinic also uses advanced techniques and modern medical equipment to enhance precision and minimize risks during surgery. Post-procedure care is given equal importance, with detailed follow-up sessions to ensure proper healing and recovery. Patients are guided throughout every stage of the process, from consultation to final results. This commitment to excellence builds trust and ensures long-term satisfaction for individuals seeking cosmetic enhancement procedures.
FAQs
1. Is a tummy tuck painful?
Some discomfort is expected during recovery, but it is manageable with medication.
2. How long do results last?
Results can last for many years with proper lifestyle maintenance.
3. Can I lose weight with a tummy tuck?
No, it is not a weight-loss procedure.
4. Will I have scars?
Yes, but they are placed discreetly and fade over time.
5. Is it safe to undergo the procedure?
Yes, when performed by qualified professionals in a reputable clinic.
6. Can men get a tummy tuck?
Yes, the procedure is suitable for both men and women.
Author
Dealing with constant pain, physical discomfort, or unusual wetness in your private areas can make life very difficult. It affects your daily office work, your family time, and your mental peace. Among various painful problems, an anal fistula is quite complex. It is a condition that almost never heals by itself with simple creams or home remedies. If you are looking for a permanent solution, getting timely and professional medical care is highly important. For anyone living in Kerala, finding the right center for modern Fistula Treatment in Thrissur is the first step toward living a happy, pain-free life.
What is an Anal Fistula Treatment?
To understand why professional medical care is necessary, it helps to understand what an anal fistula actually is. In simple terms, an anal fistula is a small, abnormal tunnel or track under the skin. It forms a link between an infected gland inside your anal canal and the external skin surrounding your anus.
Critical Symptoms You Should Never Ignore
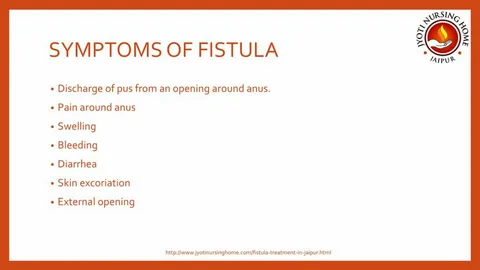
An anal fistula shows very clear warning signs. You should instantly seek a consultation if you notice any of these problems:
- Constant, Throbbing Pain: You feel a deep, continuous ache around your anal area. This pain usually gets much worse when you sit down, walk around, or try to pass stools.
- Foul-Smelling Discharge: You notice white pus, watery fluid, or sometimes drops of blood staining your undergarments. This fluid leaks out from a tiny boil or opening on the skin.
- Swelling and Tenderness: The skin near the anal opening looks red, feels warm, and hurts badly when touched.
- Skin Irritation: The continuous drainage of fluid keeps the surrounding skin wet, leading to severe itching, rashes, and skin burning.
- Recurrent Fever: If a pocket of pus (an abscess) builds up inside and cannot drain out properly, it can cause a high fever, body chills, and fatigue.
Expert Care Matters for Fistula Treatment
An anal fistula is not a simple skin boil. It is a complex anatomical problem because the tunnel frequently travels through or runs very close to your anal sphincter muscles. These are the highly important circular muscles that allow you to control your bowel movements.
If an inexperienced doctor performs a traditional surgery incorrectly, it can accidentally damage these delicate sphincter muscles. Such damage can lead to a lifetime problem called fecal incontinence, where a patient completely loses the power to control gas or stool movements.
Fistula Treatment vs. Old Surgical Methods
In the past, traditional open surgery (known as a fistulotomy) was the only treatment available. In an open surgery, doctors cut open the entire skin and muscle layer over the tunnel to turn it into an open groove that heals from the bottom up. For very deep or complex tunnels, doctors had to place a thick surgical thread (called a seton) inside the track to drain out the pus over several long months.
While those old surgeries worked, they came with major downsides:
- Large, deep open wounds that took months to heal completely.
- Severe post-surgery pain that required strong painkillers.
- The need for painful daily wound dressings and cleanings.
- Extended bed rest and a long break from office work.
- A higher risk of accidental muscle damage and recurrence.

The Benefits of Modern Laser Surgery
Minimal Post-Operative Pain:
Because there are no deep cuts, stitches, or open wounds created on your skin, the post-surgery pain is incredibly low.
Total Muscle Protection:
The advanced laser beam targets only the infected track. It does not cut or damage your crucial anal sphincter muscles, ensuring your bowel control remains completely safe.
Convenient Daycare Procedure:
The entire process takes very little time. Patients can get admitted in the morning, complete the laser procedure, and comfortably walk back home the very same day.
Rapid Recovery:
You do not need to take weeks of sick leave from your job. Most patients can stand up, sit comfortably, and return to their regular light office work within 2 to 3 days.
No Painful Daily Dressings:
Since there is no large open wound left behind, you are saved from the agony of painful daily wound packings and dressings.
Negligible Blood Loss:
The gentle heat of the laser naturally seals up small blood vessels during the procedure, making it a virtually bloodless experience.
What to Expect at Your First Consultation
We understand that speaking about or getting checked for anal issues can cause an emotional mix of anxiety, worry, or embarrassment. However, at Thrissur Piles Clinic, the entire staff follows strict guidelines to ensure your absolute comfort, dignity, and personal privacy.
1. Compassionate and Detailed Discussion
During your initial private meeting, Dr. Raviram S. will listen to your symptoms calmly. He will ask details about how your pain started, the nature of any fluid discharge, your daily eating habits, your lifestyle, and any previous medications or treatments you might have tried.
2. A Painless and Gentle Checkup
A physical examination is conducted inside a highly private, clean, and comfortable examination room. To map out the condition clearly without causing you pain, the doctor performs a very gentle and quick visual test. If required, a painless checkup using a tiny, lubricated scope (called an anoscopy) is used to inspect the internal health of the anal canal for any hidden piles, tears, or internal fistula openings.
3. Creating a Transparent Treatment Plan
If an anal fistula is found, Dr. Raviram S. will take the time to explain the structure of your condition using simple, non-medical terms. He will discuss the best modern approach, explain exactly how the laser procedure will seal your specific track, and build a customized treatment plan so you can move ahead with absolute clarity and peace of mind.
Conclusion
An anal fistula can cause a lot of daily physical pain, mental stress, and trouble in your normal life. But you do not have to live with this discomfort forever. If you try to ignore your symptoms or keep using temporary local creams, the problem will only get worse. The tunnel can grow deeper, form complicated new branches, or create painful new pus collections under your skin.
With modern, minimally invasive laser technology and specialized medical care, getting permanent relief has now become simple, safe, and nearly painless. By placing your trust in an award-winning Fistula Specialist in Thrissur like Dr. Raviram S., you are putting your health in highly experienced, trusted hands.
Author
Men frequently have questions about the safety, expectations, and results associated with Penile enlargement in Dubai. In the aesthetic sector, clarity and professional guidance are essential for making informed decisions. Our goal is to provide evidence-based answers to the most common inquiries, ensuring that your path toward aesthetic improvement is grounded in medical reality and clinical expertise.
Core Goal of Penile Enlargement
The primary goal of penile enlargement treatment is to enhance the thickness and overall appearance of the penis. Many men seek this procedure because they want to feel more confident about their body image and personal appearance. While the treatment can improve physical aesthetics, it is important to understand that it is a cosmetic procedure rather than a medical necessity.
For many individuals, concerns about penile size can affect self-esteem and confidence. Some men feel dissatisfied with their natural appearance even when their anatomy falls within a normal range. Penile enlargement procedures provide an option for those who wish to achieve a fuller and more proportionate appearance. The objective is to create natural-looking enhancement while maintaining normal function and comfort.
How Does the Treatment Work?
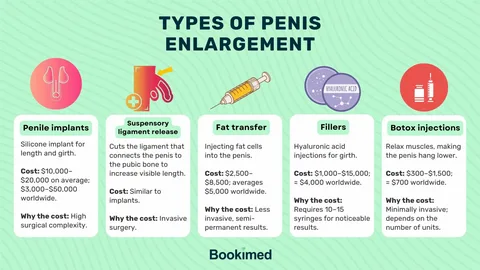
Modern penile enlargement procedures commonly use hyaluronic acid fillers to increase girth. Hyaluronic acid is a substance that naturally exists in the body and has been widely used in aesthetic medicine for many years. Its safety profile and ability to provide smooth, natural-looking volume make it a popular choice for cosmetic enhancement.
During the procedure, a qualified specialist carefully injects the filler into the soft tissue beneath the skin of the penile shaft. The practitioner uses advanced techniques to distribute the product evenly across the treatment area. This approach helps create balanced results and minimizes the risk of irregularities.
The treatment focuses on increasing circumference rather than length. Because the filler remains within the superficial tissue layers, it does not interfere with deeper anatomical structures. This allows patients to achieve aesthetic enhancement while preserving normal penile function.
Professional Guidance Important
Professional guidance plays a critical role in achieving safe and successful results. The penis contains a complex network of blood vessels, nerves, and sensitive tissues. A trained specialist understands this anatomy and knows how to perform the procedure with precision.
An experienced practitioner begins by evaluating the patient’s goals, expectations, and overall health. This assessment helps determine whether the treatment is suitable and allows the specialist to create a personalized treatment plan.
Professional care also reduces the likelihood of complications. Proper injection techniques, sterile procedures, and careful product placement contribute to better outcomes and a smoother recovery process. Patients should always seek treatment from qualified medical professionals who have experience performing aesthetic procedures in this specialized area.
Who Is an Ideal Candidate?
The ideal candidate is a healthy adult male who wants to improve the appearance of penile girth through a cosmetic procedure. Candidates should have realistic expectations and understand the capabilities and limitations of treatment.
During the consultation, the specialist reviews medical history, discusses aesthetic goals, and answers any questions the patient may have. This process helps ensure that the individual understands the procedure and can make an informed decision.
Patients should approach treatment with realistic expectations. Penile enlargement can improve appearance and confidence, but it does not completely transform anatomy. Understanding this distinction contributes to greater satisfaction with the final results.

Which Areas Are Treated?
The procedure focuses specifically on the shaft of the penis. Specialists work carefully within the superficial tissue layers and avoid deeper erectile structures. They also avoid treating areas that could interfere with normal function.
This targeted approach allows practitioners to improve girth while preserving natural sensation and performance. Precision is essential because even distribution contributes significantly to both appearance and comfort.
Understanding Cost and Value
Many individuals researching Penile enlargement in Dubai naturally want to understand the financial aspect of treatment. While cost is an important consideration, quality and safety should remain the primary focus.
A reputable clinic invests in experienced medical professionals, high-quality filler products, advanced equipment, and strict safety standards. These factors contribute directly to treatment quality and patient satisfaction.
Choosing a qualified provider often offers greater long-term value than selecting a clinic based solely on lower pricing. Patients should prioritize expertise, experience, and a strong commitment to safety when making their decision.
Recovery and Healing Expectations
Recovery is generally straightforward. Mild swelling, tenderness, or bruising may occur after treatment, but these effects are usually temporary and improve over time.
Patients should follow all aftercare instructions provided by their specialist. These guidelines often include avoiding strenuous physical activity and refraining from sexual activity during the recommended healing period.
Proper aftercare supports optimal healing and allows the filler to settle evenly within the treated area. Most individuals find the recovery process manageable and can return to normal routines relatively quickly.
Safety and Medical Precautions
Patient safety remains the foundation of every successful procedure. Qualified specialists follow strict medical protocols to reduce risks and improve outcomes.
Using approved filler products and maintaining sterile treatment conditions help protect patients throughout the process. Careful assessment, precise injection techniques, and comprehensive aftercare also contribute to safety.
Patients should avoid unlicensed providers or non-clinical environments. Procedures performed without proper medical oversight can increase the risk of complications and unsatisfactory results.
Maintaining Long-Term Results
Hyaluronic acid fillers gradually break down over time as part of the body’s natural processes. Although results are long-lasting, they are not permanent.
Many patients enjoy their enhanced appearance for approximately 12 to 18 months before considering maintenance treatment. Regular follow-up appointments allow specialists to evaluate results and determine whether touch-up sessions may be beneficial.
Maintaining communication with a qualified practitioner helps ensure that results remain consistent and natural-looking over time.
Conclusion
Choosing cosmetic enhancement is a personal decision that requires careful consideration and professional guidance. Patients should seek experienced practitioners who prioritize safety, comfort, and natural-looking outcomes. At Tajmeels Clinic, our team provides confidential care and personalized treatment plans to support every stage of your aesthetic journey. We welcome you to learn more about your options and discuss your goals with our medical professionals.
Author


Pilonidal Sinus Treatment: Modern Laser Care for Fast Relief

Subnet Calculator: Network Design and IP Address Management

Tummy Tuck in Islamabad: Myths vs Facts About Abdominoplasty

Step-Up SIP: The Smart Strategy to Build Bigger Wealth Faster

SAS Upgrade: Comfortable Scandinavian Airlines Travel

Sp5der Hoodie and Carsicko Tracksuit: Everyday Streetwear

Farm Mechanization: Transforming Agriculture with Technology

Skechers Sneakers: Comfort, Innovation, and Global Lifestyle

Fistula Treatment in Thrissur: Safe, Painless, and Permanent Relief

AI Automation: Productivity and Growth in the Digital Era

Cybersecurity Consulting Company SequelNet Provides Critical IT Support Services to Medical Billing Firm, Medical Optimum

Team Communication Software Transforms Operations at Finance Innovate

Project Management Tool Transforms Long Island Business

How Alleviate Poverty Utilized IPPBX’s All-in-One Solution to Transform Lives in New York City

Breast Cancer: The Imperative Role of Mammograms in Screening and Early Detection

Unstoppable Collaboration: D.C.’s Citi Open and Silicon Valley Classic Unite to Propel Women’s Tennis to New Heights

Embracing Renewal: Sizdabedar Celebrations Unite Iranians in New York’s Eisenhower Park

The Benefits of Starting a Side Hustle for Financial Freedom

New Blood Donation Screening Questions What You Need to Know

Stylishly Timeless: The 5 Types of Sandals You Need in Your Closet
-

 Business3 years ago
Cybersecurity Consulting Company SequelNet Provides Critical IT Support Services to Medical Billing Firm, Medical Optimum
-
Business3 years ago
Team Communication Software Transforms Operations at Finance Innovate
-
Business3 years ago
Project Management Tool Transforms Long Island Business
-
Business3 years ago
How Alleviate Poverty Utilized IPPBX’s All-in-One Solution to Transform Lives in New York City
-
health3 years ago
Breast Cancer: The Imperative Role of Mammograms in Screening and Early Detection
-
Sports3 years ago
Unstoppable Collaboration: D.C.’s Citi Open and Silicon Valley Classic Unite to Propel Women’s Tennis to New Heights
-
Art /Entertainment3 years ago
Embracing Renewal: Sizdabedar Celebrations Unite Iranians in New York’s Eisenhower Park
-
Finance3 years ago
The Benefits of Starting a Side Hustle for Financial Freedom


