
Technology
How to Tame Outlook: 8 Tips for Email Productivity
How to Tame Outlook: 8 Tips for Email Productivity
Are you overwhelmed by the amount of emails you receive every day? Do you spend hours sorting, replying, and deleting messages in Outlook? Do you wish you could be more efficient and productive with your email management?
If you answered yes to any of these questions, this article is for you. I’m a seasoned blog writer and an Outlook expert, and I’m going to share with you 8 tips that will help you tame your Outlook inbox and boost your email productivity. Whether you use Outlook for work, personal, or both, these tips will help you save time, stay organized, and get more done.
Tip 1: Schedule Specific Times for Checking Email
One of the biggest email productivity killers is checking your email constantly throughout the day. This habit not only wastes your time, but also distracts you from your other tasks and reduces your focus. Instead of letting your email dictate your schedule, you should take control and decide when and how often you check your email.
A good practice is to schedule specific times for checking email, and stick to them. For example, you can check your email twice a day, once in the morning and once in the afternoon, or three times a day, at 10 a.m., 1 p.m., and 4 p.m. The exact times will depend on your preferences and workload, but the key is to limit them to a few times a day, and avoid checking your email first thing in the morning or right before you go to bed.
By scheduling your email time, you will be able to focus on your most important tasks without interruptions, and also avoid the stress and anxiety that comes from seeing an overflowing inbox.

Tip 2: Turn Off Your Email Notifications
Another way to prevent email from disrupting your workflow is to turn off your email notifications on your phone and your computer. Email notifications are tempting and addictive, but they also distract you from your current task and make you lose your concentration. Every time you hear a ding or see a pop-up, you are tempted to check your email, even if it’s not urgent or important.
To avoid this temptation, you should turn off your email notifications and only check your email during your scheduled times. This way, you will be able to focus on your work without being constantly bombarded by email alerts. You will also find that most emails are not as urgent as they seem, and can wait until you are ready to deal with them.
Tip 3: Use Folders and Rules to Organize Your Email
One of the best ways to improve your email productivity is to organize your email into folders and use rules to automate the process. Folders and rules help you sort your email by categories, such as projects, clients, priorities, or topics. This way, you can easily find the emails you need, and also keep your inbox clean and clutter-free.
To create folders and rules in Outlook, you can follow these steps:
- Right-click on your inbox and select New Folder. Name the folder according to the category you want to use, such as Marketing, Finance, or Personal.
- Repeat this step for as many folders as you need.
- Select an email that you want to move to a folder, and click on the Home tab. Then, click on Rules and select Create Rule.
- In the Create Rule dialog box, check the conditions that you want to use to move the email, such as the sender, the subject, or the importance. Then, check the action that you want to apply, such as Move the item to folder, and select the folder that you created.
- Click on OK to create the rule. You can also check the option to run the rule on messages already in your inbox, if you want to apply it retroactively.
- Repeat this step for as many rules as you need.
By using folders and rules, you will be able to organize your email automatically and save time and effort.
Tip 4: Use Categories and Flags to Prioritize Your Email
Another way to improve your email productivity is to use categories and flags to prioritize your email. Categories and flags help you label your email by color, name, or due date, so that you can easily identify the emails that require your attention, action, or follow-up.
To use categories and flags in Outlook, you can follow these steps:
- Select an email that you want to categorize or flag, and click on the Home tab. Then, click on Categorize and select a category from the list, such as Red Category, Blue Category, or Green Category. You can also create your own categories by clicking on All Categories and clicking on New.
- Repeat this step for as many emails as you want to categorize.
- Select an email that you want to flag, and click on the Home tab. Then, click on Follow Up and select a flag from the list, such as Today, Tomorrow, or Next Week. You can also set a custom date and time by clicking on Custom.
- Repeat this step for as many emails as you want to flag.
By using categories and flags, you will be able to prioritize your email and manage your tasks more effectively.
Tip 5: Use Templates and Signatures to Save Time
One of the most time-consuming aspects of email is writing and formatting your messages. If you often send similar or repetitive emails, such as requests, confirmations, or updates, you can save time by using templates and signatures. Templates and signatures help you create and insert pre-written and pre-formatted text into your emails, so that you don’t have to type or copy and paste the same information over and over again.
To use templates and signatures in Outlook, you can follow these steps:
- To create a template, compose a new email with the text that you want to use as a template, and click on the File tab. Then, click on Save As and select Outlook Template from the Save as type list. Name the template and click on Save.
- To use a template, click on the Home tab and select New Items. Then, click on More Items and select Choose Form. In the Choose Form dialog box, select User Templates in File System from the Look In list, and select the template that you created. Click on Open to create a new email with the template text.
- To create a signature, click on the File tab and select Options. Then, click on Mail and select Signatures. In the Signatures and Stationery dialog box, click on New and name the signature. Then, type or paste the text that you want to use as a signature in the Edit signature box. You can also format the text, add images, or insert hyperlinks. Click on OK to save the signature.
- To use a signature, compose a new email and click on the Message tab. Then, click on Signature and select the signature that you created. The signature will be inserted at the end of your email.
By using templates and signatures, you will be able to write and send your emails faster and easier.
Tip 6: Use Mailtrack to Know When Your Emails Are Read
One of the most frustrating aspects of email is not knowing if your emails are read, opened, or ignored. This can cause you to wonder if you should follow up, resend, or wait for a response. To avoid this uncertainty, you can use Mailtrack, a tool that lets you know when your emails are read, how many times, and on what device.
To use Mailtrack, you can follow these steps:
- Go to Mailtrack and sign up with your Outlook account.
- Install the Mailtrack extension for your browser, such as Chrome, Firefox, or Edge.
- Compose a new email and click on the Mailtrack icon in the bottom right corner of the email window. You will see a green check mark indicating that Mailtrack is enabled for that email.
- Send your email and wait for a response. You will receive a notification when your email is read, along with the details of the time, date, and device.
- You can also check the status of your emails in your Sent folder, where you will see one or two green check marks next to each email. One check mark means that your email was delivered, and two check marks mean that your email was opened.
By using Mailtrack, you will be able to track your emails and know if they are reaching your recipients.
Tip 7: Use Clean Email to Unsubscribe in Bulk and Reduce Spam
One of the biggest challenges of email is dealing with spam, junk, and unwanted emails. These emails clutter your inbox, waste your time, and expose you to potential scams and malware. To avoid these problems, you can use Clean Email, a tool that helps you unsubscribe from unwanted emails in bulk and reduce spam.
To use Clean Email, you can follow these steps:
- Go to Clean Email and sign up with your Outlook account.
- Select your inbox and click on the Unsubscriber tab. You will see a list of all the newsletters, subscriptions, and promotions that you receive in your email.
- Check the boxes next to the emails that you want to unsubscribe from, and click on the Unsubscribe button. Clean Email will automatically send unsubscribe requests to the senders and move the emails to the Trash folder.
- You can also use the other tabs, such as Smart Views, Auto Clean, and Block Sender, to further organize and clean your email.
By using Clean Email, you will be able to unsubscribe from unwanted emails in bulk and reduce spam.
Tip 8: Use Outlook Mobile App to Access Your Email Anywhere
One of the best ways to improve your email productivity is to use the Outlook mobile app, which allows you to access your email anywhere, anytime, and on any device. The Outlook mobile app syncs with your Outlook account on your computer, so you can easily switch between devices and stay on top of your email.
The Outlook mobile app has many features that make your email management easier and faster, such as:
- Focused Inbox: This feature separates your inbox into two tabs, Focused and Other. The Focused tab shows you the most important and relevant emails, while the Other tab shows you the rest. This way, you can prioritize your email and avoid distractions.
- Swipe Gestures: This feature lets you perform quick actions on your emails by swiping left or right. You can customize the swipe gestures to suit your preferences, such as deleting, archiving, flagging, or moving emails.
- Calendar Integration: This feature lets you view and manage your calendar events from your email app. You can also create and join meetings, send invitations, and share your availability with your contacts.
- Search and Filter: This feature lets you find any email, contact, or file in your email app. You can also use filters to narrow down your search results by date, attachment, or unread status.
- Attachments and Cloud Storage: This feature lets you easily attach files from your device or from your cloud storage accounts, such as OneDrive, Dropbox, or Google Drive. You can also preview and edit your attachments without leaving your email app.
By using the Outlook mobile app, you will be able to access your email anywhere and stay productive on the go.

Image by;https://www.edisonmail.com/
Summary Table
To recap, here are the 8 tips for email productivity that I have shared with you in this article:
| Tip | Description |
|---|---|
| Schedule Specific Times for Checking Email | Limit your email time to a few times a day and avoid checking your email constantly |
| Turn Off Your Email Notifications | Disable your email alerts on your phone and your computer and only check your email during your scheduled times |
| Use Folders and Rules to Organize Your Email | Sort your email by categories and use rules to automate the process |
| Use Categories and Flags to Prioritize Your Email | Label your email by color, name, or due date and identify the emails that require your attention, action, or follow-up |
| Use Templates and Signatures to Save Time | Create and insert pre-written and pre-formatted text into your emails |
| Use Mailtrack to Know When Your Emails Are Read | Track your emails and know if they are delivered, opened, or ignored |
| Use Clean Email to Unsubscribe in Bulk and Reduce Spam | Unsubscribe from unwanted emails in bulk and reduce spam |
| Use Outlook Mobile App to Access Your Email Anywhere | Access your email anywhere, anytime, and on any device and use the features that make your email management easier and faster |
I hope you enjoyed reading this article and learned some useful tips for email productivity. If you have any questions, comments, or feedback, please feel free to leave them below. Thank you for your time and attention.
Author
Businesses today operate in a fast-moving digital environment. Markets change quickly. Customer expectations rise constantly. At the same time, companies must improve efficiency and reduce costs. Because of this pressure, digital transformation is no longer optional. SAP systems play a major role in solving these challenges. They help organizations streamline operations, manage data, and improve decision-making. However, the real value comes from proper implementation. This is where an experienced SAP Consulting Company in Pune becomes essential.
Pune has emerged as a strong technology and industrial hub in India. Companies here need advanced ERP solutions to stay competitive. Denpro Group supports this transformation with tailored SAP consulting services designed for modern business needs.
Trusted SAP Consulting Partner in India
Denpro Group is a well-established SAP consulting company in India with strong experience in delivering enterprise solutions. The company operates across major cities such as Pune, Mumbai, and Noida, supporting businesses of all sizes.
Instead of offering generic solutions, Denpro focuses on industry-specific SAP implementations. The team understands that every business has unique processes. Therefore, they design solutions that improve efficiency, accuracy, and long-term scalability.
With a strong team of SAP-certified professionals, Denpro helps organizations modernize their systems and achieve measurable results. Their reputation also extends beyond Pune, making them a recognized SAP consulting provider in multiple regions.
SAP Services Offered by Denpro
Denpro Group provides a complete range of SAP consulting and implementation services. These services cover the entire digital transformation journey.
SAP S/4HANA Implementation and Migration
Denpro helps businesses move from legacy systems to SAP S/4HANA. This upgrade improves real-time data processing, reporting accuracy, and system performance. The team supports both greenfield and brownfield migration strategies depending on business requirements.
SAP SuccessFactors for HR Transformation
Companies can modernize their human resource systems using SAP SuccessFactors. It supports recruitment, onboarding, performance tracking, and employee development in a single cloud-based platform.
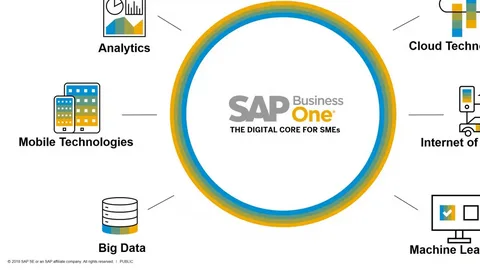
SAP Business One for SMEs
Small and mid-sized businesses in Pune benefit from SAP Business One. It integrates finance, sales, inventory, and operations into one system. This improves visibility and simplifies decision-making.
SAP Analytics Cloud
Denpro enables data-driven decision-making through SAP Analytics Cloud. Businesses gain real-time insights, predictive analytics, and reporting tools that improve operational planning.
RISE with SAP Solutions
RISE with SAP allows companies to shift to a cloud-first ERP model. Denpro helps organizations adopt this framework to improve flexibility, reduce IT complexity, and enhance digital capabilities.
Choose Denpro as Your SAP Company
Choosing the right SAP partner has a direct impact on business success. Denpro Group stands out due to its structured approach and strong technical expertise.
Industry-Focused Solutions
Denpro designs SAP systems based on industry needs. Whether it is manufacturing, pharmaceuticals, automotive, or retail, the solutions are customized for maximum efficiency.
Fast and Agile Implementation
Speed matters in digital transformation. Denpro uses agile methods to ensure faster SAP deployment without compromising quality or security.
Cost-Effective Approach
The company focuses on delivering high ROI. Their solutions help reduce operational costs while improving productivity, making them ideal for mid-sized businesses.
Certified SAP Experts
Denpro’s team includes experienced SAP consultants, developers, and integration specialists. Their expertise ensures smooth implementation and long-term system stability.
Pan-India Service Network
Real Business Impact
Denpro Group has successfully delivered SAP solutions across different industries. These real-world examples highlight their impact.
Automotive Supplier in Pune
A leading automotive supplier struggled with outdated systems. After implementing SAP S/4HANA with Denpro, the company achieved:
- 35% faster order processing
- Real-time inventory tracking
- 20% reduction in operational costs
This transformation improved both efficiency and customer satisfaction.
Pharmaceutical Company Across Cities
A pharma company with operations in Pune, Mumbai, and Noida needed centralized control. Denpro implemented SAP Business One, resulting in:
- Unified compliance reporting
- Automated batch tracking
- 99% inventory accuracy
This helped the company improve regulatory compliance and operational control.
SAP Consulting Expansion Beyond Pune
Denpro Group’s expertise is not limited to Pune. The company also provides strong SAP consulting services in Mumbai and Noida. This pan-India presence allows businesses to access consistent support across multiple locations.
Organizations in Mumbai, a major financial hub, are increasingly adopting SAP solutions to improve efficiency and scalability. Denpro supports these businesses with end-to-end implementation, migration, and support services.
SAP Implementation and Support Services
Denpro offers full lifecycle SAP services to ensure smooth digital transformation.
SAP Implementation
From planning to deployment, Denpro ensures seamless SAP system installation using best practices and industry standards.
SAP S/4HANA Migration
The company provides secure and structured migration services with minimal downtime and zero data loss.
SAP Cloud Solutions
With SAP BTP and SAP Analytics Cloud, Denpro helps businesses adopt flexible cloud environments.
Custom SAP Integration
Denpro integrates SAP with platforms like Salesforce, Microsoft Azure, and Oracle to improve system connectivity.
SAP Support and Maintenance
Ongoing support ensures system stability, performance optimization, and continuous improvement.
Training and Change Management
Denpro also trains internal teams to ensure smooth adoption and effective use of SAP systems.
Conclusion
Denpro Group, a leading SAP Consulting Company in Pune, helps businesses unlock the full potential of SAP solutions. With strong expertise in SAP S/4HANA, SAP Business One, SuccessFactors, and cloud technologies, Denpro delivers scalable and efficient systems tailored to business needs.
By combining technical expertise with industry knowledge, Denpro enables companies to improve efficiency, reduce costs, and achieve long-term digital success.
Author


Author


Author


Airtool vs OutSystems: Choosing the Right Business Platform

Tuta Palm Angels: Premium Streetwear with Timeless Style

Buying Office Furniture Online: Avoid Costly Mistakes When Buying

Dandy Worldwide: Streetwear Brand Redefining Modern Fashion

AMI Paris Pullover: Timeless Style with Everyday Comfort

Air Canada LAX Terminal: Facilities, Services & Travel Tips

Mushroom Coffee: 8 Benefits for Health and Daily Performance

House Contractors: Home Renovation Experts in Noida

Feynix Solution: Website Redesign & Development Services

Maeve Clothing: The Brand That Makes Everyday Style Feel Effortless

Cybersecurity Consulting Company SequelNet Provides Critical IT Support Services to Medical Billing Firm, Medical Optimum

Meet the Megalodon: The Shark Star of ‘Meg 2’

Reduce Video Game Lag: Level Up Your Gaming Performance
Balancing India’s Entertainment: Cricket vs. Bollywood

Jetsetter’s Secrets: Unveiling Our Favorite Travel Hacks for a Seamless Adventure

The 5 Best Live Sports Streaming Sites: Legal and Exciting!

Hollywood Labor Unrest: The Impact of ‘What About Us?’ Strikes

Unveiling the Magic of Dream Fulfillment at the Late NBA Draft

Illuminate Your Skin: Dr. Axe Unveils Natural Remedies for Lightening Knees and Elbows

Bright Choices: Navigating the Pros and Cons of Skin Whitening Creams with Dr. Axe
-

 Business3 years ago
Cybersecurity Consulting Company SequelNet Provides Critical IT Support Services to Medical Billing Firm, Medical Optimum
-
Entertainment3 years ago
Meet the Megalodon: The Shark Star of ‘Meg 2’
-
Entertainment3 years ago
Reduce Video Game Lag: Level Up Your Gaming Performance
-
 Sports3 years ago
Balancing India’s Entertainment: Cricket vs. Bollywood
-
Entertainment3 years ago
Jetsetter’s Secrets: Unveiling Our Favorite Travel Hacks for a Seamless Adventure
-
Productivity3 years ago
The 5 Best Live Sports Streaming Sites: Legal and Exciting!
-
Art /Entertainment3 years ago
Hollywood Labor Unrest: The Impact of ‘What About Us?’ Strikes
-
Sports3 years ago
Unveiling the Magic of Dream Fulfillment at the Late NBA Draft


