
Home Garden
How to Create a Relaxing Outdoor Dining Space
By
Reviewed
By Sophie Amelie

Introduction
Imagine eating your favorite meal under the open sky with the warm sun on your face and a gentle breeze around you. Creating a relaxing outdoor dining space turns ordinary meals into memorable experiences. An outdoor dining area is not just a place to eat; it is a cozy spot where you can share stories with friends and family, celebrate special moments, and enjoy nature. In this article, we will show you how to create an inviting and Peaceful Outdoor dining space. We will explain the process in simple language so that everyone, including kids, can understand. You will learn easy design tips, creative ideas, and practical steps to make your outdoor dining area comfortable and stylish. Get ready to discover how to transform a small patio or backyard into a charming dining spot.
What Is This?

Image by: Yandex.com
A relaxing outdoor dining space is an area designed for eating and socializing outdoors. It usually includes a table, chairs, and sometimes decorative elements like lights, plants, or a canopy. This space is made to feel comfortable and inviting. It helps you enjoy meals while being close to nature. When you set up an outdoor dining space, you create a place where you can unwind, laugh, and share delicious food. It might be on a patio, in a garden, or on a balcony. The goal is to make it a calm and pleasant area where you can relax and have fun.
What Is That?
Outdoor dining goes beyond just eating outside. It is about creating an atmosphere that makes you feel happy and at ease. Think of it like setting up a mini-restaurant in your own home where the view is always fresh and exciting. A well-planned dining area design includes careful choices about furniture, lighting, and decorations. For instance, soft lighting from string lights or lanterns can add a magical touch in the evening. Comfortable seating and a table that fits your space make the area practical and inviting. By choosing elements that match your style and the natural surroundings, you create a perfect spot to enjoy meals. Outdoor living becomes more enjoyable when you have a dedicated dining space that suits your needs.
Planning Your Outdoor Dining Area
The first step to creating a relaxing outdoor dining space is planning. Start by measuring your space to know how much room you have. Think about the number of people you want to host. Consider the shape of your outdoor area—whether it is a small balcony, a patio, or a garden nook. Write down your ideas and sketch a simple layout. Planning helps you decide what furniture to buy and how to arrange it for the best view and comfort. Consider natural elements like the direction of sunlight and the best spots for shade. A clear plan is like a blueprint that guides you step by step in designing your perfect outdoor dining area.
Designing a Cozy Outdoor Dining Space

Image by: Yandex.com
Designing your outdoor dining area can be fun and creative. Choose a style that fits your personality. For example, you might prefer a modern look with sleek furniture and simple decor, or a rustic feel with wooden tables and colorful cushions. Think about the colors you want to use. Soft, natural colors often create a calm and relaxing atmosphere. You can add potted plants or a small herb garden to bring a touch of nature to your space. Consider adding comfortable elements like cushions, rugs, or even a hammock nearby. A good dining area design makes the space feel welcoming and warm. With a little creativity, even a small space can be transformed into an outdoor haven for meals and gatherings.
Table: Essentials for a Relaxing Outdoor Dining Space
Below is a table that shows key elements to consider when creating your relaxing outdoor dining space, along with their benefits.
| Element | Description | Main Benefit |
|---|---|---|
| Dining Table | A sturdy, weather-resistant table | Provides a central spot for meals |
| Comfortable Chairs | Chairs with cushions or padded seats | Ensures comfort during long meals |
| Outdoor Lighting | String lights, lanterns, or solar lamps | Creates a cozy and inviting ambiance |
| Weather Protection | Umbrella, canopy, or pergola | Offers shade and shelter from rain |
| Decorative Elements | Potted plants, outdoor rugs, art pieces | Enhances the visual appeal and warmth |
This table highlights the essential items that can transform your outdoor dining area into a relaxing and beautiful space.

Choosing the Right Furniture
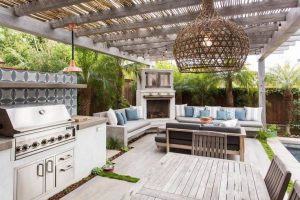
Image by: Yandex.com
The furniture you choose plays a big role in creating a relaxing outdoor dining space. Look for pieces that are not only stylish but also durable enough to withstand outdoor conditions. Materials like treated wood, metal, and weather-resistant fabrics are great choices. Make sure your dining table is large enough for meals but fits comfortably in your space. Chairs should be supportive and cozy. If you have limited space, consider foldable or stackable options that can be stored easily when not in use. Good furniture design can make your dining area both functional and attractive, ensuring that every meal is enjoyed in comfort.
Creating a Comfortable Ambiance
Ambiance is the feeling you get when you enter a space. To create a relaxing outdoor dining space, focus on the details that set a calm mood. Soft lighting is key; try using string lights or lanterns that cast a warm glow in the evening. Adding a few outdoor cushions and a cozy rug can make the area feel inviting. Natural elements like potted plants or a small water fountain can also enhance the atmosphere. Even background music played softly can add to the overall relaxation. The goal is to design a space where you feel comfortable and happy, whether you are eating a meal or simply enjoying the fresh air.
How to Incorporate Natural Elements

Image by: Yandex.com
Bringing nature into your outdoor dining space can make it even more enjoyable. Use potted plants, flowers, or even a small herb garden to add a burst of color and life. Natural elements not only beautify your space but also improve the air quality and create a peaceful environment. Consider adding a small water feature like a fountain. The sound of gently flowing water can be very calming. Choose plants that are easy to care for and suited to your local climate. This way, you can enjoy a lush, green dining area without too much work. The blend of nature and design makes your outdoor dining space a perfect retreat.
Tips for Maintaining Your Outdoor Space
Once your relaxing outdoor dining space is set up, it is important to keep it looking nice and feeling inviting. Regular maintenance makes a big difference. Clean your furniture often, and check for any signs of wear. Replace cushions and decorations as needed to keep the area fresh. If you have plants, water them regularly and trim any overgrowth. Keeping your space tidy not only helps it look great but also makes you feel more relaxed when you use it. A well-maintained outdoor area is a joy to use, and it shows that you care about creating a beautiful environment for yourself and your guests.
How to Make Your Outdoor Dining Space Kid-Friendly

Image by: Yandex.com
Creating a space that is easy to read and fun for kids is a bonus. When designing your relaxing outdoor dining space, consider adding a small play area or a simple game like a board game table. Use bright colors and playful decorations that appeal to young ones. Ensure that the furniture is safe and sturdy. A kid-friendly dining area means everyone in the family can enjoy meals together. It can also be a fun learning space where kids understand the importance of nature and healthy eating. A comfortable, family-friendly outdoor dining space enhances the overall experience for everyone.
Conclusion
In conclusion, creating a relaxing outdoor dining space is a wonderful project that brings people together. By carefully Planning your Space, choosing the right furniture, and incorporating natural elements, you can design a dining area that is both beautiful and comfortable. Whether you have a small patio, a backyard, or a balcony, you can transform it into a cozy spot for meals and gatherings. Regular maintenance and thoughtful design help keep the space inviting and enjoyable. Remember, even small changes can make a big difference in creating an outdoor retreat where you can relax and enjoy your meals. Embrace creativity, have fun with the design, and let your outdoor dining area become a cherished part of your home.
Author

The floral industry is experiencing a major transformation as designers move away from imported flowers and choose locally grown stems. This change reflects a growing demand for freshness, sustainability, and unique floral experiences. For decades, many florists depended on flowers shipped from distant countries. While this system provided a steady supply, it also created challenges related to freshness, transportation, and environmental impact. Today, designers are discovering the value of working with nearby farms. Local flowers allow them to create more meaningful arrangements while supporting growers and protecting natural resources.
Freshness That Makes Every Arrangement Stand Out
Freshness is one of the strongest advantages of locally grown flowers. Imported blooms often travel thousands of miles before reaching a floral studio. During this journey, flowers may spend several days inside storage facilities and transportation containers. Long shipping periods can affect the quality of flowers. They may lose their natural strength, fragrance and vibrant appearance before reaching customers.
Local flowers follow a shorter path from farm to vase. Farmers can harvest them and deliver them quickly to designers. Because of this, the flowers maintain their original beauty, color and texture. Customers notice the difference immediately. Local arrangements often look brighter, healthier and more natural compared to flowers that have traveled long distances.
Longer Vase Life and Natural Blooming Process
Another important benefit of local flowers is their ability to last longer. Since they spend less time in storage and transportation, they arrive in better condition. Imported flowers often begin aging before they reach the customer. Local flowers, however, continue their natural growth process after delivery. People can enjoy watching buds slowly open and petals gradually expand. This creates a more enjoyable experience because customers see the complete life cycle of the flowers. A bouquet becomes more than decoration. It becomes a living piece of nature that changes beautifully over time.
Seasonal Flowers Inspire Creative Designs
Local flowers help designers create arrangements that reflect each season. Instead of using the same flowers throughout the year, designers can work with blooms that naturally grow during specific periods. Spring arrangements may include soft flowers and fresh greenery. Summer designs can feature bright colors and bold textures. Autumn brings warm tones, unique foliage, and natural elements. This seasonal variety allows designers to create arrangements that feel fresh and original. Each piece becomes different because it follows nature’s changing patterns.
Local flowers also give designers access to rare varieties that are difficult to transport internationally. These special blooms help create artistic arrangements that customers cannot find everywhere.
Unique Colors, Textures and Natural Fragrances
Local flowers provide designers with more creative possibilities. They can experiment with different shapes, colors, and textures to create personalized floral designs. Many commercial flowers focus on durability rather than fragrance. Although imported flowers may look attractive, some varieties have very little natural scent. Local growers often preserve traditional flower varieties known for their beautiful aromas. These flowers bring a fresh and memorable fragrance into homes and event spaces. A naturally scented bouquet creates an emotional connection. It reminds people of gardens, seasons and special memories.

Strong Partnerships Between Designers and Farmers
Choosing local flowers allows designers to build direct relationships with farmers. Instead of relying only on large suppliers, florists can communicate with the people who grow their flowers. This connection creates better cooperation. Designers can discuss upcoming trends, special requests and event requirements with growers.
Farmers can also provide information about available flowers during different seasons. This communication helps designers plan better and create more thoughtful arrangements. Strong partnerships also create a reliable supply chain. Designers know where their flowers come from and can depend on local growers when they need specific blooms.
Supporting Local Communities and Small Businesses
Local flower sourcing benefits more than designers and customers. It also supports farmers and local economies. When people purchase locally grown flowers, their money stays within the community. This helps small farms continue their work and protects traditional farming knowledge. Local flower businesses also create stronger connections between customers and producers. People feel more connected when they know the story behind the flowers they bring into their homes. Supporting local farms helps preserve green spaces and encourages responsible land use.
Reducing Environmental Impact Through Local Flowers
The traditional flower industry often depends on long-distance transportation. Shipping flowers across countries requires fuel, refrigeration and large amounts of packaging. These processes increase energy use and contribute to environmental pollution. Local flowers provide a more sustainable alternative by reducing transportation distances. Many local farms also use eco-friendly methods. They may practice crop rotation, natural pest management, and other techniques that protect soil and wildlife. These practices support pollinators such as bees, butterflies and birds. By choosing local flowers, customers contribute to healthier ecosystems.
Creating Authentic and Meaningful Floral Experiences
Local flowers are changing the way people view floral design. Modern customers increasingly prefer arrangements that feel natural, personal and connected to their surroundings. Designers use local blooms to create pieces that look less artificial and more organic. Instead of perfect, identical arrangements, they create designs that celebrate natural shapes and movement. This style reflects the beauty of real gardens. Flowers can vary in sizes, textures, and shapes, giving each arrangement its own distinct character.
The result is a more emotional experience for customers. They receive something that feels carefully created rather than mass-produced.
The Future of Local Floral Design
The movement toward local flowers represent the future of the floral industry. Designers are realizing that locally grown stems offer better quality, creativity and sustainability. By choosing local flowers, florists support farmers, reduce environmental impact and provide customers with fresher arrangements. This approach creates a stronger connection between nature, communities, and floral artistry. Local flowers are not only changing how bouquets look. They are transforming how people experience and appreciate flowers. As more designers embrace local sourcing, the floral industry will continue moving toward a more sustainable, creative and meaningful future.
Author
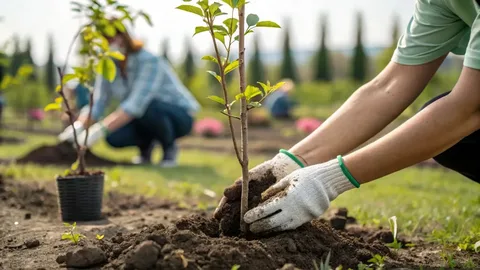
Trees are one of the most valuable assets for any property. They improve air quality, provide natural shade, enhance biodiversity, reduce soil erosion, and create attractive outdoor spaces. Whether you want to improve the appearance of your garden, increase your property’s value, or contribute to a healthier environment, investing in professional tree planting services is a smart decision. At Arborscape, we offer expert tree planting services for residential, commercial, and public sector clients. Our experienced arborists understand that successful tree planting involves much more than placing a tree in the ground. Every project begins with careful planning, proper species selection, expert installation, and ongoing care to ensure healthy growth for many years.
From planting a single ornamental tree to managing large-scale planting schemes, Arborscape delivers reliable solutions tailored to your property’s needs.
Why Professional Tree Planting Services Are Important
Planting a tree correctly is essential for its long-term health and survival. Incorrect planting depth, poor soil preparation, or choosing the wrong species can lead to slow growth, disease, weak roots, or premature tree failure. Professional tree planting services ensure that every tree is planted in the right location using proven techniques that promote healthy root development and long-lasting growth.
When you choose Arborscape, you benefit from:
- Expert tree selection
- Professional planting techniques
- Improved tree survival rates
- Healthy root establishment
- Reduced maintenance costs
- Better landscape design
- Long-term environmental benefits
Our team combines technical knowledge with practical experience to ensure every planting project is completed to the highest standard.
Our Comprehensive Tree Planting Services
Arborscape provides complete tree planting services for projects of every size. Whether you’re a homeowner, developer, business owner, or local authority, we offer tailored planting solutions that meet your specific requirements.
Tree Selection and Consultation
Every successful planting project starts with selecting the right tree. Different tree species thrive under different environmental conditions, so choosing wisely is essential.
Our experts assess your property and recommend trees based on:
- Soil type
- Climate conditions
- Sunlight availability
- Drainage
- Available space
- Landscape objectives
- Maintenance requirements
Whether you prefer native trees, ornamental varieties, flowering trees, evergreen species, or shade trees, Arborscape helps you make the best choice for your landscape.
Site Assessment and Preparation
Before planting begins, we carefully inspect the proposed site.
Our assessment includes:
- Soil testing
- Drainage evaluation
- Underground utility checks
- Space planning
- Root zone analysis
- Environmental considerations
Proper preparation ensures the soil provides the nutrients and conditions required for healthy root development.
Professional Tree Installation
Correct planting techniques significantly improve the survival and growth of young trees.
Our professional tree planting services include:
- Digging appropriately sized planting holes
- Soil improvement where necessary
- Correct tree positioning
- Root protection
- Tree staking when required
- Mulching around the base
- Initial watering
Every tree is planted according to recognized arboricultural best practices.
Tree Aftercare and Maintenance
Tree care does not end after planting. Newly planted trees require ongoing attention during the first few years to establish strong roots.
Arborscape provides aftercare guidance covering:
- Watering schedules
- Seasonal fertilizations
- Mulching
- Weed control
- Tree inspections
- Corrective pruning
- Pest and disease monitoring
Our ongoing support helps maximize tree health and longevity.

Benefits of Professional Tree Planting Services
Hiring professionals for tree planting services offers many long-term advantages.
Healthier Trees
Proper planting methods encourage stronger root systems, allowing trees to grow faster and remain healthier throughout their lifespan.
Increased Property Value
Well-designed landscapes featuring mature trees can significantly improve curb appeal and increase residential and commercial property values.
Improved Air Quality
Trees naturally absorb carbon dioxide while releasing oxygen, helping create cleaner and healthier environments.
Energy Efficiency
Strategically positioned trees provide natural shade during summer while acting as windbreaks in winter, reducing heating and cooling costs.
Environmental Sustainability
Trees support wildlife, improve biodiversity, reduce pollution, prevent soil erosion, and contribute to healthier ecosystems.
Professional tree planting services are an investment that benefits both your property and the wider environment.
Residential Tree Planting Services
Homeowners trust Arborscape to create beautiful and functional outdoor spaces.
Our residential tree planting services include:
- Garden tree planting
- Feature trees
- Fruit tree installation
- Privacy screening
- Shade trees
- Native tree planting
- Boundary planting
Whether you’re redesigning your garden or creating a peaceful outdoor retreat, we deliver personalized planting solutions designed to complement your landscape.
Commercial Tree Planting Services
Businesses increasingly recognize the value of professionally landscaped outdoor spaces.
Our commercial tree planting services support:
- Property developers
- Schools
- Hotels
- Retail centers
- Business parks
- Industrial estates
- Housing developments
- Public spaces
- Local authorities
Beautiful green spaces create welcoming environments while supporting sustainability initiatives and improving the appearance of commercial properties.
Why Choose Arborscape?
Arborscape has earned a reputation for delivering professional tree care and landscaping solutions across a wide range of projects.
Experienced Arborists
Our skilled team possesses extensive knowledge of tree biology, planting methods, and long-term maintenance.
High-Quality Trees
We source healthy trees from reputable nurseries, ensuring excellent establishment and strong future growth.
Tailored Planting Solutions
Every landscape is different. We design customized planting plans based on your property’s unique conditions and your long-term goals.
Modern Equipment
We use professional tools and equipment that allow us to complete projects efficiently while protecting both your property and newly planted trees.
Sustainable Practices
Environmental responsibility is central to everything we do. We encourage biodiversity, minimize waste, recycle organic materials where possible, and promote sustainable landscaping.
Outstanding Customer Service
From your initial consultation through to project completion, our team provides honest advice, clear communication, and dependable service.
Our Tree Planting Process
At Arborscape, we follow a proven process that delivers excellent results on every project.
Initial Consultation
We begin by discussing your objectives, preferred tree species, budget, and overall landscape vision.
Site Survey
Our arborists inspect the property to assess soil quality, drainage, sunlight exposure, and available planting space.
Planting Plan
A customized planting plan is created to maximize tree health, visual appeal, and long-term sustainability.
Professional Installation
Our experienced team carefully plants each tree using industry-approved methods that encourage healthy root establishment.
Ongoing Support
We provide expert aftercare advice and maintenance recommendations to ensure your investment continues to thrive.
Why Early Tree Planting Makes a Difference
Planting trees at the right time of year greatly improves establishment and long-term growth.
Autumn and early spring are generally ideal seasons because cooler temperatures and higher soil moisture encourage healthy root development before periods of rapid growth.
Our specialists recommend the most suitable planting schedule based on your chosen tree species and local environmental conditions.
Environmental Benefits of Tree Planting
Professional tree planting services contribute significantly to environmental conservation.
Trees help to:
- Absorb harmful carbon dioxide
- Produce oxygen
- Improve local biodiversity
- Reduce urban heat
- Prevent flooding
- Stabilize soil
- Filter pollutants
- Support birds and wildlife
- Improve mental wellbeing through greener spaces
By planting trees today, you help create healthier communities for future generations.
Contact Arborscape for Professional Tree Planting Services
If you’re searching for reliable tree planting services, Arborscape is your trusted partner. Our experienced arborists provide expert advice, professional planting, and ongoing support for projects of every size.
Whether you require a single tree for your garden or a large commercial planting programme, we deliver quality workmanship, environmentally responsible solutions, and exceptional customer service.
Conclusion
Professional tree planting services are one of the best investments you can make for your property and the environment. Correct tree selection, expert installation, and proper aftercare ensure healthy growth, improved landscapes, and long-lasting environmental benefits.
At Arborscape, we are committed to providing premium tree planting services that combine expert knowledge, sustainable practices, and exceptional workmanship. From consultation and planning to planting and maintenance, our experienced team delivers reliable solutions that help your trees flourish for decades. Contact Arborscape today to discuss your project and discover how our professional tree planting services can transform your outdoor space into a greener, healthier, and more valuable environment.
Author

Sensor-Driven Layered Curtains
Smart curtains in 2026 are quieter, simpler, and far more intuitive. Instead of dramatic automation, the focus is on layered control that works in the background. These living room window curtains typically combine sheer panels with functional liners that adjust throughout the day.
What this looks like in real homes:
- Opacity adjusts based on daylight levels or preset schedules.
- Controls work through apps or voice assistants you already use.
- Reduced glare during work hours and softer light in the evening.
- Better heat control for cities like Pune with shifting sunlight.
The result is a space that feels balanced all day without constant manual adjustment.
Bio-Based Performance Weaves
Sustainability in curtains has grown up. In 2026, eco-friendly fabrics are no longer rough, dull, or high-maintenance. Weaves made from bio-based and plant-derived materials are now specifically created for living room window curtains, providing comfort and functionality.
Key characteristics homeowners are choosing:
- Breathable fabrics suited for warm and humid climates.
- Low-allergen and skin-friendly materials.
- Subtle texture that adds warmth without heaviness.
- Longer lifespan compared to fast décor fabrics.
These materials support wellness while still looking refined and contemporary.
Light-Diffusing Surface Finishes
Instead of bold prints or heavy embroidery, many 2026 interiors are choosing curtains that play softly with light. Light-diffusing living room window curtains use micro-textures and refined weaves to scatter sunlight gently across the room.
Why this trend works:
- Creates visual depth without darkening the space.
- Makes compact living rooms feel more open.
- Reduces harsh glare without blocking daylight.
- Works well with neutral, minimalist interiors.
This approach is especially effective in apartments where natural light needs to be managed carefully.

Climate-Smart Curtain Hardware
Curtain hardware has stepped into the spotlight. In 2026, rods and tracks are no longer hidden details. For living room window curtains, hardware now supports both comfort and aesthetics.
What is changing:
- Improved insulation at mounting points
- Finishes like brushed brass and muted metallic
- Cleaner profiles that suit modern interiors
- Better compatibility with layered and motorized systems
Good hardware ensures curtains hang better, last longer, and feel intentional rather than added on later.
Nature-Inspired Intelligent Prints
Prints are back, but they are softer and more thoughtful. Instead of bold motifs, 2026 focuses on patterns inspired by nature’s geometry. These living room window curtains feature subtle, repeating designs drawn from organic forms like leaves, waves, and soft spirals.
Why designers like them:
- Visually calming rather than distracting
- Easy to pair with solid upholstery and wood finishes
- Adds interest without overwhelming the room
- Supports wellness-led interior concepts
The effect is quiet detail that reveals itself over time.
Style Your 2026 Oasis
Styling living room window curtains well in 2026 is more about proportion than decoration.
A few simple ideas go a long way:
-
Install curtains above the window frame to enhance the perception of height.
- Choose floor-length panels for a clean, finished look.
- Layer sheers and functional curtains for flexibility.
- Let texture do the work instead of bold colors.
Quick Setup and Care Hacks
Installing modern living room window curtains does not need to be complicated.
Simple steps that make a difference:
- Mount curtain rods 15 to 20 cm above the window frame.
- Set smart layers according to local daylight patterns.
- Air natural fabrics once a month to keep them fresh.
- Spot clean textured curtains instead of frequent washing.
These habits extend fabric life and reduce unnecessary replacements.
Conclusion
In 2026, living room window curtains are shaped by small but meaningful shifts. Smarter layering that adjusts on its own, breathable bio-based fabrics, and finishes that work quietly with light rather than against it. Together, these trends are less about novelty and more about ease.
Imagine living room window curtains that simply feel right, filtering harsh sunlight without fuss, breathing with the space, and lasting through seasons of real living. Thoughtful choices like textured linens, gentle diffusion, or responsive layers reflect the direction brands like GM Fabrics stand for, where quality and care guide design.
This is not about chasing what looks new for the sake of it. It is about choosing living room window curtains that support how you live now and how your home will evolve, holding everyday moments and quiet routines year after year. What little adjustment would make your windows seem more homely?
Author


Essentials Hoodie: Premium Comfort Meets Timeless Streetwear

Carsicko Clothing UK: Modern Streetwear for Everyday Style

Mommy Makeover in Dubai for Lasting Body Contouring Results

True Religion: Premium Denim & Streetwear Style Guide

Best Franchise Businesses in Australia for First-Time Investors

IT Asset Disposition Services for Secure Data: Equipment Recovery

Vuori Clothing: Why Modern Shoppers Love This Athleisure Brand

Mahjong in Boston: Best Places for Beginners to Learn & Play

MoD vigil 200 MG for Students: Sleep Disorder Treatment Guide

HVAC Estimating Services for Accurate Project Budgeting

Cybersecurity Consulting Company SequelNet Provides Critical IT Support Services to Medical Billing Firm, Medical Optimum

Meet the Megalodon: The Shark Star of ‘Meg 2’

Reduce Video Game Lag: Level Up Your Gaming Performance
Balancing India’s Entertainment: Cricket vs. Bollywood

Jetsetter’s Secrets: Unveiling Our Favorite Travel Hacks for a Seamless Adventure

The 5 Best Live Sports Streaming Sites: Legal and Exciting!

Hollywood Labor Unrest: The Impact of ‘What About Us?’ Strikes

Unveiling the Magic of Dream Fulfillment at the Late NBA Draft

Illuminate Your Skin: Dr. Axe Unveils Natural Remedies for Lightening Knees and Elbows

Bright Choices: Navigating the Pros and Cons of Skin Whitening Creams with Dr. Axe
-

 Business3 years ago
Cybersecurity Consulting Company SequelNet Provides Critical IT Support Services to Medical Billing Firm, Medical Optimum
-
Entertainment3 years ago
Meet the Megalodon: The Shark Star of ‘Meg 2’
-
Entertainment3 years ago
Reduce Video Game Lag: Level Up Your Gaming Performance
-
 Sports3 years ago
Balancing India’s Entertainment: Cricket vs. Bollywood
-
Entertainment3 years ago
Jetsetter’s Secrets: Unveiling Our Favorite Travel Hacks for a Seamless Adventure
-
Productivity3 years ago
The 5 Best Live Sports Streaming Sites: Legal and Exciting!
-
Art /Entertainment3 years ago
Hollywood Labor Unrest: The Impact of ‘What About Us?’ Strikes
-
Sports3 years ago
Unveiling the Magic of Dream Fulfillment at the Late NBA Draft


