
Beauty Fitness
The Definitive Guide To Building Muscle and Burning Fat At The Same Time
Introduction
Do you ever find yourself stuck in a perpetual loop of trying to build muscle and burn fat at the same time? Many people find it difficult to achieve both goals due to an inadequate diet, lack of knowledge, or too much time spent in the gym. But no matter how hard you try, without the right plan, you’re sure to fail. That’s why we’ve created this definitive guide on building muscle and burning fat at the same time. In this article, we’ll share with you how to construct a meal plan tailored for your needs and goals, how to structure your training sessions, and other tips and tricks that will help you reach your goal of building muscle while losing fat.
The Science Behind Muscle Growth and Fat Loss
The science behind muscle growth and fat loss is simple. When you exercise, your muscles need energy to repair and grow. This energy comes from the breakdown of glycogen in your muscles, which release glucose into your bloodstream. The glucose is then used by your body for energy.
Exercise also causes your body to release hormones that help promote muscle growth and fat loss. Growth hormone helps to stimulate the growth of new muscle cells, while glucagon helps to break down stored glycogen and fatty acids for energy.

To build muscle, you need to exercise regularly and eat a diet that is high in protein and calories. To lose fat, you need to create a calorie deficit by eating fewer calories than you burn.
The Best Methods for Building Muscle and Burning Fat
There are a lot of different ways to approach building muscle and burning fat at the same time. Some people like to do it through traditional bodybuilding methods, while others prefer more modern approaches like Crossfit or HIIT training.
No matter what method you choose, there are some key principles that will help you succeed. First, you need to make sure that you’re eating enough calories to support your training. You also need to focus on getting enough protein, which is essential for muscle growth.
In terms of training, you need to make sure that you’re lifting heavy weights and doing compound exercises that work multiple muscle groups at the same time. Cardio is also important, but you don’t want to overdo it or you’ll just end up burning off all the hard-earned muscle you’ve built up.
If you stick to these principles, you’ll be well on your way to building the ripped, muscular physique you’ve always wanted.
Nutrition for Building Muscle and Burning Fat
A well-balanced diet is essential for both building muscle and burning fat. To build muscle, you need to consume enough calories and protein. Protein provides the building blocks for muscle growth, and consuming enough calories ensures that your body has the energy it needs to build new muscle tissue. To burn fat, you need to create a calorie deficit by consuming fewer calories than your body needs. This will cause your body to burn stored body fat for energy.
There are a few key nutrients that are especially important for supporting muscle growth and fat loss. Protein is essential for building new muscle tissue, and you should aim to consume 0.8-1 grams of protein per pound of body weight per day. To support fat loss, you need to make sure you’re getting enough healthy fats in your diet. Healthy fats help to regulate hormone levels, which can impact weight loss. Aim to consume 20-30% of your daily calories from healthy fats like olive oil, avocados, nuts, and seeds. Finally, carbohydrates are important for providing energy and helping to regulate blood sugar levels. Consume 50-60% of your daily calories from carbohydrates like fruits, vegetables, whole grains, and legumes.
Training for Building Muscle and Burning Fat
There are a lot of ways to approach training if your goal is to build muscle and burn fat at the same time. The key is to find what works best for you and to stick with it.
One approach is to do a split routine where you focus on one body part per day. For example, you could train chest and triceps on Monday, back and biceps on Tuesday, legs on Wednesday, and shoulders on Thursday. This allows you to really focus on each body part and get the most out of your workouts.
Another approach is to do full-body workouts 3-4 times per week. This works well if you don’t have a lot of time to commit to working out or if you want to keep things simple. Full-body workouts also help you keep your heart rate up which can help with fat burning.
Whatever approach you decide to take, make sure that you’re consistent with it. Consistency is key when trying to build muscle and burn fat at the same time.
Supplements for Building Muscle and Burning Fat
There are a few key supplements that can help you build muscle and burn fat at the same time. These include:
Protein Powder: Protein is essential for building muscle, so protein powder is a great way to make sure you’re getting enough. Look for a quality whey protein powder that is low in sugar and carbs.
Creatine: Creatine is a popular supplement for athletes and bodybuilders, as it can help to increase energy levels and improve performance. It can also help you build muscle and burn fat more effectively.
Beta-Alanine: Beta-alanine is an amino acid that has been shown to improve exercise performance and increase muscle mass. It can also help you burn fat by increasing your metabolism.
Conclusion
Building muscle and burning fat at the same time is not an easy task but it can be done. With clear goal setting, a well-structured diet plan as well as regular exercise and tracking of your progress, you will be able to build muscle and burn fat simultaneously. Although it may take some time to see noticeable results, in the long run this process can help you achieve a leaner body with increased strength and confidence. Remember – consistency is key!
Author
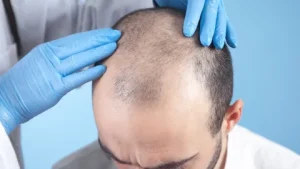
Thick, vibrant hair is the crown of beauty and a primary source of self-confidence. With the tremendous technological advancements in the field of cosmetic medicine, restoring this crown has become accessible with impressive results. Hair transplant in Dubai stands out as a global gateway for anyone seeking radical solutions to baldness and hair loss. The city combines world-class medical expertise with cutting-edge technologies to offer patients completely natural-looking and lifelong results.
Dubai leading the world in hair transplantation
Dubai didn’t become a leading destination by chance, but thanks to an ambitious strategy that transformed it into a hub for medical innovation. When searching for hair transplant centers, you’ll find that Dubai stands out for:
-
High medical expertise: Attracting the best surgeons and doctors from around the world, who have extensive experience in dealing with various types of baldness.
-
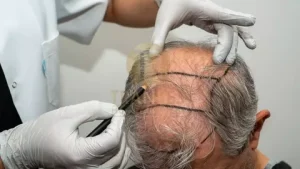
Modern techniques: Relying on techniques such as Follicular Unit Extraction (FUE) and Direct Implantation (DHI), which provide extreme precision and make the process less invasive and faster in recovery.
-
Regulatory environment: Strict oversight by the Dubai Health Authority ensures that the patient receives medical services in accordance with the highest international standards of sterilization and safety.
Techniques that restore your self-confidence
Hair transplant centers in Dubai use the latest tools that ensure a natural distribution of follicles:
DHI (Direct Hiring) technology
This technique is considered the “crown jewel” of hair transplant technology, allowing the surgeon to implant the follicle directly into the recipient area without the need for pre-drilled channels. This reduces the follicle’s time outside the body, thus raising its growth success rate to record levels.
FUE (Follicular Unit Extraction) technique
This method is characterized by not leaving large linear scars, as the follicles are harvested individually from the donor area, which makes the recovery period very quick and allows the patient to return to his daily life within a few days.
Choose the most suitable center
With so many options, here are the key points to ensure you make the right decision:
-
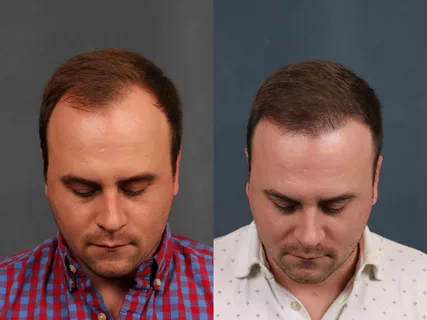
Check the professional record: Don’t be shy about asking for photos of previous cases that the center has handled.
-
Consultation session: A good center is one that takes the time to examine your scalp, assess the quality of the donor area, and discuss realistic expectations.
-
Teamwork: Ask about the medical team that will assist the doctor, as a successful operation depends on harmonious teamwork.
-
Follow-up programs: Look for a center that offers a post-operative follow-up plan to ensure the health of the transplanted follicles.
The journey of hair restoration
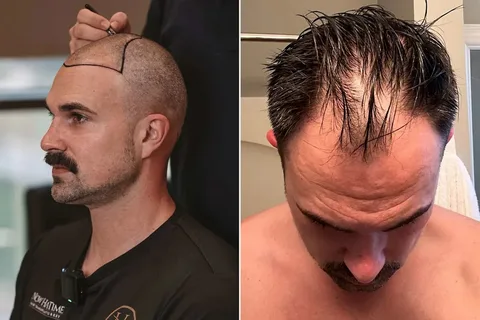
The journey begins in Dubai with a comfortable environment and hotel-like amenities designed to eliminate any stress. The doctor will geometrically design the hairline to complement your unique facial features, ensuring the final result looks 100% natural and not “implanted.” After the procedure, you will receive detailed post-operative care instructions, and the clinic will remain in contact with you to answer any questions you may have.
Benefits of investing in your appearance
Restoring your hair isn’t just a change in appearance. It’s a powerful boost to your self-confidence in both your professional and personal life. When you look in the mirror and see the thick hair you’ve always desired, you’ll feel revitalized. This investment in your appearance has an invaluable positive impact on your mental well-being.
Dubai: where medicine meets art
Hair transplant surgeons in Dubai don’t just focus on the surgical aspect; they view the procedure as an art form. The distribution of follicles, the angle of implantation, and the density of the transplant are all carefully considered to achieve the best aesthetic appearance. That suits your personality and age.
Preparing for the final result
Patience is crucial. Hair growth is a natural biological process, and noticeable results begin to appear gradually over the first few months. Reaching their peak after approximately one year. Adhering to post-operative instructions is the surest way to achieve these ideal results.
Technology and comfort in one place
Thanks to the latest technological systems, hair transplantation in Dubai has become a comfortable and safe experience. You not only get thicker hair, but you also receive exceptional medical care in a city that provides you with every comfort and luxury during your stay.
Conclusion!
The dream of regaining thick, attractive hair is a realistic and achievable goal. And the first step towards this goal begins with choosing the right place that values you and guarantees the highest standards of quality. Dubai, with its state-of-the-art centers and distinguished experts, is your ideal destination to transform your appearance for the better. If you’re ready to embark on this journey and begin a new chapter in your life. The path starts with contacting a reputable and experienced. Cosmetic clinic in Dubai that offers the best surgical and cosmetic consultations. Begin your journey today and discover why Dubai is your sure gateway to achieving the hair you deserve and desire.
Author
Dubai has become one of the most trusted global destinations for cosmetic treatments. It combines advanced medical technology with luxury healthcare services. Because of this combination, many people now travel to the city specifically for hair restoration procedures. At the same time, patients are also pleasantly surprised that hair transplant cost in Dubai are more flexible and competitive than they expect.
If you are considering restoring your hairline, understanding the cost structure is essential. It helps you plan better, avoid hidden surprises, and choose the right clinic with confidence. In this guide, we will break down everything you need to know about pricing, influencing factors, and the patient journey.
Hair Transplant Costs in Dubai
Hair transplant pricing is not random. Instead, clinics calculate the cost based on several technical and medical factors. Each patient receives a customized treatment plan depending on their level of hair loss and desired density. A key factor is the amount of grafts needed.
A graft contains one or more hair follicles. Therefore, a larger bald area requires more grafts, which increases the total cost. On the other hand, smaller areas require fewer grafts and are more affordable.
Another key factor is the technique used during the procedure. Advanced methods such as FUE (Follicular Unit Extraction) and DHI (Direct Hair Implantation) are more precise and modern. These techniques deliver natural-looking results, but they may cost more due to the time, skill, and equipment involved.
The surgeon’s experience also plays a major role. Highly skilled specialists with international training or strong reputations usually charge higher fees. However, patients often prefer experienced surgeons because they provide safer procedures and more natural outcomes.
In addition, many clinics in Dubai offer complete packages. These may include consultation, pre-operative tests, post-treatment care, and even PRP sessions to boost hair growth. These packages often provide better value compared to paying for each service separately.
Average Hair Transplant Prices in Dubai
The cost of a hair transplant in Dubai varies depending on the complexity of the case. For smaller areas of hair loss, prices typically start from around AED 6,999. These cases usually require fewer grafts and shorter treatment time.
For medium to larger areas, costs can rise significantly. On average, patients may pay between AED 10,000 and AED 15,000. This range is common for individuals who need moderate coverage and density improvement.
For advanced cases that require high-density transplantation or full scalp coverage, prices can go up to AED 18,000 to AED 25,000 or more. These procedures require a larger number of grafts and longer surgical time.
Although prices may vary, Dubai remains competitive compared to other international destinations. Patients benefit from high-quality care, advanced technology, and strict medical regulations that ensure safety.
What Affects Hair Transplant Pricing?
Several factors influence the final cost of a hair transplant. Understanding them helps you make an informed decision.
- First, the extent of hair loss matters. More severe hair loss requires more grafts, which increases the price.
- Second, the technique used affects the cost. FUE and DHI are more advanced than traditional methods, so they may cost more.
- Third, clinic reputation and location also matter. Premium clinics with modern facilities often charge higher prices due to better service and technology.
- Fourth, additional treatments like PRP therapy or laser sessions may increase the overall cost but improve results.
- Finally, aftercare services and follow-up visits are also included in some packages, adding value to the treatment.
The Patient Journey
Next comes the procedure itself. It is usually performed under local anesthesia, so patients remain comfortable throughout the process. Depending on the number of grafts, the procedure may take several hours.
After the transplant, the recovery phase begins. Patients receive detailed aftercare instructions to protect the newly implanted follicles. Clinics also schedule follow-up visits to monitor growth and healing. Over the next few months, new hair gradually begins to grow. Full results typically appear within 6 to 12 months.
Why Dubai Is a Preferred Choice
Dubai has strict medical regulations governed by the Dubai Health Authority (DHA). These standards ensure that clinics maintain high levels of safety, hygiene, and professionalism. In addition, the city is known for its modern infrastructure and advanced healthcare technology. Clinics use the latest tools and techniques to deliver natural-looking results with minimal discomfort.
Another advantage is flexibility in payment options. Many clinics offer installment plans or customized packages, making the treatment more accessible. Patients also benefit from world-class hospitality and a comfortable recovery environment, which adds to the overall experience.
Choosing the Right Clinic Matters
Selecting the right clinic is one of the most important decisions in your hair transplant journey. A good clinic will not only offer competitive pricing but also prioritize safety and natural results. It is important to check the surgeon’s experience, patient reviews, and before-and-after results. Transparency in pricing is also a key factor to consider.
While affordability is important, quality should always come first. A successful hair transplant is an investment in your appearance and confidence.
Final Thoughts
Hair transplant costs in Dubai vary depending on multiple factors such as graft count, technique, and surgeon expertise. However, the city offers a balanced combination of quality, safety, and affordability.
With advanced medical technology and highly skilled professionals, Dubai continues to be a top destination for hair restoration treatments. If you are planning to restore your hair, take the time to research your options carefully. A well-planned decision will ensure that you achieve natural, long-lasting results that enhance your confidence and overall appearance.
Author
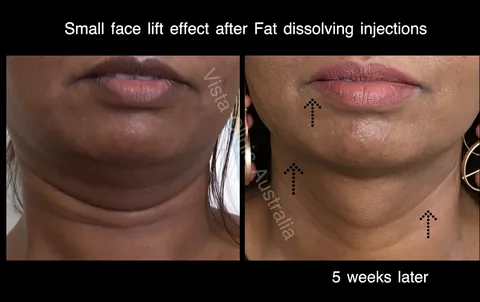
Slimness and achieving a harmonious figure that highlights the body’s curves are among the most important aspects of beauty that many people seek nowadays. Despite adhering to a healthy lifestyle and exercising regularly, the waist and buttocks areas remain among the most prone to storing localized obesity and stubborn fat that is difficult to respond to with traditional solutions. This is where non-surgical medical technology comes in to provide the optimal and fastest solution. Fat-dissolving injections in Dubai represent a real breakthrough in the world of body sculpting and contouring with complete safety and proven effectiveness, allowing individuals to get rid of annoying lumps and achieve a sculpted and defined waist without having to go through the difficulties of surgery or long recovery periods.
Medical concept of Fat-Dissolving Injections
The technique of fat-dissolving injection, scientifically known as chemical lipolysis (Injection Lipolysis), is based on an innovative medical method that involves introducing liquid compounds specifically designed and approved by health authorities directly into the depth of the fat layer located under the skin in the targeted areas.
The primary active ingredient in these injections is deoxycholic acid, a compound that mimics the structure of natural bile acids produced by the liver to break down and digest stubborn dietary fats. When precisely injected into pockets of stubborn fat in the waist and buttocks, this substance immediately begins to destroy the outer cell membrane of the fat cells, transforming the stored solid fat into a microscopic liquid emulsion. The body’s natural lymphatic system then collects and safely drains this fluid, which is subsequently eliminated from the body as a metabolic waste product over the weeks following the session.
Challenge of localized obesity in the waist and buttocks
The fat cells in the waist (love handles) and buttocks areas have a special biological nature that makes them highly resistant to natural burning processes; they contain cellular receptors that prevent the breakdown of fats as easily as facial or chest fat.
Therefore, many people notice that even with overall weight loss, the waistline remains prominent and the buttocks retain some uneven lumps that detract from the appearance of clothing. This is where fat-dissolving injections act as a highly precise sculpting tool, where the doctor disregards the overall weight and focuses solely on breaking down these stubborn fat deposits to reshape the curves smoothly and attractively, in line with the patient’s aspirations.
Common types of Fat-Dissolving Injections used
Leading cosmetic clinics offer a range of exceptional treatment options designed to suit medium and large areas of the body, including:
-
Aqualyx injections: These are a very safe and advanced gel compound that is distributed smoothly and evenly under the skin. They are the ideal option for large areas such as waist, abdomen, and buttocks fat, as they effectively break down surface fat cells and facilitate their natural expulsion.
-
Lipo dissolve injections: A popular classic formula based on a combination of phosphatidylcholine with deoxycholate, precisely targeting the breakdown of trapped fat deposits, in addition to its remarkable role in improving the overall appearance of the surrounding skin and reducing the appearance of bothersome cellulite.

Advantages of waist and buttock shaping
The procedure is witnessing record demand from both men and women thanks to its many advantages that combine comfort, effectiveness and safety:
- A safe alternative to liposuction: It completely eliminates the risks of general anesthesia, operating rooms, and the complications of traditional surgery.
- The procedure leaves no scars or surgical incisions because practitioners use very thin, precise needles that do not leave marks or deep scars on the skin’s surface.
- Each session takes only 20 to 30 minutes, and clinicians perform it using a simple topical anesthetic cream to ensure patient comfort, making the experience quick and convenient.
- Patients experience virtually no downtime. They can leave the clinic immediately after the session and resume their normal professional and social activities without needing bed rest or recovery time.
- The body permanently eliminates destroyed fat cells, and these cells do not regenerate in the same area again, which helps maintain long-lasting results as long as patients maintain a stable weight.
Common side effects
Certified medical professionals perform this procedure, which keeps it very safe with a low risk rate. However, as the injected solution interacts with fat cells and breaks down their membranes, patients may experience temporary local reactions. These reactions indicate that the treatment is working and that fat breakdown has begun.
Swelling and bloating: Commonly occurring in the waist or buttocks and lasting for several days, this is a normal reaction that gradually begins to subside.
Redness and minor bruising: These appear as a result of pricking the skin’s surface with very fine needles and disappear spontaneously within a maximum of one week.
Numbness or slight tingling: A temporary and localized sensation in the skin that fades over the first few days after the session.
Important medical tips
To maximize the benefits of the treatment and accelerate the drainage of dissolved fat from the body while protecting the skin and ensuring its uniform shrinkage, doctors recommend following these steps precisely:
-
Drink plenty of water: Consuming at least 2 to 3 liters of water daily stimulates the lymphatic system and blood circulation to expel fatty waste more efficiently and quickly.
-
Applying cold compresses: Placing ice packs wrapped in soft cloth on the injection site during the first 48 hours helps to reduce swelling and puffiness very effectively.
-
Wearing a compression garment: It is highly recommended to wear a body shaper specifically designed for several days after injections, as it effectively reduces swelling and helps the skin to shrink and tighten over the new curves without sagging.
-
Avoid sources of high heat: It is best to stay away from hot baths, saunas, and direct exposure to the scorching sun for a week after the procedure.
-
Commit to a healthy lifestyle: Maintaining a balanced diet that is low in sugars and fats ensures that your sculpting results remain perfect and stable for many years and prevents the enlargement of small remaining fat cells in other areas.
How many sessions will required
The treatment plan and number of sessions vary from person to person based on the size of the fat deposit and the thickness of the fat layer in the waist and buttocks areas. Most patients usually need between 3 and 5 treatment sessions to achieve the desired result. The doctor separates the session from the other by a period of time ranging from 4 to 6 weeks to give the body enough time to fully drain the previous fat and recover completely.
The first tangible results begin to appear gradually after about 3 to 4 weeks from the first session, as the patient notices a smaller waist size and a decrease in clothing sizes, while the final dazzling results and the perfectly sculpted and defined figure become apparent after the completion of all recommended sessions in about two to three months, so that you can enjoy a slim and attractive appearance that enhances your attractiveness and self-confidence.
Author


Comme des Garçons Limited Edition Drops: Streetwear Influence

Handcrafted Interior Design: Elevating Modern Spaces with Texture

Parquet Flooring: Elegant, Durable, and Stylish Wooden Flooring

Hair Transplant: Advanced Techniques for Natural Results

Dental Implant Drill: Precision, Design, and Material

Hair Transplant Cost in Dubai: Complete Guide to Pricing

Invoice Trading: Top Benefits for MSMEs to Improve Cash Flow

1Win Clone Script: Build a Profitable Online Betting Platform

Fat-Dissolving Injections: Non-Surgical Body Contouring

Working Capital Loan in India: Meaning, Types & Benefits

Cybersecurity Consulting Company SequelNet Provides Critical IT Support Services to Medical Billing Firm, Medical Optimum

Team Communication Software Transforms Operations at Finance Innovate

Project Management Tool Transforms Long Island Business

How Alleviate Poverty Utilized IPPBX’s All-in-One Solution to Transform Lives in New York City

Breast Cancer: The Imperative Role of Mammograms in Screening and Early Detection

Unstoppable Collaboration: D.C.’s Citi Open and Silicon Valley Classic Unite to Propel Women’s Tennis to New Heights

Embracing Renewal: Sizdabedar Celebrations Unite Iranians in New York’s Eisenhower Park

The Benefits of Starting a Side Hustle for Financial Freedom

New Blood Donation Screening Questions What You Need to Know

Stylishly Timeless: The 5 Types of Sandals You Need in Your Closet
-

 Business3 years ago
Cybersecurity Consulting Company SequelNet Provides Critical IT Support Services to Medical Billing Firm, Medical Optimum
-
Business3 years ago
Team Communication Software Transforms Operations at Finance Innovate
-
Business3 years ago
Project Management Tool Transforms Long Island Business
-
Business3 years ago
How Alleviate Poverty Utilized IPPBX’s All-in-One Solution to Transform Lives in New York City
-
health3 years ago
Breast Cancer: The Imperative Role of Mammograms in Screening and Early Detection
-
Sports3 years ago
Unstoppable Collaboration: D.C.’s Citi Open and Silicon Valley Classic Unite to Propel Women’s Tennis to New Heights
-
Art /Entertainment3 years ago
Embracing Renewal: Sizdabedar Celebrations Unite Iranians in New York’s Eisenhower Park
-
Finance3 years ago
The Benefits of Starting a Side Hustle for Financial Freedom


