
Beauty Fitness
Olaplex’s Journey from Garage Startup to Billion-Dollar Beauty Brand – And Why It May Not Last Forever

Have you ever heard of Olaplex? If not, let me introduce you to the billion-dollar beauty brand that started in a garage. Olaplex is a hair care company that has revolutionized the way we treat our hair. With its patented bond-building technology, Olaplex promises to repair and strengthen damaged hair, making it healthier than ever before. But with so many products on the market promising miraculous results, is Olaplex really worth all the hype? In this blog post, we’ll explore everything there is to know about Olaplex – from its different product types to how best to use them – and delve into whether or not this beloved brand will continue to reign supreme in the world of haircare.
What is Olaplex?
Olaplex is a hair care brand that was founded in 2014 by Dean Christal. Its proprietary technology aims to repair and protect damaged hair, particularly from the effects of coloring and heat styling. The company’s first product, Olaplex No. 1 Bond Multiplier, is designed to be mixed with bleach or color treatments to minimize damage during the process.
Olaplex claims that its products work by seeking out broken bonds in hair strands and reconnecting them, resulting in stronger and healthier hair. This unique approach has gained Olaplex a cult following among beauty enthusiasts and celebrities alike.
Since its inception, Olaplex has expanded its product line to include shampoo, conditioner, leave-in treatments, and more. Each product contains the brand’s patented bond-building technology for optimal results.
Despite being a relatively new player in the beauty industry compared to other established brands like L’Oreal or Pantene Pro-V., Olaplex quickly rose through the ranks due to its innovative technology and impressive results on various hair types.

The Different Types of Olaplex Products
Olaplex, a revolutionary hair care brand that has been taking the beauty industry by storm, offers different types of products to cater to various hair needs. Here’s a breakdown of each type:
1. Olaplex No. 1: This is the Bond Multiplier, which is used in salons during chemical treatments such as coloring or perming.
2. Olaplex No. 2: The Bond Perfector is applied after rinsing out the color or perm solution and left for at least ten minutes to work its magic on repairing broken bonds.
3. Olaplex No. 3: The Hair Perfector can be used between salon appointments to maintain healthy hair with regular use once a week.
4. Olaplex No. 4 and No.5: These are part of the shampoo and conditioner line designed for daily use to nourish and protect your locks from further damage.
Using these different types of products together will help strengthen and repair damaged hair while also preventing future breakage – resulting in healthier-looking tresses!
Pros and Cons of Olaplex
Olaplex has become a popular choice for people who want to achieve healthy and strong hair. However, like any other product, it has its own set of advantages and disadvantages.
One of the most significant benefits of Olaplex is that it can repair damaged hair effectively. It works by reconnecting broken disulfide bonds in the hair, which makes it stronger and more resistant to breakage.
Another advantage is that Olaplex can protect your hair from damage caused by chemical treatments such as coloring or perming. Adding Olaplex to these treatments can reduce the risk of breakage and help maintain healthier-looking hair.
On the downside, some people may find Olaplex products expensive compared to other similar brands on the market. Additionally, while it can make your hair feel softer and smoother after use, some users report experiencing dryness or brittleness if they overuse the product.
It’s also worth noting that while Olaplex can be effective for many people with different types of hair textures and concerns, not everyone will see dramatic results. Some people may not experience much difference in their overall hair health after using the product regularly.
While there are both pros and cons to using Olaplex products, many users find them beneficial for improving their overall hair health when used correctly according to instructions provided by professionals.
What hair type is best for Olaplex?
Olaplex is suitable for all hair types, but it’s especially beneficial for those with damaged or chemically treated hair. This includes individuals who regularly color, bleach or use heat styling tools on their hair.
If you have dry or frizzy hair, Olaplex can help restore your strands to a healthy and manageable state. It repairs the broken disulfide bonds in your hair caused by chemical treatments, environmental damage or excessive heat exposure.
For those with fine and thinning hair, Olaplex can also be helpful as it strengthens each individual strand from the inside out. This helps prevent breakage and split ends while promoting thicker-looking locks.
However, if you have naturally oily hair that tends to get weighed down easily by heavy products, using too much Olaplex may cause buildup and leave your tresses looking greasy.
Regardless of your natural hair type or texture, incorporating Olaplex into your routine can benefit the overall health and appearance of your locks.
How to use Olaplex
Using Olaplex is a simple and straightforward process that can be done at home or in the salon. The first thing you need to do is choose the type of Olaplex product that suits your needs. There are three types: No. 1 Bond Multiplier, No. 2 Bond Perfector, and No.3 Hair Perfector.
To use No.1, mix it with water in equal parts and apply it to your hair before adding any other treatment or color products. Leave it on for about ten minutes before rinsing thoroughly.
No.2 should be applied immediately after using No.1 for best results as part of an in-salon treatment but can also be used at home as a deep conditioning mask by applying to damp hair and leaving on for as long as possible before shampooing out.
There’s No.3 which is a take-home version of the bond perfector that can be used once weekly between salon visits or whenever needed to maintain healthy-looking locks!
Remember always read instructions carefully!
Olaplex Results
After using Olaplex, many people have reported significant improvements in the overall health and appearance of their hair. Users frequently rave about how soft, shiny, and manageable their hair feels after just a few uses.
One common benefit that users report is less breakage and damage to their hair. This is because Olaplex works by repairing the bonds within the hair shaft that are often damaged by heat styling or chemical treatments.
People with color-treated hair also tend to see great results from using Olaplex products. The treatment helps to maintain vibrant color for longer periods while also nourishing the strands from within.
Another aspect of Olaplex’s effectiveness that makes it stand out among other hair care brands is its ability to work on all types of hair textures, including curly or kinky locks that can be notoriously difficult to manage.
While individual results may vary depending on factors like your particular type of damage or degree of dryness before starting use of these products – many people find them incredibly effective at restoring healthy-looking locks!
Conclusion
Olaplex has had a remarkable journey from a garage startup to a billion-dollar beauty brand. Its innovative technology and quality products have revolutionized the hair care industry, making it easier for people to maintain healthy and beautiful hair. While Olaplex has been highly successful in recent years, there is no guarantee that its success will continue forever.
The hair care market is highly competitive, with new brands emerging regularly. To remain relevant, Olaplex must continue to innovate and improve its offerings while staying true to its core values of quality and effectiveness.
Despite this uncertainty about the future of the brand, one thing remains certain: Olaplex’s impact on the industry will be long-lasting. Its revolutionary approach has changed how we think about hair care products and paved the way for other brands to follow suit.
If you’re looking for an effective solution for damaged or chemically treated hair, then giving Olaplex a try may just be what your locks need!
Author
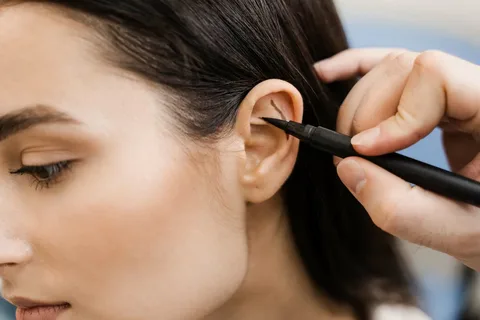
Prominent ears, which people often call “bat ears,” represent a common anatomical variation. In these cases, the ears sit at a wider angle from the head than average. While this condition does not affect hearing or physical health, the aesthetic impact can feel significant. Many cultures highly value facial symmetry, and protruding ears can disrupt that balance. Ear Reshaping Surgery in Dubai offers a definitive medical correction for this trait. Surgeons utilize advanced techniques to “pin” the ears back, creating a more recessed and natural-looking profile.
What is Ear Reshaping Surgery in Dubai for Protrusion?
Clinical protrusion occurs when the distance between the ear rim and the side of the head exceeds two centimeters. Usually, an underdeveloped antithetical fold (the inner rim) or an oversized concha bowl (the deep cup) causes this gap. Ear Reshaping Surgery in Dubai serves as the clinical process for reconstructing these specific landmarks.
The surgeon performs the procedure as an outpatient treatment. They focus on structurally repositioning the cartilage to reduce the “fan-like” appearance of the ears. In our clinical experience, correcting protrusion stands as one of the most straightforward yet transformative aesthetic surgeries available today. Patients typically report that the change feels subtle. Friends and family notice the patient looks “better,” but they rarely realize the patient underwent surgery.
How the Procedure Sets Back the Ears
The procedure functions by modifying the spring and shape of the auricular cartilage. The surgeon begins by making a discreet incision hidden in the crease behind the ear. Through this opening, they access the cartilage framework.
The surgeon then uses internal, permanent sutures to “bend” the ear backward. If they encounter particularly stiff cartilage, they may employ “cartilage scoring.” This technique involves creating microscopic abrasions that allow the tissue to take on a new shape without tension. By anchoring these sutures to the dense tissue covering the mastoid bone, the surgeon “sets back” the entire ear structure. This ensures that the results remain structurally sound. It also prevents the natural tendency of cartilage to “spring” back to its original position.

Why Choose Surgery for Prominent Ears?
The surgeon performs this intervention to bring the ears into a standard aesthetic range. Ideally, ears should sit at an angle of roughly 25 to 30 degrees from the head. Ear Reshaping Surgery in Dubai eliminates the “projection” that causes ears to stick out through hair or under hats.
This surgery serves as an essential tool for restoring facial balance. Ears that protrude too far can make the head appear wider or the face look asymmetrical. Beyond simple pinning, the surgeon uses the procedure to define the inner folds. Often, a “bat ear” looks flat and lacks detail. By recreating the antihelices fold, the surgeon gives the ear a more detailed, anatomically correct shape.
The Long-Term Benefits of Correction
Choosing to undergo surgery for protrusion offers several significant advantages:
-
Symmetrical Profile: The surgeon ensures both ears recessed to the same degree for a balanced look.
-
Natural Contour: Modern techniques avoid the “plastered to the head” appearance. Instead, they maintain a soft, natural curve.
-
Permanent Results: A single procedure provides a lifetime of correction.
-
Psychological Confidence: The surgery removes a frequent source of self-consciousness in social and professional life.
-
Hidden Scarring: The surgeon tucks all surgical marks away in the shadow behind the ear.
Identifying Ideal Candidates
The ideal candidate for Ear Reshaping Surgery in Dubai includes anyone over the age of five who feels bothered by their ear projection. For adults, the surgery finally addresses a trait they may have hidden for decades. For children, it represents a proactive step toward a more confident school experience.
During the consultation, the medical team evaluates the “spring” of your cartilage. They also measure the depth of your conchal bowl. This assessment helps them determine if a simple fold or a cartilage reduction offers the best path forward for your specific anatomy.
A Step-by-Step Look at the Pinning Process
The surgical journey follows a precise medical protocol to ensure safety and aesthetic accuracy.
-
Measurement: The surgeon uses calipers to mark the current projection and the target recessed position.
-
Incision: They make a vertical cut behind the ear where the tissue meets the scalp.
-
Cartilage Folding: The surgeon places permanent sutures to create or deepen the antihelical fold.
-
Conchal Setback: If the middle of the ear is too deep, the surgeon sutures it closer to the bone.
-
Final Verification: The surgeon checks the ears from the front to ensure the rim remains visible but no longer protrudes.
-
Bandaging: The team applies a compression wrap to protect the ears during the initial healing phase.
Common Treatment Areas and Corrective Zones
Surgeons focus on specific zones that contribute to the “bat ear” appearance.
| Protrusion Zone | Anatomical Focus | Surgical Correction |
| Superior Crura | The upper part of the ear rim. | Folds the top of the ear closer to the head. |
| Concha Bowl | The deep “cup” of the ear. | Reduces depth to pull the mid-ear inward. |
| Earlobe | The bottom fleshy part. | Ensures the lobe does not flare out. |
Cost Factors and Clinical Expertise
The investment in Ear Reshaping Surgery in Dubai reflects the intricacy of the ear’s cartilage. Stiff ears or those with multiple structural issues require more time and precision. When you choose a clinic with high standards, you pay for an expert who understands balance. They will not over-correct the ears. The true value lies in a result that looks natural and lasts a lifetime without the need for future revisions.
The Recovery Timeline
Patients typically report that the first week involves the most adjustment.
-
Days 1–3: You wear a bulky headband. Your ears may feel tight or throb slightly during this time.
-
Week 1: The surgeon removes the dressing. You can immediately see the new, closer position.
-
Weeks 2–6: You must wear a soft headband at night. This protects the internal sutures while you sleep.
-
Month 3: The ears fully “settle.” They will feel firm, natural, and permanent.
Safety and Long-Term Maintenance
The medical team maintains safety through sterile techniques and expert execution. Common side effects like temporary bruising or numbness resolve on their own. To maintain your new profile, you should follow these steps:
-
Sleep Carefully: Avoid side-sleeping for the first few weeks to prevent pressure on the sutures.
-
Handle with Care: Be gentle when putting on or taking off glasses or sunglasses.
-
Avoid Sports: Stay away from contact sports for 8 to 12 weeks. This allows the cartilage to harden fully in its new spot.
Conclusion: A More Balanced Future
Correcting “bat ears” provides a safe and effective way to bring balance to your facial features. It often brings a new level of confidence to your personal and professional life. Through the precision of Ear Reshaping Surgery in Dubai, you can achieve a profile that feels proportionate. Our team provides the medical excellence and care needed for a successful transformation.
Author

For those seeking refinement without dramatic change, Rhinoplasty in Islamabad offers solutions designed to enhance the nose while maintaining a natural appearance. Natural-looking rhinoplasty focuses on subtle adjustments that complement the patient’s facial features rather than creating a dramatically different nose. With modern surgical techniques, advanced planning, and skilled surgeons, patients can achieve aesthetic improvements that feel effortless and harmonious with their overall look.
Understanding Natural-Looking Rhinoplasty
Natural-looking rhinoplasty emphasizes preserving individual facial characteristics while correcting minor imperfections. Unlike traditional rhinoplasty, which may prioritize drastic changes, this approach aims for:
-
Balanced facial proportions
-
Minimal visible scarring
-
Subtle adjustments that enhance natural beauty
The procedure considers the patient’s facial symmetry, skin thickness, and nasal structure to deliver results that look effortless and authentic.

Key Techniques for Subtle Enhancements
1. Tip Refinement
The nasal tip plays a major role in overall aesthetics. Surgeons carefully reshape the tip using cartilage grafts or minor trimming to create a more refined appearance without over-altering the nose. This ensures a natural projection and contour that complements other facial features.
2. Dorsal Hump Reduction
For patients with a small bump on the nasal bridge, subtle dorsal hump reduction can smooth the profile while maintaining the natural slope of the nose. The goal is a harmonious contour rather than a completely flat bridge.
3. Minor Bridge Adjustments
Adjusting the nasal bridge width or alignment can improve balance and symmetry. Small modifications help correct asymmetry without making the nose look surgically altered.
4. Cartilage Grafting
Cartilage grafting is often used to support or elevate specific areas of the nose. Surgeons use the patient’s own cartilage from the septum, ear, or rib to reinforce the nasal structure. These grafts enable natural shape enhancement while ensuring stability and long-term results.
5. Preserving Facial Harmony
Natural-looking rhinoplasty always considers the relationship between the nose, eyes, lips, and chin. Surgeons carefully evaluate facial proportions to avoid overcorrection and ensure that the nose enhances rather than dominates the face.
Open vs. Closed Rhinoplasty for Subtle Results
-
Open Rhinoplasty: Provides full visualization of nasal structures and is ideal for precise, controlled adjustments. It is often used in revision cases or when multiple subtle enhancements are required.
-
Closed Rhinoplasty: Involves internal incisions with no external scars. Best suited for minor refinements or adjustments where natural results are the priority.
Both techniques can deliver subtle and natural-looking outcomes when performed by an experienced surgeon.
The Role of Pre-Operative Planning
Achieving subtle enhancements requires careful pre-operative planning. Surgeons use detailed assessments, 3D imaging, and facial analysis to determine the optimal modifications. Pre-operative simulation allows patients to visualize potential results and discuss preferences with their surgeon. This collaborative planning ensures realistic expectations and maximizes patient satisfaction.
Recovery and Healing for Natural-Looking Results
Recovery plays a crucial role in the final outcome. Proper care ensures minimal swelling, reduced bruising, and better structural alignment. Typical steps include:
-
Using cold compresses to manage swelling
-
Keeping the head elevated while sleeping
-
Following prescribed medication and care routines
-
Attending follow-up appointments to monitor healing
Patience is essential, as subtle swelling may persist for several months, and final results are usually visible after 6–12 months.
Benefits of Natural-Looking Rhinoplasty
-
Enhances overall facial harmony without a drastic change
-
Provides subtle improvements for a refined appearance
-
Minimizes scarring and invasive procedures
-
Boosts self-confidence with natural results
-
Suitable for patients seeking minor adjustments or first-time rhinoplasty
Choosing the Right Surgeon in Islamabad
Selecting a skilled and experienced surgeon is critical for natural-looking outcomes. Key considerations include:
-
Verified credentials and extensive rhinoplasty experience
-
A portfolio of before-and-after photos demonstrating subtle enhancements
-
Positive patient reviews highlighting natural results
-
Ability to personalize surgical plans based on facial anatomy
An experienced surgeon ensures that the enhancements complement the patient’s unique features while maintaining authenticity.
FAQs About Natural-Looking Rhinoplasty in Islamabad
1. What makes rhinoplasty “natural-looking”?
Natural-looking rhinoplasty prioritizes facial harmony, subtle refinements, and proportionate adjustments, avoiding dramatic changes that appear artificial.
2. How long is the recovery period?
Initial recovery usually takes 1–2 weeks, but subtle swelling may persist for months. Final results are typically visible within 6–12 months.
3. Can minor corrections still improve appearance significantly?
Yes. Even small adjustments to the tip, bridge, or alignment can enhance overall facial balance and make a noticeable difference without dramatic change.
4. Is natural-looking rhinoplasty suitable for first-time patients?
Absolutely. Many patients prefer subtle enhancements for their first rhinoplasty to achieve a refined appearance while preserving their natural look.
5. Are there risks associated with subtle rhinoplasty?
All surgeries carry some risk, including swelling, bruising, or minor asymmetry. Choosing a qualified surgeon minimizes these risks.
6. Can non-surgical rhinoplasty achieve natural-looking results?
Non-surgical options using dermal fillers can create temporary enhancements and minor adjustments, but they cannot achieve structural changes like surgical rhinoplasty.
7. How do I ensure the results remain natural over time?
Following post-operative care instructions, attending follow-ups, and avoiding trauma to the nose help maintain subtle, long-lasting results.
Natural-looking rhinoplasty emphasizes refinement over dramatic change, enhancing both aesthetics and self-confidence. By focusing on subtle enhancements, precise surgical techniques, and personalized treatment plans, patients can achieve a harmonious and authentic appearance. For professional guidance, expert surgeons, and advanced rhinoplasty procedures in Islamabad, SKN Cosmetics offers a trusted clinic with modern facilities, personalized care, and safe, effective results.
Author
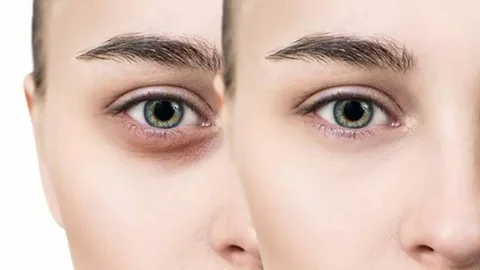
Dark circles under the eyes are a widespread concern for many individuals across Pakistan. These shadows often create a tired, aged, or stressed appearance that doesn’t always reflect how you truly feel. Before diving into a solution, it is vital to understand that the skin around your eyes is the most delicate on your body. Whether the cause is lifestyle-related or biological, professional dark circles treatment in Islamabad offers a path toward lasting results while maintaining the integrity of this sensitive area.
Identifying the Root Causes of Dark Circles
Understanding why these shadows appear is the first step in effective management. Several factors contribute to the darkening of the periorbital region:
-
Lifestyle and Fatigue: Chronic lack of sleep, high stress, and general exhaustion make the skin appear dull and pale. This allows the dark tissues and blood vessels beneath your skin to show through.
-
Genetics and Anatomy: Some people are biologically predisposed to thinner skin or deeper tear troughs. This creates a natural shadow that no amount of sleep can fully erase.
-
Environmental Factors: Excessive screen time leads to eye strain, which can enlarge the blood vessels around the eyes. Similarly, sun exposure triggers the body to produce more melanin, the pigment that provides skin with its color.
-
Aging: As you age, your skin loses collagen and thins. The resulting hollowness makes the underlying blue-tinted blood vessels more prominent.
Natural Methods to Brighten Your Eyes
For those in the early stages of concern, natural remedies can provide a refreshed look without the need for clinical intervention. Consistency is the most important factor when following these home-based routines.
1. Prioritize Rest and Hydration
Sleep is the body’s primary repair mechanism. Aiming for 7–8 hours of quality rest prevents the “puffy” look that casts shadows under the eyes. Additionally, drinking plenty of water ensures the skin remains plump and healthy; dehydration is a leading cause of a sunken, dark appearance.
2. Cold Compresses and Tea Bags
Chilled cucumber slices or cold metal spoons work by constricting dilated blood vessels. This reduces redness and puffiness almost immediately. Alternatively, used green tea bags—chilled in the fridge—provide caffeine and antioxidants that stimulate blood circulation and lighten the skin.
3. Nutritional Support
A diet rich in vitamins C, E, and K is essential for skin elasticity and strength. Vitamin C, in particular, helps in collagen production, while Vitamin K is known for its role in blood clotting and helping with bruised-looking skin under the eyes.

The Advantages of Professional Dark Circles Treatment
While home remedies are excellent for maintenance, they often struggle to eliminate deep-seated pigmentation or structural hollowness. This is where a specialized Aesthetic Clinic in Islamabad becomes essential.
Why choose professional care?
-
Targeted Technology: Clinics use FDA-approved lasers to break down excess melanin or radiofrequency to tighten the skin.
-
Structural Correction: If your dark circles are caused by “hollow eyes,” dermal fillers can lift the area, eliminating the shadow cast by the brow bone.
-
Dermatological Supervision: Professional treatments are overseen by certified experts who customize the intensity of the procedure to match your specific skin type and sensitivity.
-
Efficiency: Unlike natural remedies that take months to show subtle changes, professional sessions provide visible, long-lasting improvements in a fraction of the time.
What to Expect During and After Treatment
Choosing the right clinic in Islamabad involves looking for hygiene, transparency, and expert credentials. A reputable dermatologist will always perform a thorough skin analysis before recommending a specific laser, chemical peel, or injectable treatment.
The Recovery Process
Modern aesthetic procedures prioritize minimal downtime. You may experience slight redness or minor swelling immediately following a laser or filler session, but this typically subsides within 24 to 48 hours. Most patients return to their daily routines the very next day. To maintain your results, it is crucial to use high-quality SPF and follow a gentle skincare regimen as prescribed by your doctor.
Frequently Asked Questions
Q: How quickly will I see a difference? A: Most patients notice an improvement within a few days to two weeks, depending on whether they opted for fillers (immediate) or laser therapy (gradual).
Q: Are these treatments safe for sensitive Pakistani skin types? A: Yes. Modern lasers are calibrated to treat various skin tones safely, specifically targeting pigment without damaging the surrounding tissue.
Q: Can I combine home remedies with professional sessions? A: Absolutely. In fact, maintaining a healthy lifestyle and using cold compresses can extend the life of your professional results.
Conclusion: Investing in Your Confidence
Dark circles do not have to be a permanent feature. By combining healthy lifestyle choices with the precision of a professional dark circles treatment in Islamabad, you can restore a youthful, energetic glow to your face. Whether you are dealing with genetic pigmentation or the effects of a busy lifestyle, modern dermatology offers safe and effective ways to brighten your outlook.
Author


Ear Reshaping Surgery in Dubai: Bat Ear Correction & Procedure

Secure Software Lifecycle Management: Approach to Cybersecurity

Corteiz Clothing: Hoodies, Tracksuits, Cargos & Streetwear Style

House and Land Packages in NSW: Complete Guide for Buyers

Houston Local SEO That Connects Businesses with Customers

Burberry Shirt US: Authentic Styles, Fit Guide & Online Store

Green Ammonia Market Growth: Trends, Technology & Outlook

Best Health Insurance Plan in India List Triggers Debate

Large Cap Funds: Benefits, and How They Build Long-Term Wealth

Why Sp5der Shorts Are Dominating Modern Streetwear Trends

Cybersecurity Consulting Company SequelNet Provides Critical IT Support Services to Medical Billing Firm, Medical Optimum

Team Communication Software Transforms Operations at Finance Innovate

Project Management Tool Transforms Long Island Business

How Alleviate Poverty Utilized IPPBX’s All-in-One Solution to Transform Lives in New York City

Breast Cancer: The Imperative Role of Mammograms in Screening and Early Detection

Unstoppable Collaboration: D.C.’s Citi Open and Silicon Valley Classic Unite to Propel Women’s Tennis to New Heights

Embracing Renewal: Sizdabedar Celebrations Unite Iranians in New York’s Eisenhower Park

The Benefits of Starting a Side Hustle for Financial Freedom

New Blood Donation Screening Questions What You Need to Know

Stylishly Timeless: The 5 Types of Sandals You Need in Your Closet
-

 Business3 years ago
Cybersecurity Consulting Company SequelNet Provides Critical IT Support Services to Medical Billing Firm, Medical Optimum
-
Business3 years ago
Team Communication Software Transforms Operations at Finance Innovate
-
Business3 years ago
Project Management Tool Transforms Long Island Business
-
Business3 years ago
How Alleviate Poverty Utilized IPPBX’s All-in-One Solution to Transform Lives in New York City
-
health3 years ago
Breast Cancer: The Imperative Role of Mammograms in Screening and Early Detection
-
Sports3 years ago
Unstoppable Collaboration: D.C.’s Citi Open and Silicon Valley Classic Unite to Propel Women’s Tennis to New Heights
-
Art /Entertainment3 years ago
Embracing Renewal: Sizdabedar Celebrations Unite Iranians in New York’s Eisenhower Park
-
Finance3 years ago
The Benefits of Starting a Side Hustle for Financial Freedom


