
Home Garden
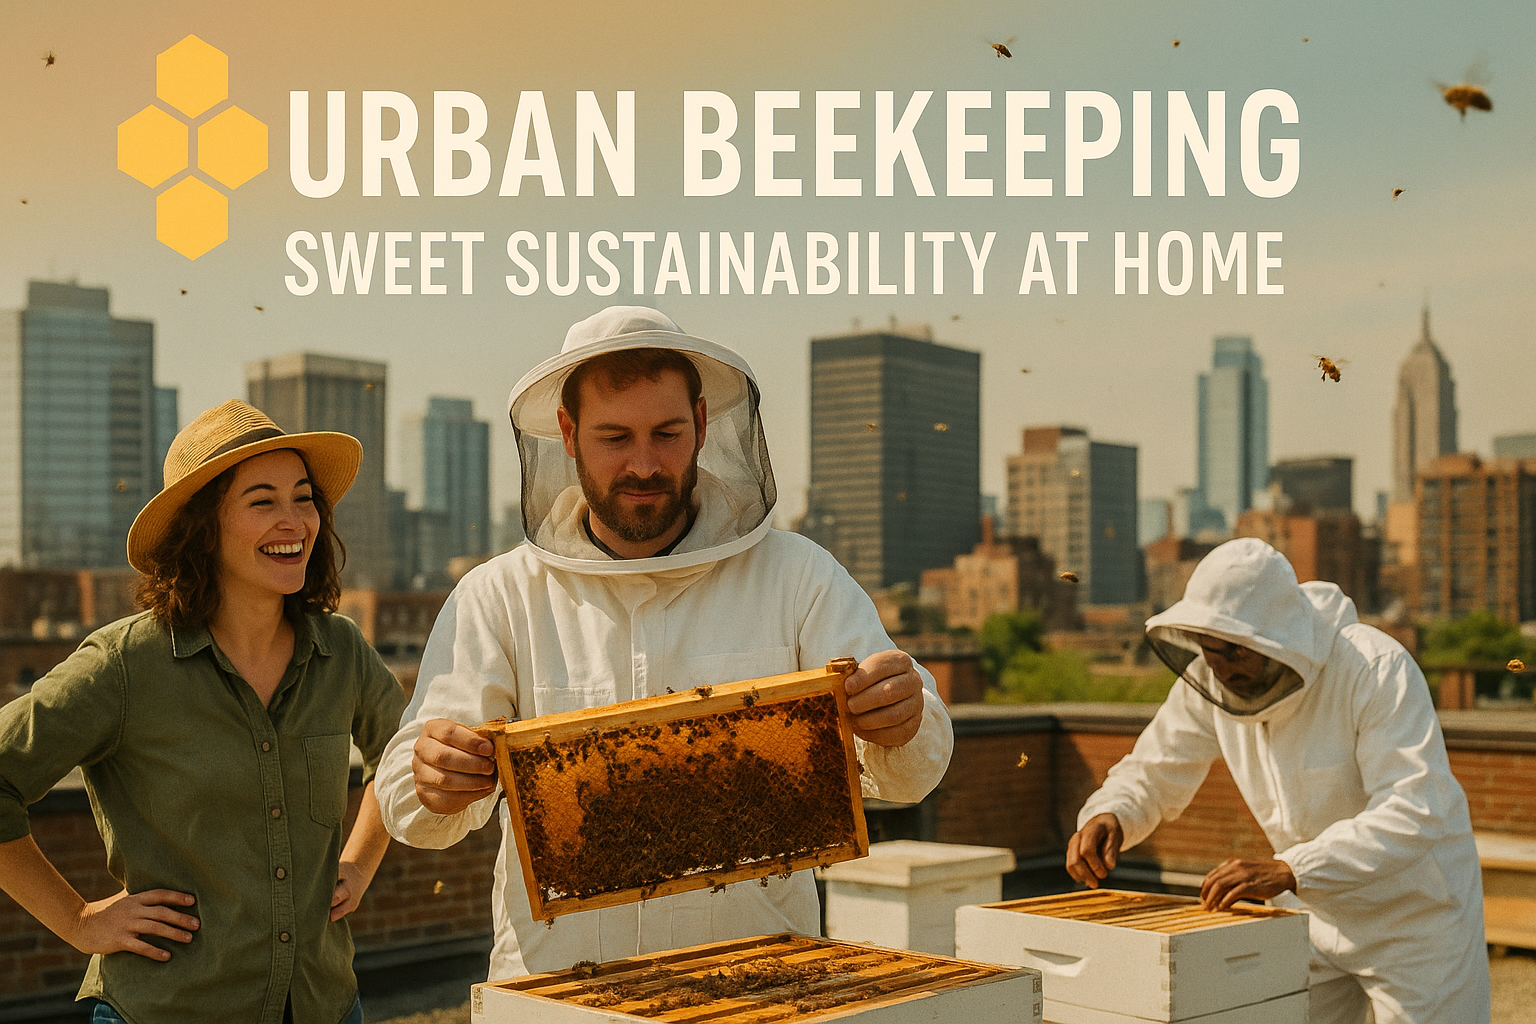
Urban Beekeeping: Sweet Sustainability at Home
By
Reviewed
By Blake River
Introduction
Imagine stepping onto your balcony and seeing a hive buzzing with life. Urban beekeeping brings nature’s sweetness to city living. This trend lets city dwellers practice urban beekeeping and support sustainable gardening. Instead of searching for honey at a store, you harvest your own. Bees pollinate nearby flowers, gardens, and parks. This simple action supports pollinator-friendly spaces in crowded areas.
In the United States in 2025, more people want eco-friendly hobbies. Keeping bees on rooftops, balconies, and small yards fits the bill. It offers fresh honey, fosters wildlife, and connects you with nature. Whether you live in a tall apartment building or a small house, you can join the movement. This article will explain what urban beekeeping is and why it matters. We will cover the benefits, how to get started, practical tips, and how to keep urban bees healthy. You will also find a helpful table comparing hive types. By the end, you will see how easy and rewarding it can be to welcome these busy insects into your urban life.
What Is Urban Beekeeping?

Image by: Yandex.com
Urban beekeeping means keeping honey bee colonies in a city or town. Rather than placing hives on farms or in rural areas, beekeepers set up hives on rooftops, balconies, or small plots of land. These bees collect nectar from urban flowers, trees, and gardens. They return to the hive and make honey.
Unlike keeping pets, beekeeping requires nurturing a small community of insects. Bees work together to build comb, store honey, and care for larvae. A beehive can fit into a space as small as a 1-foot square box. Modern hives often use simple wooden boxes called Langstroth hives. Some urban beekeepers use smaller designs like top-bar hives or flow hives for easy honey extraction.
Live in urban areas offers diverse flowers from parks, street trees, and backyard gardens. Bees find pollen and nectar from lavender, sunflowers, clover, and even flowering trees. Because cities often have fewer pesticides than farms, urban honey can be pure and flavorful. Urban beekeeping also educates neighbors about nature, helps gardens thrive, and supports local ecosystems.
Why Urban Beekeeping Matters

Image by: Yandex.com
Keeping bees in the city supports many goals at once. Here are key reasons why urban beekeeping is important:
- Supports Pollinators: Bees pollinate most fruits, vegetables, and flowers. In cities, green spaces can be limited. Urban hives help maintain pollinator populations. This benefits community gardens, parks, and local farms.
- Produces Local Honey: Urban beekeepers harvest fresh, local honey. Each batch reflects the unique plants in the neighborhood. Local honey can help with seasonal allergies by exposing people to local pollen.
- Builds Green Spaces: Bees need flowers. Urban beekeepers often plant pollinator gardens around hives. This adds color to streets and attracts other beneficial insects like butterflies and ladybugs.
- Educates the Community: Beekeeping teaches people about the urban environments, biology, and sustainability. Schools and community groups often invite beekeepers to show hives. This hands-on education inspires a love of nature.
- Promotes Sustainable Living: Keeping bees fits into a sustainable gardening lifestyle. Making your own honey reduces plastic packaging and transport emissions. Plus, caring for bees encourages eco-friendly habits like composting and planting native flowers.
- Enhances Mental Wellbeing: Interacting with beehives can be calming. Watching bees work improves focus and reduces stress. Many beekeepers say time spent near hives is a form of meditation.
Getting Started with Urban Beekeeping

Image by: Yandex.com
Before bringing bees home, plan carefully. Street beekeeping in a busy city requires extra steps. Follow these guidelines:
1. Check Local Laws
Each city has rules about beekeeping. Some areas allow a limited number of hives per property. Others require registering hives. Research local ordinances online or contact local beekeeping associations. Make sure you comply with safety and zoning requirements.

2. Choose a Suitable Location
Hives need afternoon sun and some shade in the hottest hours. A rooftop, balcony, or backyard corner can work. Make sure people and pets do not walk too close to hive entrances. A hedge, fence, or tall planter can guide bee flight paths upward and away from walking areas.
3. Select the Right Hive Type
Common hive choices include Langstroth hives, top-bar hives, and flow hives. Langstroth hives are versatile and have removable frames for inspection. Top-bar hives use horizontal bars where bees build comb naturally. Flow hives let you harvest honey directly without opening the hive. Consider space, cost, and ease of use when choosing.
4. Buy Quality Equipment
Essential items include protective clothing (veil, gloves, suit), hive tool, smoker, and bee brush. Get a sturdy hive stand to keep hives off the ground. Use food-grade plastic or wooden frames. Ensure your equipment is sanitized to prevent disease.
5. Get Bees from a Reputable Source
Order nucs (nucleus colonies) or packaged bees from a local beekeeper or reputable breeder. Nucs come with a small colony on frames, easy to install in your hive. Packaged bees are loose in boxes and need time to settle. Local bees adapt better to climate and local plants.
6. Learn Bee Biology and Behavior
Understanding basic bee biology helps you care for your hive. Learn about queen roles, worker tasks, and seasonal cycles. Know signs of queen health, brood patterns, and honey flow times. Join a local beekeeping club or take an online course.
7. Prepare Food and Water Sources
In early spring, bees may need sugar syrup until flowers bloom. Also provide a shallow water source with floating cork pieces or stones so bees can land safely. This helps bees cool the hive and feed larvae.
8. Start with One or Two Hives
Don’t overwhelm yourself. Beginning with a single hive helps you learn tasks like inspections, feeding, and pest control. As you gain confidence, consider adding more hives.
Caring for Your Urban Hive
Image by: Yandex.com
Caring for bees involves regular checks and seasonal tasks. Below are steps to maintain a happy colony:
- Regular Hive Inspections: Open your hive every 7–10 days in spring and summer. Look for healthy brood (eggs, larvae, pupae) in neat circles. Check for signs of disease or pests like varroa mites. Ensure the queen is present and laying eggs. Also check honey and pollen stores.
- Provide Feed When Needed: In early spring or late fall, supplement with sugar syrup or pollen patties if nectar flow and pollen are scarce. Do not overfeed; bees need natural sources to remain strong. Feed only when necessary to help colony growth.
- Manage Pests and Diseases: Monitor mites, wax moths, and foulbrood. Use gentle treatments like thymol strips or organic acids for varroa mites. Keep equipment clean and rotate old frames. An integrated pest management approach reduces harm to bees and the environment.
- Harvest Honey Responsibly: Harvest honey only when frames are mostly capped (covered with wax). Leave enough honey—about 10–15 pounds—for the bees to survive winter. Use a bee brush to gently remove bees from frames. Extract honey using a clean extractor.
- Winter Preparations: In fall, reduce hive entrance size to keep out pests and reduce drafts. Add insulation or a hive wrap if your region gets cold. Feed bees so they build up honey stores. Place hives in a location protected from strong winds and heavy snow.
- Harvest Wax and Propolis: Besides honey, you can collect beeswax and propolis. Beeswax makes candles, lip balms, and natural polish. Propolis is the resin bees use to seal cracks. It has antimicrobial properties and can be made into tinctures.
Tips for Urban Beekeeping Success

Image by: Yandex.com
Experience helps, but these tips can fast-track success for new urban beekeepers:
- Join a Local Beekeeping: Club Meeting other beekeepers gives you shared advice and community support. You can observe their hives and learn hands-on techniques. Many clubs offer group hive inspections and mentoring.
- Maintain Good Neighbor: Relations Inform neighbors about your beekeeping plans. A small number of hives does not pose a major risk if proper safeguards are in place. Offer jars of honey as goodwill gestures to show your bees are gentle and beneficial.
- Use Native Plants: Plant flowers suited to your region. Native wildflowers, herbs, and shrubs bloom in sequence, providing bees with a steady food supply from spring through fall. This reduces the need for supplemental feeding.
- Keep Records: Track hive inspections, feeding, treatments, and honey harvests in a simple notebook or app. Notes help you identify patterns such as low honey yields or pest issues so you can improve next year.
- Learn from Online Resources: Websites like Bee Informed Partnership or local extension services share articles and videos on disease management, queen rearing, and more advanced topics. Online forums let you ask questions and learn from global beekeepers.
- Plan for Swarm Prevention: Swarming is when a branch of the colony splits off to form a new hive. Learn to spot signs (like queen cells) and perform splits before a full swarm. This keeps your colony healthy and avoids conflicts with neighbors.
- Honey Extraction Workshops: Attend workshops on honey extraction and processing. You will learn to use an extractor safely, filter honey properly, and check for moisture content. Proper technique ensures pure, long-lasting honey.
Comparative Table: Hive Types in Urban Beekeeping
| Hive Type | Description | Pros | Cons |
|---|---|---|---|
| Langstroth | Stacked boxes with removable frames | Easy to inspect, widely used, modular | Bulkier, heavier, more expensive |
| Top-Bar | Horizontal bars where bees build natural comb | Simple design, close to natural hive | Harder to inspect, lower honey yield |
| Flow Hive | Modified Langstroth with tap & flow system | Easy honey harvesting, less disturbance | Higher cost,complex parts to maintain |
| Warre | Vertical boxes with fixed combs | Low maintenance, insulated | Harder to harvest, limited module options |
| Nuc | Small nucleus colonies for starting new hives | Ideal for beginners, less risk | Limited honey production, small space |
Conclusion
Urban beekeeping is a simple yet powerful way to practice sustainable living at home. By setting up a hive on your balcony, rooftop, or backyard beekeeping, you help save local bee populations and create pollinator-friendly spaces. You also harvest pure, local honey and learn about nature firsthand. With the right research, legal permits, and mindful consumption, keeping bees in the city is safe and rewarding. Just follow best practices, choose the right hive type, and engage with your community. As cities grow, urban beekeeping will play a vital role in making green open spaces thrive, connecting people with nature, and ensuring future generations enjoy healthy gardens and fresh honey.
Call to Action
Ready to start your urban beekeeping journey? Visit our website for beginner guides, hive kit recommendations, and local beekeeping club contacts. Take the first step toward sweet sustainability set up your own city hive today!
Author

Silk curtains are more than just window treatments — they’re a statement of sophistication, luxury, and timeless style. In Dubai, where interior design often reflects modern elegance with a touch of opulence, silk curtains have become increasingly popular for living rooms, bedrooms, and upscale spaces.
In this blog, we’ll explore the beauty, benefits, and considerations of choosing silk curtains for your Dubai home.
What Are Silk Curtains?
Silk curtains are made from silk fabric — a natural fiber known for its glossy sheen, smooth texture, and elegant drape. Available in a range of styles from pure silk to silk blends (like silk–polyester or silk–linen mixes), these curtains bring a luxurious aesthetic that few other fabrics can match.
Whether you choose soft pastel tones or rich jewel hues, silk curtains create a warm, inviting ambience that instantly elevates any room.

Why Silk Curtains Are Perfect for Dubai Homes
1. Unmatched Elegance and Luxury
Silk curtains add a sense of grandeur and sophistication to any space. Their natural luster catches light beautifully, creating a soft shimmer that enhances the look of your living room or bedroom. Whether your décor is classic, contemporary, or eclectic, silk curtains fit perfectly — adding depth, texture, and a refined finish.
2. Light Reflection & Soft Ambience
Silk curtains gently diffuse incoming light, creating a soft, warm ambience in your room. Unlike heavier fabrics that block light abruptly, silk allows subtle light through — perfect for living rooms where you want natural light with a soft, elegant feel.
In Dubai’s bright climate, this balance between light and shade makes silk curtains especially appealing.
3. Ideal for Formal & Stylish Spaces
Silk curtains work wonderfully in spaces where aesthetic impact matters most — living rooms, formal seating areas, guest lounges, and master bedrooms. Their refined appearance makes them perfect for homes that emphasize style and presentation.
4. Adds Texture and Visual Depth
Silk’s unique texture adds dimension to interiors. Whether plain, printed, or embroidered, silk curtains add visual interest without overpowering the rest of your décor.
They also pair beautifully with other fabrics — like velvet cushions, linen sofas, or even sheer panel layers — creating a rich, layered look.
Types of Silk Curtains Commonly Used in Dubai
Here are the most popular silk curtain options homeowners choose:
Pure Silk Curtains
Made from 100% natural silk, these are the most luxurious and have the richest sheen and softest drape. Ideal for high-end interiors.
Silk Blend Curtains
Often blended with polyester or linen to improve durability while keeping a luxurious feel — excellent for everyday use.
Silk with Blackout Lining
Perfect if you want elegant style plus light-blocking functionality — ideal for bedrooms or media rooms.
Silk Panels with Sheer Layers
Combining silk curtain with sheer layers gives a versatile solution — luxurious by day, private by night.
Choosing the Right Silk Curtain for Your Living Room
When selecting silk curtain for your Dubai home, consider the following:
Color and Finish
Choose colors that complement your interior palette:
- Neutral Shades: Ivory, cream, beige — perfect for minimal or modern décor
- Rich Tones: Emerald, navy, gold — add luxury and depth
- Pastels: Soft blue, blush pink or champagne — ideal for light, airy rooms
Silk’s natural sheen amplifies color richness, so choose tones that harmonize with furniture, walls, and flooring.
Size and Length
Floor-to-ceiling silk curtains make small rooms feel grander and taller. For large living room windows, long, flowing panels create a dramatic, luxurious effect.
Lining and Functionality
Pure silk is delicate and beautiful but may not block sunlight entirely. Consider lining options:
- Blackout Lining: Blocks light fully — great for privacy and bedrooms.
- Thermal Lining: Helps with temperature control.
- Standard Lining: Reduces light slightly while preserving softness.
Choose lining based on your needs and room usage.
Care and Maintenance Tips for Silk Curtains
Silk is beautiful, but it requires some care:
- Professional Cleaning: Silk should be dry-cleaned — avoid washing at home
- Avoid Direct Sun Exposure: Too much direct sun can fade silk. Use sheers or blinds to protect fabric
- Rotation: Occasionally rotate panels to prevent uneven fading
- Gentle Handling: Pull curtains gently — silk fibers are delicate
Are Silk Curtains Worth It in Dubai?
Absolutely — especially in living rooms and formal spaces. Silk curtain bring:
- Timeless elegance and premium appearance
- Beautiful light diffusion
- A luxurious look that complements contemporary Dubai interiors
- A statement-making window treatment
While silk curtain may cost more than ordinary fabrics, their visual impact and refined appeal make them a worthy investment for homes that value sophistication and style.
Final Thoughts
Silk curtains are more than decorative fabric — they are a design statement. In Dubai’s luxury-focused environment, they complement high-end interiors, create soft lighting effects, and elevate your living space with unmatched elegance.
Whether you’re decorating a villa, apartment, or penthouse, silk curtains can transform your rooms into stylish, inviting spaces that reflect your taste and lifestyle.
Author

It’s 2026, and your living room has quietly transformed into something more versatile than ever before. This space now serves multiple roles throughout each day—morning coffee spot, occasional home office, gathering place for friends, and sanctuary for evening relaxation. Given how much happens here, it makes perfect sense that living room window curtains have evolved alongside these changing needs.
Today’s window treatments do far more than simply cover glass. They respond intelligently to shifting light, contribute to household wellness, and seamlessly blend technological convenience with natural materials. The result feels intuitive rather than complicated—curtains that support real life without demanding constant attention.
Let’s explore what’s shaping living room window curtains in 2026, focusing on practical trends that actually make daily life better.

Five Fresh Trends Defining 2026 Curtains
Sensor-Driven Layered Curtains
Smart home technology has matured considerably, and window treatments reflect this evolution. The dramatic, attention-seeking automation of previous years has given way to something far more subtle and useful: layered systems that work quietly in the background.
Today’s living room window curtains typically combine sheer panels with functional liners that adjust automatically throughout the day. This isn’t about showing off technology—it’s about creating consistent comfort without requiring constant adjustments.
In actual homes, this looks like opacity that shifts based on natural daylight levels. Morning sun might trigger sheers to diffuse light gently, while afternoon glare prompts additional layers to engage. Voice assistants you already use can control settings, and simple apps allow schedule adjustments when needed.
The practical benefits matter most. Homeowners report reduced screen glare during work hours, softer light for evening relaxation, and better temperature control in regions with shifting sunlight patterns. Your living room simply feels more balanced throughout the day, without requiring you to constantly adjust curtains manually.
Bio-Based Performance Weaves
Environmental consciousness in home textiles has matured significantly. The rough, uninspiring eco-friendly fabrics of the past have given way to sophisticated materials that perform beautifully while treading lightly on the planet.
Bio-based and plant-derived weaves now feature prominently in living room window curtains, offering genuine comfort alongside environmental benefits. These aren’t compromise products—they’re thoughtfully engineered textiles designed for real-world performance.
Homeowners increasingly choose these materials for several practical reasons. The breathable fabrics suit both warm and humid climates exceptionally well, preventing that stuffy feeling that some synthetic curtains create. Low-allergen properties make them ideal for households with sensitivity concerns. The subtle natural texture adds visual warmth without heaviness, and these materials typically outlast fast-fashion decorative fabrics significantly.
The result supports both personal wellness and environmental values while looking completely refined and contemporary.
Light-Diffusing Surface Finishes
Bold prints and heavy embroidery have taken a backseat to something more subtle and arguably more sophisticated. Many 2026 interiors feature curtains designed specifically to play softly with natural light.
Light-diffusing living room window curtains incorporate micro-textures and carefully refined weaves that scatter sunlight gently across the room. This creates a luminous quality that changes throughout the day without darkening the space entirely.
Designers appreciate this approach for several compelling reasons. The visual depth created by diffused light makes compact living rooms feel more spacious and open. Harsh glare reduces significantly while maintaining connection to outdoors. The effect works beautifully with neutral, minimalist interiors that characterize contemporary design preferences.
For apartment dwellers especially, this approach proves valuable. Managing natural light carefully in smaller spaces transforms how the entire room feels throughout daylight hours.
Climate-Smart Curtain Hardware
Sometimes the most significant improvements happen where you least expect them. Curtain hardware has stepped into the spotlight in 2026, with rods and tracks becoming intentional design elements rather than hidden afterthoughts.
For living room window curtains, hardware now actively supports both comfort and aesthetics. Improved insulation at mounting points helps maintain indoor temperatures more consistently. Finished options like brushed brass and muted metallic add subtle elegance. Cleaner profiles suit modern interiors perfectly. Better engineering ensures compatibility with layered and motorized systems.
Quality hardware makes an immediate practical difference. Curtains hang better, move more smoothly, and last significantly longer. The entire window treatment feels intentional rather than added as an afterthought, elevating the whole room’s appearance.
Nature-Inspired Intelligent Prints
Patterns have returned to window treatments, but they’re softer and more thoughtful than previous generations of printed curtains. Rather than bold, attention-grabbing motifs, 2026 focuses on patterns drawn from nature’s geometry.
These living room window curtains feature subtle, repeating designs inspired by organic forms—leaves, waves, soft spirals, and natural textures. The effect is quietly detailed rather than dramatically patterned.
Designers increasingly recommend these prints because they create visual calm rather than distraction. They pair easily with solid upholstery and natural wood finishes that characterize contemporary interiors. Interest builds slowly, revealing itself over time rather than announcing itself immediately. This approach aligns perfectly with wellness-led interior concepts that prioritize comfort and relaxation.
Styling Your 2026 Living Room
Creating beautiful window treatments in 2026 relies more on proportion and intention than on decoration alone. A few straightforward principles yield consistently excellent results.
Hanging curtains higher than the window frame immediately creates the illusion of height and grandeur. This simple adjustment transforms how the whole room feels. Choosing floor-length panels ensures a clean, finished appearance that looks professionally designed. Layering sheers with functional curtains provides flexibility for changing needs throughout days and seasons. Letting texture do the work rather than relying on bold colors creates sophisticated interest that wears well over time.
These approaches work because they focus on fundamental design principles rather than fleeting decorative trends.
Practical Setup and Care
Installing modern living room window curtains doesn’t require professional expertise. Simple steps make the process straightforward and results professional.
Mount curtain rods approximately 15 to 20 centimeters above the window frame for optimal proportions. This height creates visual lift while remaining practical for daily use. Set smart layers according to your local daylight patterns—observe how light moves through your space and program automation accordingly. Air natural fabrics monthly to keep them fresh and prevent dust accumulation. Spot clean textured curtains when needed rather than washing frequently, which extends fabric life significantly.
These simple habits keep curtains beautiful longer while reducing unnecessary replacements.
Looking Forward
Living room window curtains in 2026 reflect thoughtful evolution rather than radical change. Smarter layering adjusts automatically to daily light patterns. Breathable bio-based fabrics contribute to household wellness. Finishes work quietly with light rather than fighting against it. Together, these developments create window treatments that feel less like decoration and more like genuine support for daily life.
Imagine curtains that simply feel right throughout every day—filtering harsh sunlight without blocking connection to outdoors, breathing naturally with your home’s environment, and lasting beautifully through seasons of real living. Thoughtful choices like textured natural fabrics, gentle light diffusion, or responsive layers reflect this direction, where quality and care guide design decisions.
This approach isn’t about chasing novelty for its own sake. It’s about choosing living room window curtains that genuinely support how your household lives now and how your home will evolve over time. The best window treatments hold everyday moments and quiet routines gracefully, year after year.
What small change would make your windows feel more like home? Sometimes the simplest adjustments—higher rods, softer fabrics, smarter layers—transform not just how a room looks, but how it feels to be in it.
Author

Outdoor spaces are an essential part of any property, offering both aesthetic appeal and practical value. In a historic city like Canterbury, gardens play a significant role in enhancing lifestyle, property value, and overall visual charm. From small residential gardens to large commercial landscapes, professional Garden landscaping contractors Canterbury provide the expertise required to create outdoor environments that are both beautiful and functional.
Landscaping is not simply about improving appearance. It involves careful planning, skilled construction, and long-term sustainability. Professional contractors combine creativity with technical knowledge to design gardens that suit the property, the environment, and the needs of the owner.

The Importance of Professional Garden Landscaping
Professional landscapers understand how to transform underused or outdated outdoor areas into practical spaces. This might include creating seating areas, improving access, adding greenery, or enhancing privacy. With expert planning, even small gardens can feel spacious and inviting.
Comprehensive Landscaping Services
Garden landscaping contractors offer a wide range of services to meet different requirements. These typically include garden design, groundwork, hard landscaping, soft landscaping, drainage solutions, fencing, and long-term maintenance.
Each project begins with an assessment of the existing space. Contractors consider factors such as soil condition, drainage, sunlight, and layout. Based on this information, they develop a design that maximizes space while ensuring durability and ease of maintenance.
Custom Garden Design for Canterbury Properties
Every property has unique features, and a one-size-fits-all approach rarely works in landscaping. Professional garden designers create bespoke layouts that reflect both the client’s vision and the character of the property.
In Canterbury, traditional gardens with lawns, flower borders, and natural stone features remain popular. At the same time, many homeowners are choosing contemporary designs with clean lines, minimal planting, and modern paving materials.
Contractors work closely with clients to understand how the garden will be used. Whether it’s a family-friendly space, a low-maintenance garden, or an area designed for entertaining, the final design balances style and practicality.
Hard Landscaping: Creating Structure and Functionality
Hard landscaping forms the backbone of any garden design. It includes features such as patios, walkways, retaining walls, steps, and driveways. These elements provide structure and define different areas of the garden.
Professional installation is crucial for hard landscaping features. Proper groundwork ensures surfaces remain level and durable over time. In Canterbury, where rainfall can be frequent, effective drainage is essential to prevent water damage and surface deterioration.
Soft Landscaping: Bringing Gardens to Life
Soft landscaping focuses on natural elements such as plants, lawns, trees, and shrubs.
This ensures healthy growth and reduces maintenance requirements. A balanced planting scheme includes a mix of evergreen and seasonal plants to keep gardens looking attractive throughout the year.
Lawn installation is another key aspect of soft landscaping. Contractors prepare the ground thoroughly to ensure proper drainage and root development. Both natural turf and artificial grass options are available, depending on usage and maintenance preferences.
Sustainable Landscaping Practices
Sustainability is an important consideration in modern landscaping. Professional contractors increasingly use environmentally responsible methods to reduce environmental impact.
This may include installing permeable paving to manage rainwater naturally, selecting native plant species, and designing gardens that require minimal watering. Efficient irrigation systems help conserve water while maintaining healthy plants.
Using recycled materials and reducing waste during construction also contribute to sustainable landscaping practices. These approaches benefit both the environment and the long-term health of the garden.
Enhancing Outdoor Living Spaces
Modern landscaping focuses heavily on creating usable outdoor living areas. Gardens are no longer just decorative spaces; they are extensions of the home.
Professional landscapers design outdoor seating areas, dining zones, and relaxation spaces that encourage year-round use. Features such as decking, pergolas, and raised planters add both functionality and visual interest. https://contrank.com/wp-admin/post-new.php
Lighting is another important element. Well-placed garden lighting enhances safety and creates atmosphere, allowing outdoor spaces to be enjoyed after dark.
Landscaping for Commercial Properties
Garden landscaping contractors also work with commercial clients in Canterbury. Well-maintained outdoor spaces enhance the professional image of businesses, offices, and public spaces.
Commercial landscaping focuses on durability, accessibility, and ease of maintenance. Clear pathways, defined entrances, and attractive planting improve both functionality and appearance.
Professional landscaping can also contribute to employee wellbeing and customer satisfaction by creating pleasant outdoor environments.
Increasing Property Value Through Landscaping
High-quality landscaping is a valuable investment. A well-designed garden can significantly increase property value and market appeal.
Potential buyers often see professional landscaping as a sign of quality and care. Features such as paved patios, structured planting, and neat lawns create a strong visual impact.
In Canterbury’s competitive property market, a landscaped garden can make a property stand out and attract greater interest.
Ongoing Garden Maintenance Services
Many landscaping contractors offer maintenance services to preserve the appearance and health of gardens. These services may include lawn mowing, pruning, weed control, and seasonal planting.
Regular maintenance ensures gardens remain tidy and prevents small issues from developing into costly problems. Professional care helps extend the lifespan of both plants and hard landscaping features.
For homeowners seeking convenience, low-maintenance garden designs reduce upkeep while maintaining visual appeal.
Choosing the Right Landscaping Contractor
Selecting the right contractor is essential for achieving successful results. Skilled landscapers offer effective communication, thorough planning, and open pricing.
Local knowledge is particularly valuable. Contractors familiar with Canterbury understand regional soil conditions, planning considerations, and architectural styles.
Professionalism, reliability, and attention to detail are key indicators of a trustworthy landscaping contractor.
The Landscaping Project Journey
The landscaping process typically begins with a consultation. Contractors discuss ideas, assess the space, and identify requirements. This is followed by a detailed design and project plan.
Once approved, work begins with site preparation and groundwork. Hard and soft landscaping elements are then installed according to the design. Final checks ensure quality standards are met before completion.
Clear timelines and regular updates help ensure a smooth and stress-free experience for clients.
Long-Term Benefits of Professional Landscaping
Professional landscaping provides long-term benefits beyond immediate visual improvement. Durable construction reduces repair costs, while thoughtful design improves usability.
Well-designed gardens also enhance lifestyle quality, offering spaces for relaxation, socializing, and recreation. These benefits contribute to overall wellbeing and property enjoyment.
Conclusion
Professional garden landscaping transforms outdoor spaces into functional and visually appealing environments. By working with skilled contractors, property owners in Canterbury can achieve gardens that reflect their lifestyle, enhance property value, and stand the test of time.
From design and construction to maintenance and sustainability, expert landscaping services provide lasting results that elevate both residential and commercial properties.
Author


Essential Power System Studies for Substation Engineering Projects

CMS Platform vs Custom Website Development: Which Is Better?

Modern Name Plates Dubai – Steel & Acrylic Designs

Laser Hair Removal in Dubai: Understanding the Science

How Editing Transforms a Good Manuscript Into a Publish-Ready Book

Soda Ash Prices Report Analysis — Global Market

How to Combine Editing, Publishing, and Marketing for Maximum Impact

Hydrate & Glow with Skin Boosters in Dubai

Youthful Skin with Salmon DNA & Polynucleotides in Dubai

Financial Fraud Investigation: Corporate Fraud, AI‑Driven Detection, and Blockchain Forensics

Cybersecurity Consulting Company SequelNet Provides Critical IT Support Services to Medical Billing Firm, Medical Optimum

Team Communication Software Transforms Operations at Finance Innovate

Project Management Tool Transforms Long Island Business

How Alleviate Poverty Utilized IPPBX’s All-in-One Solution to Transform Lives in New York City

Breast Cancer: The Imperative Role of Mammograms in Screening and Early Detection

Unstoppable Collaboration: D.C.’s Citi Open and Silicon Valley Classic Unite to Propel Women’s Tennis to New Heights

Embracing Renewal: Sizdabedar Celebrations Unite Iranians in New York’s Eisenhower Park

The Benefits of Starting a Side Hustle for Financial Freedom

New Blood Donation Screening Questions What You Need to Know

Stylishly Timeless: The 5 Types of Sandals You Need in Your Closet
-

 Business3 years ago
Cybersecurity Consulting Company SequelNet Provides Critical IT Support Services to Medical Billing Firm, Medical Optimum
-
Business3 years ago
Team Communication Software Transforms Operations at Finance Innovate
-
Business3 years ago
Project Management Tool Transforms Long Island Business
-
Business3 years ago
How Alleviate Poverty Utilized IPPBX’s All-in-One Solution to Transform Lives in New York City
-
health3 years ago
Breast Cancer: The Imperative Role of Mammograms in Screening and Early Detection
-
Sports3 years ago
Unstoppable Collaboration: D.C.’s Citi Open and Silicon Valley Classic Unite to Propel Women’s Tennis to New Heights
-
Art /Entertainment3 years ago
Embracing Renewal: Sizdabedar Celebrations Unite Iranians in New York’s Eisenhower Park
-
Finance3 years ago
The Benefits of Starting a Side Hustle for Financial Freedom


