
Home Garden
Transform Your Outdoors with Hedge Enclosures
By
Reviewed
By Freya Estelle
Introduction
Have you ever looked at your yard and felt like something was missing? Maybe it lacks privacy. Maybe it doesn’t feel cozy or inviting. Or maybe you just want something greener and more natural than a plain fence. If so, hedge enclosures could be the perfect solution.
These living fences not only give your outdoor space a natural charm, but they also serve practical purposes—like marking boundaries, offering privacy, and reducing noise. And the best part? They’re eco-friendly and beautiful all year round.
In this article, we’ll explore how hedge enclosures can transform your outdoors, whether you live in the city or countryside. Get ready to discover one of the simplest and greenest ways to upgrade your yard.
What Are Hedge Enclosures?
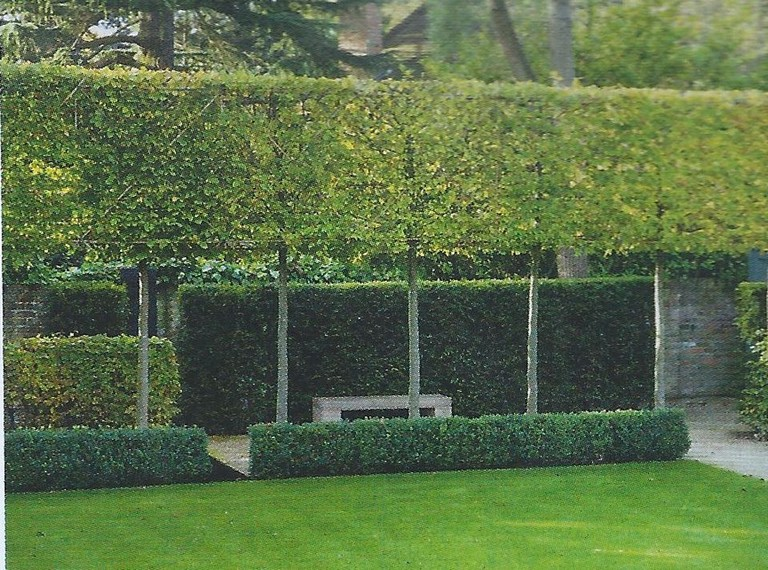
Hedge enclosures are rows of closely planted shrubs or small trees that grow to form a living barrier. Unlike wooden or metal fences, hedges are made of plants such as boxwood, privet, holly, or arborvitae.
They’re often used to:

- Create natural fences
- Divide garden areas
- Provide privacy from neighbors
- Reduce wind and noise
- Enhance landscaping
You can trim them into neat shapes or let them grow wild for a natural look. Either way, they add life and beauty to your yard.
Why Choose Hedge Enclosures?
There are many ways to create fences or borders, so why pick hedges? Here are some strong reasons:
1. Privacy Without Walls
Hedge enclosures give you privacy without blocking light or air. They act like green curtains, shielding your space from curious neighbors or busy streets.
2. Eco-Friendly and Sustainable
Unlike plastic or metal fences, hedges are living plants. They absorb carbon dioxide, produce oxygen, and support birds and butterflies.
3. Beautiful Year-Round
Many hedge plants stay green in winter, bloom in spring, and change colors in autumn. This adds interest to your yard in every season.
4. Noise and Wind Barrier
Thick hedge walls help reduce street noise and block strong winds, creating a calm and comfortable outdoor space.
5. Flexible Design Options
From low borders to tall walls, hedge enclosures can fit any yard size or style. You can mix plant types or shape them creatively.
Best Plants for Hedge Enclosures
Choosing the right plant is key to creating a beautiful and lasting hedge. Here are some popular choices:
| Plant Name | Growth Type | Features | Maintenance Level |
|---|---|---|---|
| Boxwood | Evergreen | Dense, great for shaping | Low |
| Privet | Semi-evergreen | Fast-growing, dense foliage | Medium |
| Arborvitae | Evergreen | Tall, narrow, excellent for privacy | Low |
| Holly | Evergreen | Prickly leaves, red berries | Medium |
| Hornbeam | Deciduous | Stays dense even without leaves | Medium |
Each plant has its own charm. Some grow faster, while others need trimming to stay tidy. Pick one that matches your climate and how much time you want to spend caring for it.
How to Set Up a Hedge Enclosure
Building a hedge enclosure takes planning, but it’s simple if you follow a few key steps:
Step 1: Plan the Area
Measure where you want the hedge to grow. Use string or spray paint to mark the line. Make sure there’s enough space for the plants to grow wide and tall.
Step 2: Choose the Right Plants
Pick plants based on your goals—privacy, decoration, or garden layout. Check how tall and wide they grow and how fast they mature.
Step 3: Prepare the Soil
Loosen the soil, remove weeds, and add compost or fertilizer. This gives the plants a healthy start.
Step 4: Plant with Spacing
Plant the shrubs in a straight line, following the spacing rules for each type. Usually, 12 to 24 inches apart is a good rule for dense growth.
Step 5: Water and Mulch
Water the new plants well. Add mulch around the base to keep the soil moist and stop weeds from growing.
Step 6: Trim and Shape
As your hedge grows, trim it regularly to shape it and keep it healthy. The first year is important for setting the shape.
Where to Use Hedge Enclosures
Hedge enclosures work in many outdoor settings. Here are some creative ideas:
🌿 Garden Divider
Use hedges to separate flower beds, veggie patches, or play areas.
🛋️ Outdoor Lounge Privacy
Plant tall hedges around your outdoor sofa or firepit to make it feel like an outdoor room.
🚪 Natural Entryways
Frame your garden path or front gate with trimmed hedges for a welcoming touch.
🐾 Pet Play Zones
Create safe, green spaces for pets to run around without the need for metal or plastic fencing.
Table: Hedge Enclosure vs. Traditional Fence
| Feature | Hedge Enclosure | Traditional Fence |
|---|---|---|
| Appearance | Natural and green | Plain or industrial |
| Privacy | Excellent (with right plants) | Depends on material |
| Maintenance | Needs trimming | Needs painting/repair |
| Cost (Long-Term) | Low after planting | Medium to high |
| Eco-Friendliness | Very high | Low |
| Wildlife Friendly | Yes (birds, insects) | No |
Benefits for the Environment
Hedge enclosures don’t just look good—they help nature, too:
- Clean the air by absorbing pollutants
- Reduce soil erosion
- Provide homes for birds and insects
- Trap dust and reduce heat
In cities, planting hedges can even help lower urban temperatures by adding more green areas.
Common Challenges and How to Overcome Them
Problem: Slow Growth
Solution: Choose fast-growing varieties or plant more closely for quicker coverage.
Problem: Pests or Diseases
Solution: Use organic pest control methods and inspect plants regularly.
Problem: Uneven Growth
Solution: Trim regularly and water evenly to help all plants grow the same way.
Problem: Legal Boundaries
Solution: Check with your local town or homeowners association before planting near property lines.
Conclusion
Hedge enclosures are a smart, natural, and stylish way to transform your outdoor space. Whether you want more privacy, a better garden design, or just a greener yard, hedges offer a beautiful solution that grows with time.
Unlike hard fences, hedges add life, help nature, and improve your home’s charm and comfort. All you need is a little planning, the right plants, and some regular care—and you’ll enjoy the rewards for years.
Now’s the time to turn your yard into a private, peaceful, and green retreat. Let hedge enclosures work their magic.
Author


Author
Silk curtains are more than just window treatments — they’re a statement of sophistication, luxury, and timeless style. In Dubai, where interior design often reflects modern elegance with a touch of opulence, silk curtains have become increasingly popular for living rooms, bedrooms, and upscale spaces.
In this blog, we’ll explore the beauty, benefits, and considerations of choosing silk curtains for your Dubai home.
What Are Silk Curtains?
Silk curtains are made from silk fabric — a natural fiber known for its glossy sheen, smooth texture, and elegant drape. Available in a range of styles from pure silk to silk blends (like silk–polyester or silk–linen mixes), these curtains bring a luxurious aesthetic that few other fabrics can match.
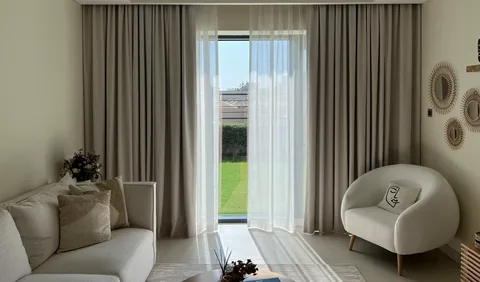
Whether you choose soft pastel tones or rich jewel hues, silk curtains create a warm, inviting ambience that instantly elevates any room.

Why Silk Curtains Are Perfect for Dubai Homes
1. Unmatched Elegance and Luxury
Silk curtains add a sense of grandeur and sophistication to any space. Their natural luster catches light beautifully, creating a soft shimmer that enhances the look of your living room or bedroom. Whether your décor is classic, contemporary, or eclectic, silk curtains fit perfectly — adding depth, texture, and a refined finish.
2. Light Reflection & Soft Ambience
Silk curtains gently diffuse incoming light, creating a soft, warm ambience in your room. Unlike heavier fabrics that block light abruptly, silk allows subtle light through — perfect for living rooms where you want natural light with a soft, elegant feel.
In Dubai’s bright climate, this balance between light and shade makes silk curtains especially appealing.
3. Ideal for Formal & Stylish Spaces
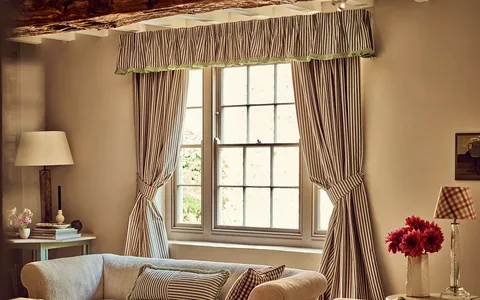
Silk curtains work wonderfully in spaces where aesthetic impact matters most — living rooms, formal seating areas, guest lounges, and master bedrooms. Their refined appearance makes them perfect for homes that emphasize style and presentation.
4. Adds Texture and Visual Depth
Silk’s unique texture adds dimension to interiors. Whether plain, printed, or embroidered, silk curtains add visual interest without overpowering the rest of your décor.
They also pair beautifully with other fabrics — like velvet cushions, linen sofas, or even sheer panel layers — creating a rich, layered look.
Types of Silk Curtains Commonly Used in Dubai
Here are the most popular silk curtain options homeowners choose:
Pure Silk Curtains
Made from 100% natural silk, these are the most luxurious and have the richest sheen and softest drape. Ideal for high-end interiors.
Silk Blend Curtains
Often blended with polyester or linen to improve durability while keeping a luxurious feel — excellent for everyday use.
Silk with Blackout Lining
Perfect if you want elegant style plus light-blocking functionality — ideal for bedrooms or media rooms.
Silk Panels with Sheer Layers
Combining silk curtain with sheer layers gives a versatile solution — luxurious by day, private by night.
Choosing the Right Silk Curtain for Your Living Room
When selecting silk curtain for your Dubai home, consider the following:
Color and Finish
Choose colors that complement your interior palette:
- Neutral Shades: Ivory, cream, beige — perfect for minimal or modern décor
- Rich Tones: Emerald, navy, gold — add luxury and depth
- Pastels: Soft blue, blush pink or champagne — ideal for light, airy rooms
Silk’s natural sheen amplifies color richness, so choose tones that harmonize with furniture, walls, and flooring.
Size and Length
Floor-to-ceiling silk curtains make small rooms feel grander and taller. For large living room windows, long, flowing panels create a dramatic, luxurious effect.
Lining and Functionality
Pure silk is delicate and beautiful but may not block sunlight entirely. Consider lining options:
- Blackout Lining: Blocks light fully — great for privacy and bedrooms.
- Thermal Lining: Helps with temperature control.
- Standard Lining: Reduces light slightly while preserving softness.
Choose lining based on your needs and room usage.
Care and Maintenance Tips for Silk Curtains
Silk is beautiful, but it requires some care:
- Professional Cleaning: Silk should be dry-cleaned — avoid washing at home
- Avoid Direct Sun Exposure: Too much direct sun can fade silk. Use sheers or blinds to protect fabric
- Rotation: Occasionally rotate panels to prevent uneven fading
- Gentle Handling: Pull curtains gently — silk fibers are delicate
Are Silk Curtains Worth It in Dubai?
Absolutely — especially in living rooms and formal spaces. Silk curtain bring:
- Timeless elegance and premium appearance
- Beautiful light diffusion
- A luxurious look that complements contemporary Dubai interiors
- A statement-making window treatment
While silk curtain may cost more than ordinary fabrics, their visual impact and refined appeal make them a worthy investment for homes that value sophistication and style.
Final Thoughts
Silk curtains are more than decorative fabric — they are a design statement. In Dubai’s luxury-focused environment, they complement high-end interiors, create soft lighting effects, and elevate your living space with unmatched elegance.
Whether you’re decorating a villa, apartment, or penthouse, silk curtains can transform your rooms into stylish, inviting spaces that reflect your taste and lifestyle.
Author
It’s 2026, and your living room has quietly transformed into something more versatile than ever before. This space now serves multiple roles throughout each day—morning coffee spot, occasional home office, gathering place for friends, and sanctuary for evening relaxation. Given how much happens here, it makes perfect sense that living room window curtains have evolved alongside these changing needs.
Today’s window treatments do far more than simply cover glass. They respond intelligently to shifting light, contribute to household wellness, and seamlessly blend technological convenience with natural materials. The result feels intuitive rather than complicated—curtains that support real life without demanding constant attention.
Let’s explore what’s shaping living room window curtains in 2026, focusing on practical trends that actually make daily life better.
Five Fresh Trends Defining 2026 Curtains
Sensor-Driven Layered Curtains
Smart home technology has matured considerably, and window treatments reflect this evolution. The dramatic, attention-seeking automation of previous years has given way to something far more subtle and useful: layered systems that work quietly in the background.
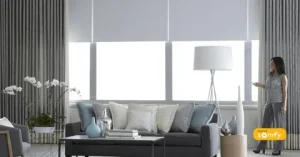
Today’s living room window curtains typically combine sheer panels with functional liners that adjust automatically throughout the day. This isn’t about showing off technology—it’s about creating consistent comfort without requiring constant adjustments.
In actual homes, this looks like opacity that shifts based on natural daylight levels. Morning sun might trigger sheers to diffuse light gently, while afternoon glare prompts additional layers to engage. Voice assistants you already use can control settings, and simple apps allow schedule adjustments when needed.
The practical benefits matter most. Homeowners report reduced screen glare during work hours, softer light for evening relaxation, and better temperature control in regions with shifting sunlight patterns. Your living room simply feels more balanced throughout the day, without requiring you to constantly adjust curtains manually.
Bio-Based Performance Weaves
Environmental consciousness in home textiles has matured significantly. The rough, uninspiring eco-friendly fabrics of the past have given way to sophisticated materials that perform beautifully while treading lightly on the planet.
Bio-based and plant-derived weaves now feature prominently in living room window curtains, offering genuine comfort alongside environmental benefits. These aren’t compromise products—they’re thoughtfully engineered textiles designed for real-world performance.
Homeowners increasingly choose these materials for several practical reasons. The breathable fabrics suit both warm and humid climates exceptionally well, preventing that stuffy feeling that some synthetic curtains create. Low-allergen properties make them ideal for households with sensitivity concerns. The subtle natural texture adds visual warmth without heaviness, and these materials typically outlast fast-fashion decorative fabrics significantly.
The result supports both personal wellness and environmental values while looking completely refined and contemporary.
Light-Diffusing Surface Finishes
Bold prints and heavy embroidery have taken a backseat to something more subtle and arguably more sophisticated. Many 2026 interiors feature curtains designed specifically to play softly with natural light.
Light-diffusing living room window curtains incorporate micro-textures and carefully refined weaves that scatter sunlight gently across the room. This creates a luminous quality that changes throughout the day without darkening the space entirely.
Designers appreciate this approach for several compelling reasons. The visual depth created by diffused light makes compact living rooms feel more spacious and open. Harsh glare reduces significantly while maintaining connection to outdoors. The effect works beautifully with neutral, minimalist interiors that characterize contemporary design preferences.
For apartment dwellers especially, this approach proves valuable. Managing natural light carefully in smaller spaces transforms how the entire room feels throughout daylight hours.
Climate-Smart Curtain Hardware
Sometimes the most significant improvements happen where you least expect them. Curtain hardware has stepped into the spotlight in 2026, with rods and tracks becoming intentional design elements rather than hidden afterthoughts.
For living room window curtains, hardware now actively supports both comfort and aesthetics. Improved insulation at mounting points helps maintain indoor temperatures more consistently. Finished options like brushed brass and muted metallic add subtle elegance. Cleaner profiles suit modern interiors perfectly. Better engineering ensures compatibility with layered and motorized systems.
Quality hardware makes an immediate practical difference. Curtains hang better, move more smoothly, and last significantly longer. The entire window treatment feels intentional rather than added as an afterthought, elevating the whole room’s appearance.
Nature-Inspired Intelligent Prints
Patterns have returned to window treatments, but they’re softer and more thoughtful than previous generations of printed curtains. Rather than bold, attention-grabbing motifs, 2026 focuses on patterns drawn from nature’s geometry.
These living room window curtains feature subtle, repeating designs inspired by organic forms—leaves, waves, soft spirals, and natural textures. The effect is quietly detailed rather than dramatically patterned.
Designers increasingly recommend these prints because they create visual calm rather than distraction. They pair easily with solid upholstery and natural wood finishes that characterize contemporary interiors. Interest builds slowly, revealing itself over time rather than announcing itself immediately. This approach aligns perfectly with wellness-led interior concepts that prioritize comfort and relaxation.
Styling Your 2026 Living Room
Creating beautiful window treatments in 2026 relies more on proportion and intention than on decoration alone. A few straightforward principles yield consistently excellent results.
Hanging curtains higher than the window frame immediately creates the illusion of height and grandeur. This simple adjustment transforms how the whole room feels. Choosing floor-length panels ensures a clean, finished appearance that looks professionally designed. Layering sheers with functional curtains provides flexibility for changing needs throughout days and seasons. Letting texture do the work rather than relying on bold colors creates sophisticated interest that wears well over time.
These approaches work because they focus on fundamental design principles rather than fleeting decorative trends.
Practical Setup and Care
Installing modern living room window curtains doesn’t require professional expertise. Simple steps make the process straightforward and results professional.
Mount curtain rods approximately 15 to 20 centimeters above the window frame for optimal proportions. This height creates visual lift while remaining practical for daily use. Set smart layers according to your local daylight patterns—observe how light moves through your space and program automation accordingly. Air natural fabrics monthly to keep them fresh and prevent dust accumulation. Spot clean textured curtains when needed rather than washing frequently, which extends fabric life significantly.
These simple habits keep curtains beautiful longer while reducing unnecessary replacements.
Looking Forward
Living room window curtains in 2026 reflect thoughtful evolution rather than radical change. Smarter layering adjusts automatically to daily light patterns. Breathable bio-based fabrics contribute to household wellness. Finishes work quietly with light rather than fighting against it. Together, these developments create window treatments that feel less like decoration and more like genuine support for daily life.
Imagine curtains that simply feel right throughout every day—filtering harsh sunlight without blocking connection to outdoors, breathing naturally with your home’s environment, and lasting beautifully through seasons of real living. Thoughtful choices like textured natural fabrics, gentle light diffusion, or responsive layers reflect this direction, where quality and care guide design decisions.
This approach isn’t about chasing novelty for its own sake. It’s about choosing living room window curtains that genuinely support how your household lives now and how your home will evolve over time. The best window treatments hold everyday moments and quiet routines gracefully, year after year.
What small change would make your windows feel more like home? Sometimes the simplest adjustments—higher rods, softer fabrics, smarter layers—transform not just how a room looks, but how it feels to be in it.
Author


Enfants Riches Déprimés x Essentials Hoodie: Luxury Streetwear

Temporary Replacement Vehicles UK: Save Time and Stay Mobile

Low-Cost Family Cars London: Everything You Need to Know

JetBlue Airlines: Contact Number, Chat & Support Guide 2026

Sulphur Price Trend March 2026: Forecast & Regional Analysis

Skin Parasites in Livestock: Prevention & Best Hygiene Solutions

Pool Coping Replacement: Signs, Benefits & Cost Guide

Fully Managed Landlord Services: Save Time, Stress, and Money

Prevent Crushing and Leaning With Custom Corrugated Boxes

Car Battery Replacement: Step-by-Step Guide to Reliable Starts

Cybersecurity Consulting Company SequelNet Provides Critical IT Support Services to Medical Billing Firm, Medical Optimum

Team Communication Software Transforms Operations at Finance Innovate

Project Management Tool Transforms Long Island Business

How Alleviate Poverty Utilized IPPBX’s All-in-One Solution to Transform Lives in New York City

Breast Cancer: The Imperative Role of Mammograms in Screening and Early Detection

Unstoppable Collaboration: D.C.’s Citi Open and Silicon Valley Classic Unite to Propel Women’s Tennis to New Heights

Embracing Renewal: Sizdabedar Celebrations Unite Iranians in New York’s Eisenhower Park

The Benefits of Starting a Side Hustle for Financial Freedom

New Blood Donation Screening Questions What You Need to Know

Stylishly Timeless: The 5 Types of Sandals You Need in Your Closet
-

 Business3 years ago
Cybersecurity Consulting Company SequelNet Provides Critical IT Support Services to Medical Billing Firm, Medical Optimum
-
Business3 years ago
Team Communication Software Transforms Operations at Finance Innovate
-
Business3 years ago
Project Management Tool Transforms Long Island Business
-
Business3 years ago
How Alleviate Poverty Utilized IPPBX’s All-in-One Solution to Transform Lives in New York City
-
health3 years ago
Breast Cancer: The Imperative Role of Mammograms in Screening and Early Detection
-
Sports3 years ago
Unstoppable Collaboration: D.C.’s Citi Open and Silicon Valley Classic Unite to Propel Women’s Tennis to New Heights
-
Art /Entertainment3 years ago
Embracing Renewal: Sizdabedar Celebrations Unite Iranians in New York’s Eisenhower Park
-
Finance3 years ago
The Benefits of Starting a Side Hustle for Financial Freedom


