
Home Garden
Expert-Approved Gardening Hacks Every Green Thumb Should Know

Are you a green thumb looking to take your gardening skills to the next level? Whether you’re a seasoned gardener or just getting started, these expert-approved gardening hacks are sure to help you cultivate the garden of your dreams. From choosing the right soil for your plants to implementing effective pest control strategies, we’ve got you covered. So put on those gardening gloves and get ready to dig in!
The Best Soil for Your Garden
When it comes to gardening, the soil you use can make all the difference in the health and growth of your plants. The best soil for your garden will depend on a variety of factors, including the types of plants you’re growing and your local climate.
One important factor to consider when choosing soil is its texture. Ideally, you want a soil that is loose and crumbly, with plenty of space for air and water to flow through. Sandy soils are great for drainage but may not hold onto nutrients as well as heavier soils.
Another key consideration is pH levels. Most plants prefer a slightly acidic soil with a pH between 6.0 and 7.0, although some may require more alkaline or acidic conditions.
If you’re unsure what type of soil is best for your garden, consider getting a soil test done by a professional or using an at-home testing kit. This can help identify any nutrient deficiencies or imbalances in pH levels so that you can choose the right fertilizer or amendments to promote healthy plant growth.

Ultimately, finding the best soil for your garden takes time and experimentation – so don’t be afraid to try out different blends until you find one that works well in your specific environment!
How to Get Rid of Garden Pests
Garden pests can be a real hassle for any green thumb. Not only do they damage your plants, but they also disrupt the overall aesthetic of your garden. Fortunately, there are several ways to get rid of them without resorting to harsh chemicals.
One effective method is companion planting. This involves planting certain types of plants together that naturally repel pests. For example, marigolds are known to deter aphids and whiteflies while basil helps keep mosquitoes at bay.
Another option is using natural repellents such as garlic or pepper spray. Simply mix chopped garlic or hot peppers with water and allow it to sit overnight before straining and spraying onto your affected plants.
If you’re dealing with larger pests like rabbits or deer, installing fencing around your garden can help prevent them from getting in. Additionally, incorporating physical barriers like netting or row covers can protect individual plants from pesky insects.
Attracting beneficial insects such as ladybugs and praying mantises can also provide a natural defense against garden pests. Planting flowers like daisies and yarrow will attract these helpful bugs while repelling harmful ones.
There are plenty of natural solutions for controlling garden pests without causing harm to your plants or the environment. By implementing some of these methods into your gardening routine, you’ll be able to enjoy a healthy and flourishing garden all season long!
The Perfect Planting Schedule
Proper timing is crucial when it comes to planting your garden. Each type of plant has a specific window in which it should be planted, and planting outside of that window can result in stunted growth or no growth at all. The perfect planting schedule varies depending on the climate you live in, so it’s important to do your research before getting started.
Some plants thrive best when planted during cooler months, while others prefer warmer temperatures. For example, cool-season vegetables like broccoli and kale should be planted in early spring or late summer for optimal growth. On the other hand, warm-season crops like tomatoes and peppers need warm soil temperatures above 60°F to germinate successfully.
It’s also important to consider factors like frost dates and rainy seasons when planning out your planting schedule. In areas with short growing seasons or frequent frosts, starting seeds indoors or using season extenders can help you get a head start on the growing season.
Ultimately, the key to creating the perfect planting schedule is research and preparation. Take note of each plant’s individual needs and requirements, as well as any environmental factors that could affect its growth. With a little bit of effort upfront, you’ll have a bountiful garden come harvest time!
The Benefits of Composting
Composting is an essential part of any sustainable gardening routine. It involves breaking down organic material such as food scraps, leaves, and grass clippings into nutrient-rich soil. There are several benefits to composting that make it an excellent choice for any green thumb.
Firstly, composting reduces waste in landfills by diverting organic materials from the trash. This lowers greenhouse gas emissions from decomposing waste and helps reduce our carbon footprint.
Secondly, compost is a great natural fertilizer that can improve soil health and plant growth. It contains important nutrients like nitrogen, phosphorus, and potassium that plants need to thrive. By using homemade compost instead of synthetic fertilizers or pesticides, you’ll save money while promoting healthy soil.
Thirdly, creating your own compost allows you to control what goes into it – so you know exactly what’s being added back into your garden. You can avoid harmful chemicals found in many commercial fertilizers or pesticides by making your own compost at home.
Incorporating compost into your garden can help retain moisture in the soil which means less watering overall! Compost also has the ability to loosen compacted soils which improves drainage; this will provide more space for roots to grow allowing them access to water and air.
There are numerous benefits to starting your own backyard compost pile including reducing landfill waste and improving soil health naturally – all while saving money on fertilizers!
Expert-Approved Gardening Tips
Expert-approved gardening tips can help you make the most out of your garden and achieve a lush, healthy outdoor space. Here are some valuable insights from experts that every green thumb should know.
Firstly, it’s important to choose plants that will thrive in your specific climate and soil type. This means doing research on what types of plants are native to your area and selecting those that will be best suited for your environment.
Secondly, keep an eye on the weather forecast so you can adjust watering schedules accordingly. Overwatering or underwatering can be detrimental to plant health, so it’s crucial to find the right balance.
Thirdly, pruning is an essential part of gardening maintenance. Regular pruning not only keeps plants looking tidy but also promotes healthy growth by removing dead or damaged branches.
Fourthly, consider using organic fertilizers instead of synthetic ones as they provide long-term benefits for both plant growth and soil health without harmful chemicals.
Don’t forget about the importance of proper lighting when choosing where to place your plants. Understanding their light requirements will ensure they receive enough sunlight to thrive while avoiding damage caused by too much direct sunlight exposure.
By following these expert-approved gardening tips, you’ll be well on your way towards creating a beautiful and thriving garden space!
Conclusion
Gardening can be a very fulfilling and rewarding experience for anyone who wants to get closer to nature. With these expert-approved gardening hacks, you’ll have all the tips and tricks you need to keep your garden thriving throughout the year.
Remember that finding the right soil, keeping pests at bay, following a planting schedule, composting regularly and implementing other expert-approved tips are just some of the things that can help take your gardening skills to new heights.
So go ahead and start putting these tips into action today – before long, you’ll be amazed at just how lush and beautiful your garden has become! Happy Gardening!
Author

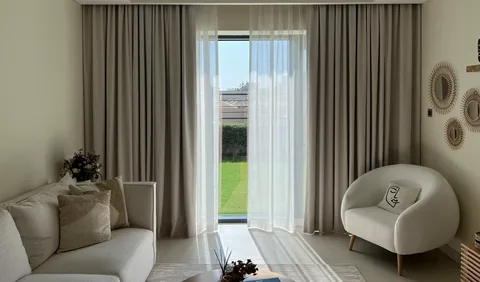
Silk curtains are more than just window treatments — they’re a statement of sophistication, luxury, and timeless style. In Dubai, where interior design often reflects modern elegance with a touch of opulence, silk curtains have become increasingly popular for living rooms, bedrooms, and upscale spaces.
In this blog, we’ll explore the beauty, benefits, and considerations of choosing silk curtains for your Dubai home.
What Are Silk Curtains?
Silk curtains are made from silk fabric — a natural fiber known for its glossy sheen, smooth texture, and elegant drape. Available in a range of styles from pure silk to silk blends (like silk–polyester or silk–linen mixes), these curtains bring a luxurious aesthetic that few other fabrics can match.
Whether you choose soft pastel tones or rich jewel hues, silk curtains create a warm, inviting ambience that instantly elevates any room.

Why Silk Curtains Are Perfect for Dubai Homes
1. Unmatched Elegance and Luxury
Silk curtains add a sense of grandeur and sophistication to any space. Their natural luster catches light beautifully, creating a soft shimmer that enhances the look of your living room or bedroom. Whether your décor is classic, contemporary, or eclectic, silk curtains fit perfectly — adding depth, texture, and a refined finish.
2. Light Reflection & Soft Ambience
Silk curtains gently diffuse incoming light, creating a soft, warm ambience in your room. Unlike heavier fabrics that block light abruptly, silk allows subtle light through — perfect for living rooms where you want natural light with a soft, elegant feel.
In Dubai’s bright climate, this balance between light and shade makes silk curtains especially appealing.
3. Ideal for Formal & Stylish Spaces
Silk curtains work wonderfully in spaces where aesthetic impact matters most — living rooms, formal seating areas, guest lounges, and master bedrooms. Their refined appearance makes them perfect for homes that emphasize style and presentation.
4. Adds Texture and Visual Depth
Silk’s unique texture adds dimension to interiors. Whether plain, printed, or embroidered, silk curtains add visual interest without overpowering the rest of your décor.
They also pair beautifully with other fabrics — like velvet cushions, linen sofas, or even sheer panel layers — creating a rich, layered look.
Types of Silk Curtains Commonly Used in Dubai
Here are the most popular silk curtain options homeowners choose:
Pure Silk Curtains
Made from 100% natural silk, these are the most luxurious and have the richest sheen and softest drape. Ideal for high-end interiors.
Silk Blend Curtains
Often blended with polyester or linen to improve durability while keeping a luxurious feel — excellent for everyday use.
Silk with Blackout Lining
Perfect if you want elegant style plus light-blocking functionality — ideal for bedrooms or media rooms.
Silk Panels with Sheer Layers
Combining silk curtain with sheer layers gives a versatile solution — luxurious by day, private by night.
Choosing the Right Silk Curtain for Your Living Room
When selecting silk curtain for your Dubai home, consider the following:
Color and Finish
Choose colors that complement your interior palette:
- Neutral Shades: Ivory, cream, beige — perfect for minimal or modern décor
- Rich Tones: Emerald, navy, gold — add luxury and depth
- Pastels: Soft blue, blush pink or champagne — ideal for light, airy rooms
Silk’s natural sheen amplifies color richness, so choose tones that harmonize with furniture, walls, and flooring.
Size and Length
Floor-to-ceiling silk curtains make small rooms feel grander and taller. For large living room windows, long, flowing panels create a dramatic, luxurious effect.
Lining and Functionality
Pure silk is delicate and beautiful but may not block sunlight entirely. Consider lining options:
- Blackout Lining: Blocks light fully — great for privacy and bedrooms.
- Thermal Lining: Helps with temperature control.
- Standard Lining: Reduces light slightly while preserving softness.
Choose lining based on your needs and room usage.
Care and Maintenance Tips for Silk Curtains
Silk is beautiful, but it requires some care:
- Professional Cleaning: Silk should be dry-cleaned — avoid washing at home
- Avoid Direct Sun Exposure: Too much direct sun can fade silk. Use sheers or blinds to protect fabric
- Rotation: Occasionally rotate panels to prevent uneven fading
- Gentle Handling: Pull curtains gently — silk fibers are delicate
Are Silk Curtains Worth It in Dubai?
Absolutely — especially in living rooms and formal spaces. Silk curtain bring:
- Timeless elegance and premium appearance
- Beautiful light diffusion
- A luxurious look that complements contemporary Dubai interiors
- A statement-making window treatment
While silk curtain may cost more than ordinary fabrics, their visual impact and refined appeal make them a worthy investment for homes that value sophistication and style.
Final Thoughts
Silk curtains are more than decorative fabric — they are a design statement. In Dubai’s luxury-focused environment, they complement high-end interiors, create soft lighting effects, and elevate your living space with unmatched elegance.
Whether you’re decorating a villa, apartment, or penthouse, silk curtains can transform your rooms into stylish, inviting spaces that reflect your taste and lifestyle.
Author

It’s 2026, and your living room has quietly transformed into something more versatile than ever before. This space now serves multiple roles throughout each day—morning coffee spot, occasional home office, gathering place for friends, and sanctuary for evening relaxation. Given how much happens here, it makes perfect sense that living room window curtains have evolved alongside these changing needs.
Today’s window treatments do far more than simply cover glass. They respond intelligently to shifting light, contribute to household wellness, and seamlessly blend technological convenience with natural materials. The result feels intuitive rather than complicated—curtains that support real life without demanding constant attention.
Let’s explore what’s shaping living room window curtains in 2026, focusing on practical trends that actually make daily life better.

Five Fresh Trends Defining 2026 Curtains
Sensor-Driven Layered Curtains
Smart home technology has matured considerably, and window treatments reflect this evolution. The dramatic, attention-seeking automation of previous years has given way to something far more subtle and useful: layered systems that work quietly in the background.
Today’s living room window curtains typically combine sheer panels with functional liners that adjust automatically throughout the day. This isn’t about showing off technology—it’s about creating consistent comfort without requiring constant adjustments.
In actual homes, this looks like opacity that shifts based on natural daylight levels. Morning sun might trigger sheers to diffuse light gently, while afternoon glare prompts additional layers to engage. Voice assistants you already use can control settings, and simple apps allow schedule adjustments when needed.
The practical benefits matter most. Homeowners report reduced screen glare during work hours, softer light for evening relaxation, and better temperature control in regions with shifting sunlight patterns. Your living room simply feels more balanced throughout the day, without requiring you to constantly adjust curtains manually.
Bio-Based Performance Weaves
Environmental consciousness in home textiles has matured significantly. The rough, uninspiring eco-friendly fabrics of the past have given way to sophisticated materials that perform beautifully while treading lightly on the planet.
Bio-based and plant-derived weaves now feature prominently in living room window curtains, offering genuine comfort alongside environmental benefits. These aren’t compromise products—they’re thoughtfully engineered textiles designed for real-world performance.
Homeowners increasingly choose these materials for several practical reasons. The breathable fabrics suit both warm and humid climates exceptionally well, preventing that stuffy feeling that some synthetic curtains create. Low-allergen properties make them ideal for households with sensitivity concerns. The subtle natural texture adds visual warmth without heaviness, and these materials typically outlast fast-fashion decorative fabrics significantly.
The result supports both personal wellness and environmental values while looking completely refined and contemporary.
Light-Diffusing Surface Finishes
Bold prints and heavy embroidery have taken a backseat to something more subtle and arguably more sophisticated. Many 2026 interiors feature curtains designed specifically to play softly with natural light.
Light-diffusing living room window curtains incorporate micro-textures and carefully refined weaves that scatter sunlight gently across the room. This creates a luminous quality that changes throughout the day without darkening the space entirely.
Designers appreciate this approach for several compelling reasons. The visual depth created by diffused light makes compact living rooms feel more spacious and open. Harsh glare reduces significantly while maintaining connection to outdoors. The effect works beautifully with neutral, minimalist interiors that characterize contemporary design preferences.
For apartment dwellers especially, this approach proves valuable. Managing natural light carefully in smaller spaces transforms how the entire room feels throughout daylight hours.
Climate-Smart Curtain Hardware
Sometimes the most significant improvements happen where you least expect them. Curtain hardware has stepped into the spotlight in 2026, with rods and tracks becoming intentional design elements rather than hidden afterthoughts.
For living room window curtains, hardware now actively supports both comfort and aesthetics. Improved insulation at mounting points helps maintain indoor temperatures more consistently. Finished options like brushed brass and muted metallic add subtle elegance. Cleaner profiles suit modern interiors perfectly. Better engineering ensures compatibility with layered and motorized systems.
Quality hardware makes an immediate practical difference. Curtains hang better, move more smoothly, and last significantly longer. The entire window treatment feels intentional rather than added as an afterthought, elevating the whole room’s appearance.
Nature-Inspired Intelligent Prints
Patterns have returned to window treatments, but they’re softer and more thoughtful than previous generations of printed curtains. Rather than bold, attention-grabbing motifs, 2026 focuses on patterns drawn from nature’s geometry.
These living room window curtains feature subtle, repeating designs inspired by organic forms—leaves, waves, soft spirals, and natural textures. The effect is quietly detailed rather than dramatically patterned.
Designers increasingly recommend these prints because they create visual calm rather than distraction. They pair easily with solid upholstery and natural wood finishes that characterize contemporary interiors. Interest builds slowly, revealing itself over time rather than announcing itself immediately. This approach aligns perfectly with wellness-led interior concepts that prioritize comfort and relaxation.
Styling Your 2026 Living Room
Creating beautiful window treatments in 2026 relies more on proportion and intention than on decoration alone. A few straightforward principles yield consistently excellent results.
Hanging curtains higher than the window frame immediately creates the illusion of height and grandeur. This simple adjustment transforms how the whole room feels. Choosing floor-length panels ensures a clean, finished appearance that looks professionally designed. Layering sheers with functional curtains provides flexibility for changing needs throughout days and seasons. Letting texture do the work rather than relying on bold colors creates sophisticated interest that wears well over time.
These approaches work because they focus on fundamental design principles rather than fleeting decorative trends.
Practical Setup and Care
Installing modern living room window curtains doesn’t require professional expertise. Simple steps make the process straightforward and results professional.
Mount curtain rods approximately 15 to 20 centimeters above the window frame for optimal proportions. This height creates visual lift while remaining practical for daily use. Set smart layers according to your local daylight patterns—observe how light moves through your space and program automation accordingly. Air natural fabrics monthly to keep them fresh and prevent dust accumulation. Spot clean textured curtains when needed rather than washing frequently, which extends fabric life significantly.
These simple habits keep curtains beautiful longer while reducing unnecessary replacements.
Looking Forward
Living room window curtains in 2026 reflect thoughtful evolution rather than radical change. Smarter layering adjusts automatically to daily light patterns. Breathable bio-based fabrics contribute to household wellness. Finishes work quietly with light rather than fighting against it. Together, these developments create window treatments that feel less like decoration and more like genuine support for daily life.
Imagine curtains that simply feel right throughout every day—filtering harsh sunlight without blocking connection to outdoors, breathing naturally with your home’s environment, and lasting beautifully through seasons of real living. Thoughtful choices like textured natural fabrics, gentle light diffusion, or responsive layers reflect this direction, where quality and care guide design decisions.
This approach isn’t about chasing novelty for its own sake. It’s about choosing living room window curtains that genuinely support how your household lives now and how your home will evolve over time. The best window treatments hold everyday moments and quiet routines gracefully, year after year.
What small change would make your windows feel more like home? Sometimes the simplest adjustments—higher rods, softer fabrics, smarter layers—transform not just how a room looks, but how it feels to be in it.
Author

Outdoor spaces are an essential part of any property, offering both aesthetic appeal and practical value. In a historic city like Canterbury, gardens play a significant role in enhancing lifestyle, property value, and overall visual charm. From small residential gardens to large commercial landscapes, professional Garden landscaping contractors Canterbury provide the expertise required to create outdoor environments that are both beautiful and functional.
Landscaping is not simply about improving appearance. It involves careful planning, skilled construction, and long-term sustainability. Professional contractors combine creativity with technical knowledge to design gardens that suit the property, the environment, and the needs of the owner.

The Importance of Professional Garden Landscaping
Professional landscapers understand how to transform underused or outdated outdoor areas into practical spaces. This might include creating seating areas, improving access, adding greenery, or enhancing privacy. With expert planning, even small gardens can feel spacious and inviting.
Comprehensive Landscaping Services
Garden landscaping contractors offer a wide range of services to meet different requirements. These typically include garden design, groundwork, hard landscaping, soft landscaping, drainage solutions, fencing, and long-term maintenance.
Each project begins with an assessment of the existing space. Contractors consider factors such as soil condition, drainage, sunlight, and layout. Based on this information, they develop a design that maximizes space while ensuring durability and ease of maintenance.
Custom Garden Design for Canterbury Properties
Every property has unique features, and a one-size-fits-all approach rarely works in landscaping. Professional garden designers create bespoke layouts that reflect both the client’s vision and the character of the property.
In Canterbury, traditional gardens with lawns, flower borders, and natural stone features remain popular. At the same time, many homeowners are choosing contemporary designs with clean lines, minimal planting, and modern paving materials.
Contractors work closely with clients to understand how the garden will be used. Whether it’s a family-friendly space, a low-maintenance garden, or an area designed for entertaining, the final design balances style and practicality.
Hard Landscaping: Creating Structure and Functionality
Hard landscaping forms the backbone of any garden design. It includes features such as patios, walkways, retaining walls, steps, and driveways. These elements provide structure and define different areas of the garden.
Professional installation is crucial for hard landscaping features. Proper groundwork ensures surfaces remain level and durable over time. In Canterbury, where rainfall can be frequent, effective drainage is essential to prevent water damage and surface deterioration.
Soft Landscaping: Bringing Gardens to Life
Soft landscaping focuses on natural elements such as plants, lawns, trees, and shrubs.
This ensures healthy growth and reduces maintenance requirements. A balanced planting scheme includes a mix of evergreen and seasonal plants to keep gardens looking attractive throughout the year.
Lawn installation is another key aspect of soft landscaping. Contractors prepare the ground thoroughly to ensure proper drainage and root development. Both natural turf and artificial grass options are available, depending on usage and maintenance preferences.
Sustainable Landscaping Practices
Sustainability is an important consideration in modern landscaping. Professional contractors increasingly use environmentally responsible methods to reduce environmental impact.
This may include installing permeable paving to manage rainwater naturally, selecting native plant species, and designing gardens that require minimal watering. Efficient irrigation systems help conserve water while maintaining healthy plants.
Using recycled materials and reducing waste during construction also contribute to sustainable landscaping practices. These approaches benefit both the environment and the long-term health of the garden.
Enhancing Outdoor Living Spaces
Modern landscaping focuses heavily on creating usable outdoor living areas. Gardens are no longer just decorative spaces; they are extensions of the home.
Professional landscapers design outdoor seating areas, dining zones, and relaxation spaces that encourage year-round use. Features such as decking, pergolas, and raised planters add both functionality and visual interest. https://contrank.com/wp-admin/post-new.php
Lighting is another important element. Well-placed garden lighting enhances safety and creates atmosphere, allowing outdoor spaces to be enjoyed after dark.
Landscaping for Commercial Properties
Garden landscaping contractors also work with commercial clients in Canterbury. Well-maintained outdoor spaces enhance the professional image of businesses, offices, and public spaces.
Commercial landscaping focuses on durability, accessibility, and ease of maintenance. Clear pathways, defined entrances, and attractive planting improve both functionality and appearance.
Professional landscaping can also contribute to employee wellbeing and customer satisfaction by creating pleasant outdoor environments.
Increasing Property Value Through Landscaping
High-quality landscaping is a valuable investment. A well-designed garden can significantly increase property value and market appeal.
Potential buyers often see professional landscaping as a sign of quality and care. Features such as paved patios, structured planting, and neat lawns create a strong visual impact.
In Canterbury’s competitive property market, a landscaped garden can make a property stand out and attract greater interest.
Ongoing Garden Maintenance Services
Many landscaping contractors offer maintenance services to preserve the appearance and health of gardens. These services may include lawn mowing, pruning, weed control, and seasonal planting.
Regular maintenance ensures gardens remain tidy and prevents small issues from developing into costly problems. Professional care helps extend the lifespan of both plants and hard landscaping features.
For homeowners seeking convenience, low-maintenance garden designs reduce upkeep while maintaining visual appeal.
Choosing the Right Landscaping Contractor
Selecting the right contractor is essential for achieving successful results. Skilled landscapers offer effective communication, thorough planning, and open pricing.
Local knowledge is particularly valuable. Contractors familiar with Canterbury understand regional soil conditions, planning considerations, and architectural styles.
Professionalism, reliability, and attention to detail are key indicators of a trustworthy landscaping contractor.
The Landscaping Project Journey
The landscaping process typically begins with a consultation. Contractors discuss ideas, assess the space, and identify requirements. This is followed by a detailed design and project plan.
Once approved, work begins with site preparation and groundwork. Hard and soft landscaping elements are then installed according to the design. Final checks ensure quality standards are met before completion.
Clear timelines and regular updates help ensure a smooth and stress-free experience for clients.
Long-Term Benefits of Professional Landscaping
Professional landscaping provides long-term benefits beyond immediate visual improvement. Durable construction reduces repair costs, while thoughtful design improves usability.
Well-designed gardens also enhance lifestyle quality, offering spaces for relaxation, socializing, and recreation. These benefits contribute to overall wellbeing and property enjoyment.
Conclusion
Professional garden landscaping transforms outdoor spaces into functional and visually appealing environments. By working with skilled contractors, property owners in Canterbury can achieve gardens that reflect their lifestyle, enhance property value, and stand the test of time.
From design and construction to maintenance and sustainability, expert landscaping services provide lasting results that elevate both residential and commercial properties.
Author


Cox.net Yahoo Email: Guide to Fix Login, Sync & Email Issues

Best Air Cleaners for Home: Types, Benefits, and Maintenance Tips

Canon Printer Support: Quick Ways to Contact Customer Care

Packaging Companies: Trends, Top Players & Packaging Solutions

Web Scraping Statistics 2026: Market Size, Growth & Industry

AI-Driven Social Media Marketing Strategies for Modern Businesses

Ami Paris Pullover & Hoodie: The Ultimate Material & Care Guide

Radiopharmaceutical Therapeutic Market : Innovations in Oncology
North America Deflazacort Market: 2026 Outlook & 2031 Forecast

New Apartments in NT: Darwin Harbour & Tropical Living

Cybersecurity Consulting Company SequelNet Provides Critical IT Support Services to Medical Billing Firm, Medical Optimum

Team Communication Software Transforms Operations at Finance Innovate

Project Management Tool Transforms Long Island Business

How Alleviate Poverty Utilized IPPBX’s All-in-One Solution to Transform Lives in New York City

Breast Cancer: The Imperative Role of Mammograms in Screening and Early Detection

Unstoppable Collaboration: D.C.’s Citi Open and Silicon Valley Classic Unite to Propel Women’s Tennis to New Heights

Embracing Renewal: Sizdabedar Celebrations Unite Iranians in New York’s Eisenhower Park

The Benefits of Starting a Side Hustle for Financial Freedom

New Blood Donation Screening Questions What You Need to Know

Stylishly Timeless: The 5 Types of Sandals You Need in Your Closet
-

 Business3 years ago
Cybersecurity Consulting Company SequelNet Provides Critical IT Support Services to Medical Billing Firm, Medical Optimum
-
Business3 years ago
Team Communication Software Transforms Operations at Finance Innovate
-
Business3 years ago
Project Management Tool Transforms Long Island Business
-
Business3 years ago
How Alleviate Poverty Utilized IPPBX’s All-in-One Solution to Transform Lives in New York City
-
health3 years ago
Breast Cancer: The Imperative Role of Mammograms in Screening and Early Detection
-
Sports3 years ago
Unstoppable Collaboration: D.C.’s Citi Open and Silicon Valley Classic Unite to Propel Women’s Tennis to New Heights
-
Art /Entertainment3 years ago
Embracing Renewal: Sizdabedar Celebrations Unite Iranians in New York’s Eisenhower Park
-
Finance3 years ago
The Benefits of Starting a Side Hustle for Financial Freedom


