
Technology Explained
How to Enable/Disable Call Announcements on Android

Introduction: Enable or Disable Call Announcements on Android
Before we dive into the nitty-gritty of enabling or disabling call announcements, let’s understand what this feature is all about. Introduced by Google in 2021, call announcements are designed to make your life easier. They allow your Android phone to announce the name of the caller when your phone rings. This means you no longer need to check your phone manually to identify the caller. But, as with any feature, it can be both helpful and occasionally annoying, depending on your circumstances and preferences.
Enabling Call Announcements on Google’s Phone App
If you’re using Google’s Phone app, which is renowned for its user-friendly features, enabling call announcements is a breeze. Follow these simple steps:
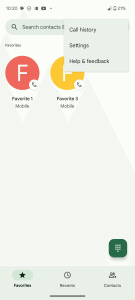
- Open the Phone app: Locate and open the Phone app on your Android device.
- Access Settings: Tap the three-dot menu in the top right corner of the screen to access the app’s settings.
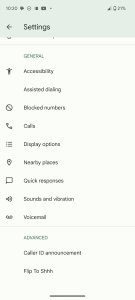
- Caller ID Announcement: Scroll down to the ‘Advanced’ section and tap on ‘Caller ID announcement.’
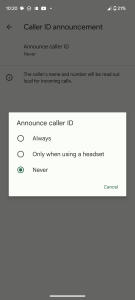
- Enable the Feature: On the following page, select ‘Announce caller ID’ and choose between ‘Always’ or ‘Only when using a headset’ to enable the feature.
- Always: Your device will announce the caller’s name with every incoming call.
- Only when using a headset: Call announcements will be made only when you have a headset connected.
These changes will be automatically saved. The next time your phone rings, it will announce the caller’s name, making it easier for you to decide whether to answer, even if your phone is not within arm’s reach.
-

- Image by https://www.makeuseof.com/
-
- Image by https://www.makeuseof.com/
-
- Image by https://www.makeuseof.com/
Disabling Call Announcements on Google’s Phone App
If you’ve found that call announcements are more of a nuisance than a convenience, here’s how to turn them off:
- Access Settings: Tap the three-dot menu in the top right corner and select ‘Settings.’
- Caller ID Announcement: Navigate to ‘Caller ID announcement’ and tap it.
- Disable the Feature: From the pop-up menu, select ‘Never’ to disable call announcements completely.
Now, your phone will ring without announcing the caller’s identity.
Enabling or Disabling Call Announcements on Samsung Galaxy Devices
If you’re the proud owner of a Samsung Galaxy smartphone and you’re using the default Phone app (Samsung Call), the process is slightly different but equally straightforward. Here’s what you need to do:
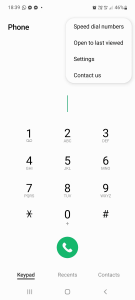
- Open Samsung’s Phone App: Locate and open the ‘Samsung Call’ app on your device.
- Access Settings: Tap the three-dot menu in the top right corner of the screen to access the app’s settings.
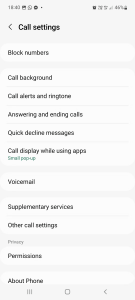
- Call Settings: Under the ‘Call settings’ page, select ‘Answering and ending calls.’
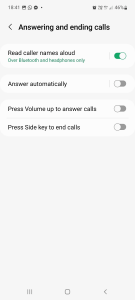
- Toggle the Feature: Toggle ‘Read caller names aloud’ on or off to enable or disable the feature.
- By default: The feature will only work when you have headphones or wireless earbuds connected, which is convenient for most modern accessories that allow you to receive calls by tapping a button.
- Always: If you prefer your device to always announce caller IDs, simply tap ‘Read caller names aloud’ and change the setting to ‘Always.’
-
- Image by https://www.makeuseof.com/
-
- Image by https://www.makeuseof.com/
-
- Image by https://www.makeuseof.com/
-
Toggle On or Off Caller ID Announcements on Android
In conclusion, whether you find call announcements helpful or not depends on your preferences. If it’s not your cup of tea, disabling it is a straightforward process. On the other hand, if you’d rather have your phone announce the caller’s identity, it’s equally easy to enable this feature.
Your Android device should cater to your needs, and with these simple steps, you can make sure it announces callers or stays silent as you wish.

Remember, in this digital age, convenience is key, and managing your phone’s settings to suit your preferences is just a few taps away. So, go ahead and customize your Android device to make it work best for you.
Table: Enabling/Disabling Call Announcements
| Platform | How to Access | Enable | Disable |
|---|---|---|---|
| Google’s Phone App | Open the Phone app | Announce caller ID | Never |
| Tap three-dot menu | (Always/Only when using a headset) | ||
| Samsung Galaxy Devices | Open Samsung’s Phone app | Toggle ‘Read caller names aloud’ | Toggle ‘Read caller names aloud’ |
| Tap three-dot menu | in ‘Answering and ending calls’ | to enable or disable |
In today’s fast-paced world, managing your phone’s features efficiently can make a significant difference in your daily life. Whether you’re always on the go or simply seeking more convenience, knowing how to enable or disable call announcements on your Android device is a valuable skill.
So, customize your phone, enjoy your incoming calls, and make technology work for you!
Author: Alvin Wanjala
Alvin Wanjala is a tech enthusiast with a passion for making technology accessible to everyone. With years of experience in the field, he’s your go-to source for all things tech-related.
Author


Columbus’s colleges are losing students to other schools simply because their websites are better structured. I found that when I audited 15 local colleges, poor design was running rampant across the board—most are fixable as well.
Slow Load Times on Mobile Devices
Ohio State’s primary website loads in just 2.3 seconds on a mobile device. Conversely, Columbus State’s website loads in 8.7 seconds. Given that 73% of prospective students use smartphones to browse, that’s not just slow, it’s a death sentence for admissions.
The Solution: Any reputable web design company in Columbus will tell you that mobile-first design is no longer up for discussion. Pages should load in 3 seconds or less, forms should be usable with a thumb, and navigation should be thumb-friendly. CCAD (Columbus College of Art and Design) just redesigned its website using these principles, and its applications have increased by 34% since the redesign.

Invisible in local search results
If you enter “colleges around Columbus” on a search engine (Google), you will see Ohio State as the only college that shows up. However, when searching for community colleges and other specialised institutions, you will find these institutions ranking around page 3 or lower for their named programs.
The problem: No GMB (Google My Business) optimisation. Franklin University even fails to fully claim their GMB listing. Their address is commonly listed as “temporarily closed.”
The Solution: Create and then optimize all campus addresses through both Google and business directory listings. Include photographs, create labels to respond to people reviewing your school, and post recent updates relating to the available enrollment periods. You want colleges to be able to locate you locally first when a prospective student types in “nursing programs Columbus” and you are visible in the map section.
Content That Converts Students
The college sites of most institutions are written in an academic style – high-density paragraphs about “excellence of the institution” and “a transformative learning experience.” When students are looking for information, they are looking for answers to questions such as how long it will take to complete the program, how much it will cost, and will there be any job opportunities upon completion.
For example, Otterbein University’s nursing website includes 847 words of content; however, it does not include the starting salary for a graduate until paragraph six. A competing institution’s website leads with, “96% job placement rate with an average starting salary of $65,000.”
Solution: answer the money questions up front and create program pages that convert:
- Job placement rates (with 3rd party sources).
- Graduate’s average starting salaries.
- Total program cost (not just tuition).
- Time to complete the program.
- Prerequisite information listed in plain English
Technical SEO Disasters
Most of the Columbus, Ohio college websites fail to meet the industry’s minimum criteria for Search Engine Optimization (SEO), which lead to decreased rankings in all search engines. The common issues we found include:
1. Broken internal links.
2. Missing alt tags on images.
3. Duplicate content across program pages (Capital University has 23 pages with the same meta description).
Some additional key technical issues that hamper the rankings on all college websites include:
1. No schema markup for either program or location.
2. Slow server response times.
3. Missing SSL certificate on multiple application forms.
4. Broken mobile navigation for multiple programs.
5. No local business structured data to support citation and rankings.
These common technical issues are far more than technical; they are also killing your rankings. Google cannot recommend college’s websites to its visitors if those sites are not accessible to Google through its crawler or can be understood once crawled.
The Death of Enrollment Forms
67% of potential students who fill out inquiry forms at Columbus colleges are lost at the inquiry stage. Why does this happen? Schools are using inquiry forms that require up to 15 fields when 4 would suffice, not having mobile-optimized inquiries, and having broken “Submit” buttons.
Delaware County Community College cut their inquiry form from 12 fields down to only 3 fields, resulting in an 89% increase in inquiries over 2 months.
Successful Examples of Results
Columbus State Community College worked with an SEO Services Columbus that specializes in local search engine optimisation and experienced the benefits:
- 156% more traffic through organic search
- 43% additional program inquiries
- Increased performance in local search results for targeted programs
Their formula for success: a mobile-first redesign, aggressive optimization of their Google My Business profile across their campuses, and totally answering students’ questions using quality content.
To sum it up
Ohio colleges have to compete against Arizona and Florida Colleges’ web-based programs with better web pages and better collegiate leads search engine optimization, so there’s no longer a local marketplace for columbus schools to get their students from.
It’s really easy to fix the problem. You’ll need to work with a web design company who understands education marketing, and to do that, you need to optimize the site for local search and generate content that gets visitors to apply.
Your competitors are already doing this, and if you wait to make decisions about how many more students you will lose to your competitors.
If you are ready to improve your school’s web presence, do a technical audit, make your mobile experience priority, and claim local search results. In a competitive academic landscape, your website serves not just for promotion, but as your enrollment powerhouse.
Author
Author
Scroll through Facebook for just five minutes and you’ll notice something: most posts look exactly the same. Plain text blends into the feed, making it easy for users to scroll past without noticing important messages. In a crowded social media environment, visual formatting plays a major role in grabbing attention and increasing engagement. This is where Boldify, a powerful bold text generator, makes a difference. Instead of struggling with plain, unformatted posts, Boldify allows you to create eye-catching Facebook bold text instantly. In this article, you’ll learn why bold text matters, how Boldify works, and how you can use it to stand out on Facebook within seconds.
Why Bold Text Matters on Facebook (User Engagement Psychology)
Facebook is a fast-moving platform. Users scroll quickly, often stopping only when something visually stands out. Bold text works because it creates contrast. When certain words appear heavier or more prominent, the brain processes them faster.
Here’s why bold text improves engagement:
- It grabs attention in crowded feeds.
- It improves readability and scan ability.
- It highlights key messages instantly.
Bold formatting is especially powerful in:
- Facebook posts
- Comments
- Bios
- Facebook groups
If you’re building a brand or growing a personal profile, bold text strengthens your identity. It emphasizes important announcements, promotions, or calls to action, making your message harder to ignore.

The Challenge: Facebook Doesn’t Offer Built-In Bold Formatting
One of the biggest frustrations for users is that Facebook does not provide built-in bold formatting for regular posts. Unlike word processors, you cannot simply select text and click “Bold.”
That’s why many people search for:
- how to bold text on Facebook
- Facebook bold text generator
- bold letters for Facebook
Without a proper tool, users are left copying complicated codes or trying ineffective formatting tricks. This creates a clear need for a reliable and easy-to-use bold font generator.
What Is Boldify?
Boldify is an online bold text generator designed to help users create stylish bold letters instantly. Instead of modifying Facebook’s formatting, Boldify uses Unicode-based bold fonts that are fully compatible with social media platforms.
Here’s what makes Boldify simple and powerful:
- No installation required
- Works directly in your browser
- Free and instant access
- Compatible with Facebook, Instagram, Twitter, and WhatsApp
Because it uses special Unicode characters, the bold text appears naturally once pasted into Facebook posts, comments, bios, or Messenger chats. This makes Boldify a practical and beginner-friendly solution for anyone looking to create bold text online.
How Boldify Helps You Create Bold Facebook Text in Seconds
Using Boldify is straightforward and requires no technical knowledge. Here’s a simple step-by-step guide:
Step 1: Enter Your Text
Open Boldify and type your message into the input box. This could be a status update, promotional message, announcement, or bio line.
Example:
New Blog Post Live
Limited Time Offer
Join Our Community Today
Step 2: Automatic Bold Conversion
As soon as you enter your text, Boldify automatically converts it into multiple bold font styles. Within seconds, you’ll see several variations generated instantly.
Step 3: Copy and Paste to Facebook
Choose the bold style you like, click the copy button, and paste it directly into:
- Facebook posts
- Comments
- Bios
- Messenger chats
That’s it. In just a few seconds, your plain text becomes visually powerful Facebook bold text.
Key Features That Make Boldify Stand Out
There are many tools online, but Boldify offers specific advantages that make it reliable and user-friendly.
1. One-Click Copy Feature
No need to manually select text. Just click and copy instantly.
2. Multiple Bold Style Variations
Get access to different bold styles to match your tone and branding.
3. Mobile-Friendly Interface
Boldify works smoothly on smartphones, tablets, and desktops.
4. No Login Required
You don’t need to create an account. Just open and start using.
5. Fast Performance
Text conversion happens instantly without delays.
6. Clean and Simple Design
The interface is distraction-free, making it easy for beginners to use.
These features make Boldify more than just a basic bold letters generator—it becomes a practical social media enhancement tool.
Practical Ways to Use Bold Text on Facebook
Now that you know how to generate bold text, let’s explore practical ways to use it effectively.
Highlight Important Announcements
SALE TODAY ONLY
Registration Closes Tonight
Bold formatting ensures these messages get noticed quickly.
Strengthen Call-to-Actions
Instead of writing:
Join us now
Write:
JOIN US NOW
It creates urgency and clarity.
Emphasize Keywords in Posts
Highlight important parts of your message to guide the reader’s attention.
Improve Facebook Bios
Use bold text to make your profession, tagline, or brand name stand out.
Stand Out in Facebook Groups
When commenting in large groups, bold text increases visibility and improves response rates.
SEO & Branding Benefits of Using Bold Text
While bold text doesn’t directly change Facebook’s algorithm, it improves how users interact with your content.
Here’s how it benefits branding and visibility:
- Improves readability
- Encourages longer post engagement
- Strengthens personal or business branding
- Creates structured content hierarchy
- Makes posts look professional
When your content looks organized and visually appealing, users are more likely to stop scrolling and engage.
Tips for Using Bold Text Effectively
Bold text is powerful—but only when used strategically.
- Don’t overuse bold formatting.
- Highlight only key phrases or calls-to-action.
- Combine bold text with emojis carefully.
- Maintain readability and spacing.
Too much bold text can reduce its impact. The goal is to enhance clarity, not overwhelm the reader.
Conclusion
Standing out on Facebook is no longer optional—it’s necessary. Since Facebook doesn’t offer built-in bold formatting for posts, tools like Boldify provide a fast and effective solution.
Author


Cox.net Yahoo Email: Guide to Fix Login, Sync & Email Issues

Best Air Cleaners for Home: Types, Benefits, and Maintenance Tips

Canon Printer Support: Quick Ways to Contact Customer Care

Packaging Companies: Trends, Top Players & Packaging Solutions

Web Scraping Statistics 2026: Market Size, Growth & Industry

AI-Driven Social Media Marketing Strategies for Modern Businesses

Ami Paris Pullover & Hoodie: The Ultimate Material & Care Guide

Radiopharmaceutical Therapeutic Market : Innovations in Oncology
North America Deflazacort Market: 2026 Outlook & 2031 Forecast

New Apartments in NT: Darwin Harbour & Tropical Living

Cybersecurity Consulting Company SequelNet Provides Critical IT Support Services to Medical Billing Firm, Medical Optimum

Team Communication Software Transforms Operations at Finance Innovate

Project Management Tool Transforms Long Island Business

How Alleviate Poverty Utilized IPPBX’s All-in-One Solution to Transform Lives in New York City

Breast Cancer: The Imperative Role of Mammograms in Screening and Early Detection

Unstoppable Collaboration: D.C.’s Citi Open and Silicon Valley Classic Unite to Propel Women’s Tennis to New Heights

Embracing Renewal: Sizdabedar Celebrations Unite Iranians in New York’s Eisenhower Park

The Benefits of Starting a Side Hustle for Financial Freedom

New Blood Donation Screening Questions What You Need to Know

Stylishly Timeless: The 5 Types of Sandals You Need in Your Closet
-

 Business3 years ago
Cybersecurity Consulting Company SequelNet Provides Critical IT Support Services to Medical Billing Firm, Medical Optimum
-
Business3 years ago
Team Communication Software Transforms Operations at Finance Innovate
-
Business3 years ago
Project Management Tool Transforms Long Island Business
-
Business3 years ago
How Alleviate Poverty Utilized IPPBX’s All-in-One Solution to Transform Lives in New York City
-
health3 years ago
Breast Cancer: The Imperative Role of Mammograms in Screening and Early Detection
-
Sports3 years ago
Unstoppable Collaboration: D.C.’s Citi Open and Silicon Valley Classic Unite to Propel Women’s Tennis to New Heights
-
Art /Entertainment3 years ago
Embracing Renewal: Sizdabedar Celebrations Unite Iranians in New York’s Eisenhower Park
-
Finance3 years ago
The Benefits of Starting a Side Hustle for Financial Freedom


