
Beauty Fitness
How to Style Your Blue Button-Up Shirt for Any Occasion This Summer

Summer is here, and it’s time to break out your favorite blue button-up shirt. Whether you’re heading to an outdoor barbecue or a formal dinner party, this versatile wardrobe staple can be styled in countless ways to suit any occasion. But with so many options, it can be overwhelming trying to figure out how to make the most of your blue button-up. Fortunately, we’ve got you covered! In this blog post, we’ll show you how to style your blue button-up for any summer event – from casual hangouts with friends to fancy date nights under the stars. So sit back, relax and let us guide you through the endless possibilities of this classic piece!
The Classic Blue Button-Up
The classic blue button-up shirt is a wardrobe essential that will never go out of style. This timeless piece can be paired with anything from jeans to dress pants, making it versatile enough for any occasion.
For a casual daytime look, try rolling up the sleeves and pairing your blue button-up with shorts or chinos. If you’re headed to the office, tuck your shirt into tailored trousers and add a belt to complete the look.
When dressing up for an evening event, opt for a darker shade of blue and pair your button-up with a blazer or suit jacket. This will give you a polished yet relaxed appearance that’s perfect for date night or dinner parties.
To add some personality to this classic piece, experiment with different textures like chambray or linen fabrics. You can also play around with patterns and prints such as stripes or polka dots.

The classic blue button-up offers endless styling opportunities that are only limited by your creativity!
The Relaxed Blue Button-Up
The relaxed blue button-up shirt is a must-have for any summer wardrobe. This versatile piece can be dressed up or down, making it perfect for a casual day out or a night on the town.
To achieve a laid-back look, pair your blue button-up with some light-washed jeans and white sneakers. Roll up the sleeves to give off an effortless vibe and add some sunglasses to complete the look.
Another way to relax your blue button-up is by layering it over a plain t-shirt with some chino shorts. This will create a cool and comfortable outfit that’s perfect for those hot summer days.
For an even more relaxed style, try wearing your blue button-up as an overshirt over a graphic tee paired with denim shorts. Add some sandals to finish off this trendy yet comfortable ensemble.
The beauty of the relaxed blue button-up is its versatility. Whether you’re running errands, catching up with friends or heading out on date night, this shirt has got you covered in terms of comfort and style.
The Formal Blue Button-Up
The formal blue button-up is a versatile piece that can be dressed up or down depending on the occasion. For more formal events such as weddings or business meetings, pair your blue button-up with a tailored suit and dress shoes. Opt for a slim-fit cut to achieve a modern look.
When it comes to accessorizing, keep it simple and classic with a leather belt and watch in silver or gold tones. Avoid wearing flashy jewelry or accessories that may detract from the formality of the outfit.
For an added touch of sophistication, consider adding a pocket square to your blazer jacket. Choose one in complementary colors that will complement your shirt and tie.
If you’re attending an event during warmer weather, swap out your suit jacket for a lightweight blazer in beige or grey tones. Pair this with chinos or dress pants in coordinating shades.
When styling the formal blue button-up shirt, remember to keep things clean-cut and polished while incorporating subtle touches of personal flair through accessories.
The Playful Blue Button-Up
Looking for a way to add some fun and personality to your summer wardrobe? Look no further than the playful blue button-up shirt! This versatile piece can be dressed up or down, making it perfect for any occasion.
For a playful daytime look, pair your blue button-up with denim shorts and sneakers. Roll up the sleeves and tuck in just the front of the shirt for an effortless yet put-together vibe. Add some colorful accessories like a patterned headband or statement earrings to really make this outfit pop.
If you’re heading out for a night on the town, try pairing your blue button-up with a bold skirt or trousers. A bright colored midi skirt looks great with a fitted button-up tucked in at the waist. Finish off this look with strappy heels and minimalist jewelry.
Don’t be afraid to play around with patterns when styling your playful blue button-up! Try pairing it with polka dot pants or floral shorts for an unexpected twist on classic prints.
No matter how you choose to style it, there’s no denying that the playful blue button-up is sure to become one of your go-to pieces this summer season!
How to Accessorize Your Blue Button-Up
When it comes to styling your blue button-up shirt, accessories can make all the difference. Here are some tips on how to accessorize for any occasion this summer.
For a casual look, pair your blue button-up with some classic white sneakers and a simple leather belt. This effortless combination will give you that laid-back vibe while still keeping things stylish.
If you want to dress up your blue button-up for a more formal event, try pairing it with a sleek watch or cufflinks. This will add an element of sophistication and elevate your outfit instantly.
For a pop of color, consider adding a pocket square in a complementary shade to bring out the blues in your shirt. Alternatively, you can opt for patterned socks that match or complement the tones in your shirt.
Don’t be afraid to experiment with different textures and fabrics when accessorizing. For example, try pairing your blue button-up with some denim jeans and leather boots for an edgier look that’s perfect for nighttime events.
There are countless ways to accessorize your blue button-up shirt this summer. With these tips in mind, you’ll be able to create looks that are both timeless and modern at the same time!
Conclusion
To sum it up, a blue button-up shirt is an incredibly versatile piece that can be styled in so many ways for any occasion this summer. From casual to formal events, there’s no limit to how you can wear it. Remember to choose the right fit and fabric for your body type and comfort level.
Experiment with different looks by pairing your blue button-up with various accessories such as belts, hats, or jewelry. Don’t forget to consider the color of your pants or shorts when putting together an outfit.
With these tips on how to style your blue button-up shirt for any occasion this summer, you’ll never run out of options! So go ahead and try out new things until you find what works best for you. Fashion is all about having fun while expressing yourself!
Author
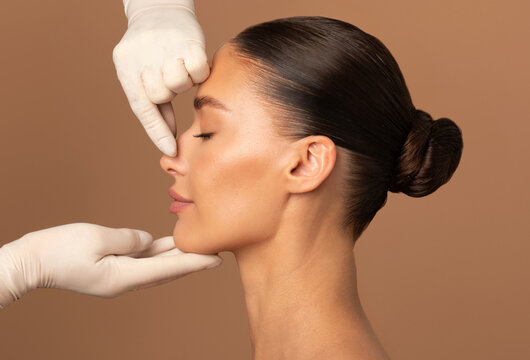
The world has officially entered the era of the Fourth Industrial Revolution, and the field of cosmetic surgery is undergoing a massive transformation. Today, the rhinoplasty sector in Dubai is experiencing a qualitative leap due to the integration of artificial intelligence (AI). These technologies are revolutionizing the planning and simulation phases of surgery. Patients no longer enter the operating room fearing unknown outcomes. Instead, they can clearly envision their “aesthetic future” before any surgical procedure begins.
Dubai is a global hub for innovation. The city is adopting these technologies to ensure the highest levels of precision and facial harmony. By doing so, surgeons are minimizing error rates and achieving unprecedented levels of patient satisfaction.
The Age of Digital Simulation: Goodbye to Unrealistic Expectations
Previously, communication between a surgeon and a patient relied on verbal descriptions or rough paper sketches. This often led to misunderstandings regarding the final results. Now, artificial intelligence has changed the game through several key advancements:
-
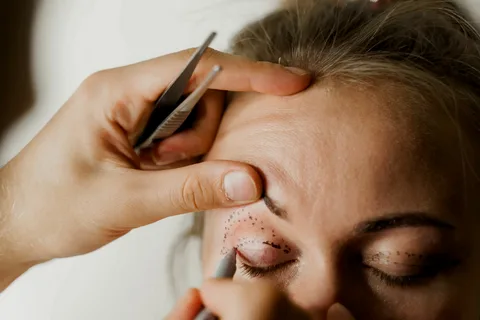
3D High-Definition Simulation: Advanced software performs a comprehensive facial scan to build a realistic digital model. This allows the surgeon to adjust the angles and proportions of the nose on a screen right in front of the patient.
-
Facial Proportion Analysis: AI algorithms rely on “golden ratio” rules to analyze facial features like the forehead, chin, and cheeks. The system then suggests a nose shape that achieves the ideal balance for that specific individual.
-
Reducing Psychological Anxiety: Seeing a simulated image gives a patient immense reassurance. They see with their own eyes how their features will change, which builds a vital bridge of trust with the surgeon.

How AI Techniques Work in Nose Surgery
The process involves precise technical steps that ensure the accuracy of the final results. It is a blend of data science and medical artistry:
-
Multi-Angle Photography: The clinic captures a series of high-resolution images from the front, side, and bottom.
-
Algorithmic Processing: The AI system combines these images to create a digital, 360-degree rotating object of the patient’s head.
-
Dynamic Modification: The surgeon can digitally “sculpt” the nose. They can reduce the bridge, raise the tip, or narrow the nostrils. The system accurately analyzes skin thickness and bone structure to ensure the digital model remains medically grounded.
Benefits of Integrating AI into Dubai’s Cosmetic Surgery
The benefits of this technology go far beyond just a “beautiful image.” They encompass critical medical and scientific aspects that improve patient safety.
| Feature | Impact on the Patient | Impact on the Surgeon |
| Planning Accuracy | Results match the patient’s ethnicity and features. | Reduces the need for corrective secondary procedures. |
| Complete Clarity | Understands the limits of what is achievable. | Acts as a precise visual communication tool. |
| Job Performance | Ensures that breathing is not negatively affected. | Simulates airflow in the new nasal passages. |
Ethnic Considerations and Statistics in Rhinoplasty
A significant advantage of AI is its ability to respect ethnic identity while enhancing harmony. In a diverse hub like Dubai, patients come from various backgrounds, each with distinct nasal structures.
-
Middle Eastern Patients: Often seek refinement of a prominent dorsal hump. Statistics show that nearly 45% of rhinoplasty cases in the region involve hump reduction and tip refinement.
-
Asian Patients: Typically focus on increasing the height of the nasal bridge. Approximately 35% of these procedures involve augmentation using implants or cartilage.
-
African and Caucasian Profiles: AI helps surgeons maintain the structural integrity of a wide range of nasal widths and skin thicknesses.
Data suggests that clinics in Dubai using AI-driven simulation have reported a 20% increase in patient satisfaction rates compared to traditional consultation methods. Furthermore, the rate of revision (corrective) surgeries has dropped by nearly 15% when AI is used for pre-operative airflow simulation.
Challenges: Artificial Intelligence vs. Human Skill
Despite the power of technology, a vital question remains: Will AI replace the surgeon? The answer is a definitive no.
Artificial intelligence is an “assistance” tool that enhances a surgeon’s vision. However, the actual execution depends on the skill of the human hand. Surgical expertise is required to deal with living tissue, which heals differently from person to person. In Dubai, “digital intelligence” is combined with world-class medical expertise to ensure there is no discrepancy between the simulated image and reality.
The Future of Rhinoplasty and Innovation
We are rapidly approaching the era of Augmented Reality (AR). Soon, patients may see their new nose shape through special glasses or via their smartphones in their everyday environment. Dubai is investing heavily in this research to remain the premier destination for those seeking the latest scientific advancements in appearance enhancement.
Tips When Choosing Simulation Technology:
-
Make sure the clinic uses modern and internationally accredited software.
-
Discuss with the surgeon how the digital simulation will be transferred to the surgical field.
-
Remember that simulation is a “roadmap.” It is not a 100% promise because biological healing is unique to every individual.
Conclusion
The remarkable advancements in artificial intelligence have made the dream of harmonious facial features a measurable reality. Rhinoplasty is no longer an unpredictable adventure; it is a carefully planned journey. This journey begins on a digital screen and culminates in sustainable, natural beauty.
Dubai is leading this global transformation thanks to its state-of-the-art medical infrastructure. To ensure the most accurate simulations and optimal surgical results, we recommend visiting one of Dubai’s leading cosmetic clinics. There, AI is harnessed to enhance your beauty and guarantee a safe, precise, and exceptional treatment experience. By starting with a digital plan, you can step into the operating room with total confidence.
Author

Botox injection in Islamabad has become one of the most popular cosmetic treatments for people who want to look younger without surgery. It is a quick, safe, and effective procedure that helps reduce wrinkles and fine lines. Many individuals in Pakistan prefer this treatment because it offers visible results with minimal downtime. The demand is growing as more people become aware of modern aesthetic solutions.
In Islamabad, clinics are equipped with advanced technology and skilled professionals who ensure safe procedures. Whether you are dealing with forehead lines, crow’s feet, or frown lines, Botox can help you achieve smoother skin. It is a non-invasive treatment, making it ideal for busy individuals. The results are natural-looking when performed correctly by experts.
What is Botox and How Does It Work
Botox is a purified protein that temporarily relaxes facial muscles. It works by blocking nerve signals to the muscles, preventing them from contracting. This reduces the appearance of wrinkles and gives the skin a smoother look. The procedure is simple and usually takes only 10 to 20 minutes.
Many people in Pakistan choose botox injection in Islamabad because it delivers quick and noticeable improvements. The treatment does not require surgery or long recovery periods. You can return to your daily routine shortly after the procedure. Results usually start appearing within a few days and improve over time.
Benefits of Botox Injection
Botox offers multiple benefits for individuals looking to enhance their appearance. It is not only used for cosmetic purposes but also for certain medical conditions. The treatment is highly effective when performed by trained professionals.
- Reduces fine lines and wrinkles
- Provides a youthful and refreshed appearance
- Quick and non-surgical procedure
- Minimal recovery time
- Long-lasting results compared to creams
People prefer botox injection in islamabad because it is both safe and reliable. The results can last for several months, making it a convenient option. Regular sessions can help maintain smoother skin for a longer time.

Common Areas Treated with Botox
Botox is commonly used on different areas of the face to reduce signs of aging. The most popular areas include the forehead, around the eyes, and between the eyebrows. These areas tend to develop wrinkles due to repeated facial expressions.
In Islamabad, many clinics offer customized treatment plans based on individual needs. The goal is to achieve natural-looking results without affecting facial expressions. Botox injection in islamabad is also used for jawline slimming and excessive sweating. This makes it a versatile treatment option.
Why Choose Botox in Islamabad
Islamabad is home to many reputable aesthetic clinics offering advanced cosmetic procedures. The city has experienced dermatologists and trained staff who ensure safe treatments. Patients can expect high-quality care and professional services.
Another reason people prefer botox injection in islamabad is affordability compared to international standards. Clinics provide personalized consultations to understand patient needs. This helps in achieving the best possible results. The availability of modern equipment also ensures effective outcomes.
Procedure and What to Expect
The Botox procedure is simple and does not take much time. A specialist will first examine your skin and discuss your concerns. Small injections are then administered into targeted muscles using fine needles. The discomfort is minimal and usually well tolerated.
After the procedure, patients are advised to avoid rubbing the treated area. You may also be asked to stay upright for a few hours. Results begin to show within 3 to 5 days and continue to improve. Choosing botox injection in islamabad ensures that the process is handled professionally.
Aftercare and Recovery
Aftercare is important to achieve the best results from Botox treatment. Patients should follow the instructions given by their specialist. Avoiding intense physical activity for at least 24 hours is usually recommended. This helps the Botox settle properly in the targeted areas.
Recovery is quick, and most people experience no major side effects. Some may notice slight redness or swelling, which disappears within a few hours. Botox injection in islamabad is popular because of its convenience and minimal downtime. Proper aftercare ensures long-lasting and effective results.
How Long Do Results Last
The results of Botox are not permanent but can last for several months. Typically, the effects last between 3 to 6 months depending on the individual. Factors like age, lifestyle, and skin condition can influence the duration.
Regular sessions can help maintain the desired look for a longer time. Many people in Pakistan schedule follow-up treatments to keep their skin smooth. Choosing botox injection in islamabad allows you to maintain consistent results with expert care. Over time, wrinkles may become less noticeable even after the effects wear off.
Are There Any Side Effects
Botox is generally safe when performed by qualified professionals. However, like any cosmetic procedure, it may have minor side effects. These include slight swelling, redness, or mild bruising at the injection site.
Serious complications are rare and usually occur due to unqualified practitioners. This is why it is important to choose a trusted clinic. Botox injection in islamabad is considered safe because experienced specialists follow proper guidelines. Always consult a professional before undergoing the treatment.
Who is a Good Candidate for Botox
Botox is suitable for adults who want to reduce wrinkles and improve their appearance. It is ideal for individuals with mild to moderate signs of aging. People looking for non-surgical solutions often choose this treatment.
However, pregnant women and individuals with certain medical conditions should avoid Botox. A proper consultation is necessary to determine eligibility. Many clinics offering botox injection in Islamabad provide detailed assessments before the procedure. This ensures safe and effective results for every patient.
FAQs
What is the cost of Botox in Islamabad
The cost varies depending on the clinic and the number of units required. It is best to consult a specialist for accurate pricing.
Is Botox painful
The procedure involves minimal discomfort as very fine needles are used. Most patients tolerate it easily.
How soon can I see results
Results usually start appearing within a few days and improve over one to two weeks.
Can men get Botox
Yes, Botox is suitable for both men and women who want to reduce wrinkles.
How often should I get Botox
Most people repeat the treatment every 3 to 6 months to maintain results.
Final Thoughts
Choosing Botox injection in Islamabad is a smart option for those who want a youthful and refreshed appearance without surgery. The treatment is quick, effective, and widely available in the city. With proper care and professional guidance, you can achieve long-lasting results.
If you are considering this treatment, always choose a trusted clinic for the best experience. For reliable services and expert care, you can explore skn cosmetics where professional treatments are offered. This can be a great step toward achieving your desired look with confidence.
Author
Are you considering eyelid surgery in Islamabad to enhance your appearance or address droopy eyelids? Whether you seek cosmetic rejuvenation or need to resolve a medical issue, choosing the right clinic makes all the difference. Islamabad serves as a hub for some of the finest aesthetic and medical professionals. These experts specialize in eyelid surgery, offering safe procedures, modern techniques, and exceptional results.
When patients research eyelid surgery in Islamabad, they prioritize safety, experience, and artistic expertise. Many top-tier clinics now combine advanced technology with personalized care. This approach ensures every patient feels confident before, during, and after the procedure. This article explores the top-rated clinics, what you can expect during the process, and why this surgery is gaining such popularity in the capital.
Why Choose Eyelid Surgery in Islamabad?
Eyelid surgery, professionally known as blepharoplasty, corrects drooping upper eyelids, removes excess skin, and reduces puffiness under the eyes. For many patients in Islamabad, the benefits extend far beyond simple aesthetics.
-
Clearer Vision: Droopy eyelids often obstruct the line of sight; surgery restores a full field of vision.
-
Facial Rejuvenation: The procedure creates a youthful, refreshed appearance by removing “tired” eyes.
-
Confidence Boost: Improving your facial symmetry naturally enhances self-esteem.
-
Efficiency: Modern techniques offer long-lasting results with surprisingly minimal downtime.
Choosing to undergo eyelid surgery in Islamabad gives you access to surgeons who understand both functional and aesthetic eyelid corrections. Most clinics provide detailed consultations to discuss your specific goals and facial structure.

Top Services Offered by Leading Clinics
The best clinics in Islamabad focus on delivering a comprehensive patient experience. You should expect the following services when booking your procedure:
-
Personalized Evaluation: Surgeons conduct a thorough analysis of your eye anatomy and medical history.
-
Advanced Techniques: Clinics use modern methods for both upper and lower eyelid adjustments.
-
Hidden Incisions: Skilled surgeons place incisions within the natural folds of the eyelid to ensure minimal scarring.
-
Safety Protocols: Facilities use state-of-the-art anesthesia and recovery monitoring.
-
Aftercare Plans: Dedicated post-surgery follow-up ensures the healing process stays on track.
These clinics guide you through every step. They educate patients on potential risks and recovery times, making eyelid surgery in Islamabad a transparent and satisfying journey.
How to Select the Right Clinic
Selecting the right provider is the most crucial step for a successful outcome. Consider these key factors before making your choice:
-
Board Certification: Ensure your surgeon has the proper credentials and extensive experience.
-
Patient Testimonials: Look for positive reviews and “before and after” galleries.
-
Modern Facilities: The clinic should utilize up-to-date surgical equipment and sterile environments.
-
Transparent Pricing: A reputable clinic provides a detailed explanation of costs without hidden fees.
-
Follow-Up Care: Choose a team that prioritizes your recovery through scheduled check-ups.
Many clinics in Islamabad offer free initial consultations. This allows you to ask questions and gauge your comfort level with the staff before committing to the surgery.
Popular Clinics for Eyelid Surgery in Islamabad
If you are looking for proven results, several top-rated clinics perform eyelid surgery in Islamabad with great success:
-
SKN Cosmetics: Renowned for employing expert surgeons and utilizing the latest aesthetic techniques.
-
Islamabad Aesthetic Clinic: Provides comprehensive eyelid surgery packages and holistic care.
-
CosmoCare Islamabad: Specializes in procedures designed for minimal downtime.
-
Enhance Beauty Clinic: Merges cosmetic artistry with functional eyelid corrections.
-
Elite Skin & Laser Centre: Offers personalized consultations with some of the city’s top surgeons.
Each of these facilities ensures professional care and natural-looking results. We encourage patients to visit multiple clinics to find the one that best aligns with their personal goals.
What to Expect During the Procedure
Understanding the surgical process can ease anxiety and help you prepare mentally. Here is a quick overview of a typical blepharoplasty:
-
Comfort First: Surgeons use either local or general anesthesia so you feel no pain.
-
Precision Removal: The doctor removes or repositions excess skin, fat, and muscle tissue.
-
Strategic Incisions: The surgeon hides incisions in the natural eyelid creases to make them invisible once healed.
-
Duration: The surgery typically takes between one and three hours, depending on the complexity.
-
Immediate Aftercare: You will receive detailed instructions to manage swelling and bruising.
Most patients return to their normal daily activities within one to two weeks. Strictly following your post-operative care plan is essential for achieving the best possible results.
Tips for a Smooth and Fast Recovery
To ensure you get the best results from your eyelid surgery in Islamabad, follow these professional recovery tips:
-
Maintain Cleanliness: Keep the surgical area clean and strictly avoid touching or rubbing your eyes.
-
Medication Adherence: Use all prescribed ointments or eye drops to prevent infection and soothe the area.
-
Rest Your Body: Avoid strenuous exercise or heavy lifting for at least seven days.
-
Elevate Your Head: Sleep with an extra pillow to help reduce swelling during the first few nights.
-
Keep Appointments: Attend every follow-up visit so your surgeon can monitor your progress.
Final Thoughts: A Refreshed Perspective
If you want to enhance your appearance or improve your vision, eyelid surgery in Islamabad offers a safe and highly effective solution. By choosing a top-rated clinic like SKN Cosmetics, you gain access to expert surgeons and personalized care tailored to your unique needs. Whether you seek cosmetic rejuvenation or functional improvement, the right professional ensures a comfortable procedure and outstanding results.
Visit SKN Cosmetics today to learn more about eyelid surgery and schedule your personal consultation. Taking this step can help you reclaim a youthful look and the confidence that comes with it.
Author


Chrome Hearts Hats: Trucker Hats, Craftsmanship & Styling

Geelong’s Green Apartment: Solar Power & EV‑Ready Living

Peace in War: Examples of Humanity, Hope, and Compassion
Valabasas Clothing Guide 2026: Stacked Jeans & Streetwear Style

Best Web Development Agency to Hire in 2026: Top 10 Picks

Fear of God Essentials Tracksuit: Modern Streetwear Style

Essentials Tracksuit: Everyday Comfort & Simple Streetwear Style

Corteiz Tracksuit: Official Store, Styles & Buying Guide

Rhinoplasty in Dubai | AI-Powered Nose Surgery & 3D Simulation

Customer Experience Training Platform: AI-Driven CX Training

Cybersecurity Consulting Company SequelNet Provides Critical IT Support Services to Medical Billing Firm, Medical Optimum

Team Communication Software Transforms Operations at Finance Innovate

Project Management Tool Transforms Long Island Business

How Alleviate Poverty Utilized IPPBX’s All-in-One Solution to Transform Lives in New York City

Breast Cancer: The Imperative Role of Mammograms in Screening and Early Detection

Unstoppable Collaboration: D.C.’s Citi Open and Silicon Valley Classic Unite to Propel Women’s Tennis to New Heights

Embracing Renewal: Sizdabedar Celebrations Unite Iranians in New York’s Eisenhower Park

The Benefits of Starting a Side Hustle for Financial Freedom

New Blood Donation Screening Questions What You Need to Know

Stylishly Timeless: The 5 Types of Sandals You Need in Your Closet
-

 Business3 years ago
Cybersecurity Consulting Company SequelNet Provides Critical IT Support Services to Medical Billing Firm, Medical Optimum
-
Business3 years ago
Team Communication Software Transforms Operations at Finance Innovate
-
Business3 years ago
Project Management Tool Transforms Long Island Business
-
Business3 years ago
How Alleviate Poverty Utilized IPPBX’s All-in-One Solution to Transform Lives in New York City
-
health3 years ago
Breast Cancer: The Imperative Role of Mammograms in Screening and Early Detection
-
Sports3 years ago
Unstoppable Collaboration: D.C.’s Citi Open and Silicon Valley Classic Unite to Propel Women’s Tennis to New Heights
-
Art /Entertainment3 years ago
Embracing Renewal: Sizdabedar Celebrations Unite Iranians in New York’s Eisenhower Park
-
Finance3 years ago
The Benefits of Starting a Side Hustle for Financial Freedom


