
health
Sit Your Way to Slim: Effective Chair Exercises for Weight Loss
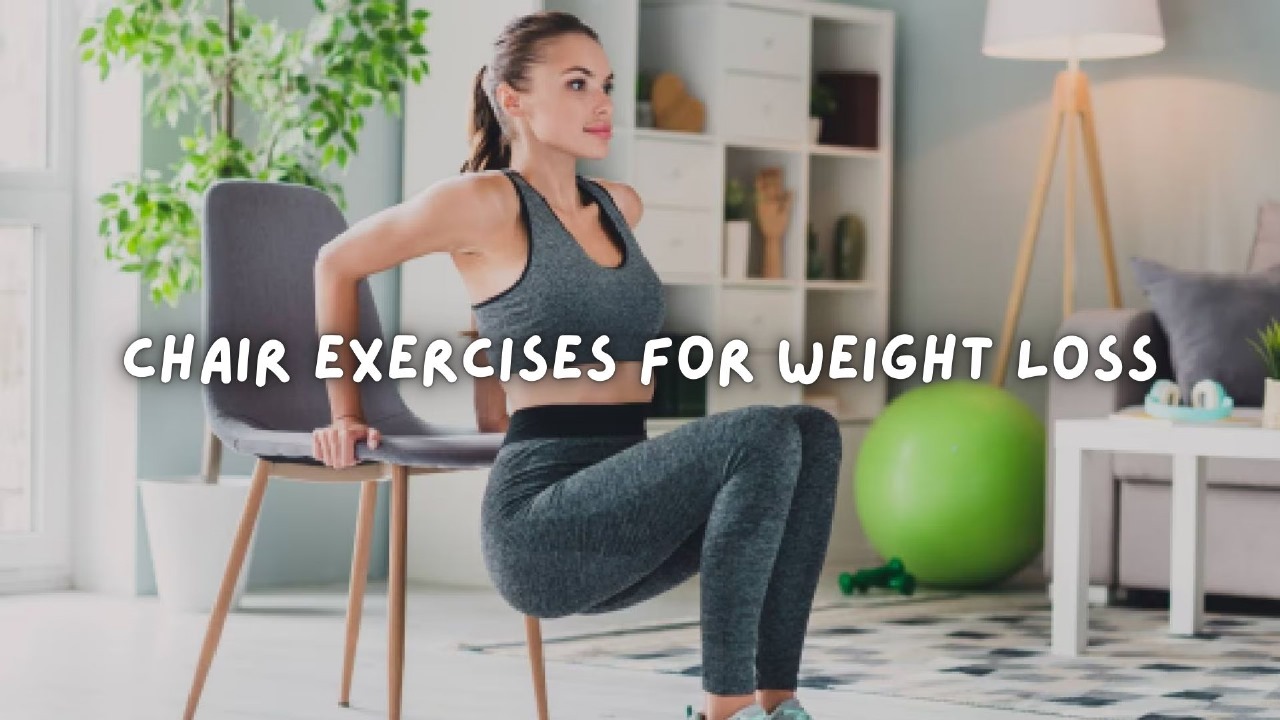
Welcome to WeightFine, your partner in achieving a healthier and happier you! We understand that embarking on a weight loss journey can sometimes feel overwhelming, especially when mobility limitations or a busy schedule make traditional workouts challenging. But what if we told you that you could effectively burn calories and tone your body without even leaving your chair?
This comprehensive guide explores the power of Chair exercise for weight loss, specifically tailored for our vibrant USA community. We’ll delve into the science behind why these seated movements are surprisingly effective, provide a detailed routine you can easily incorporate into your day, and offer valuable tips to maximize your results. Get ready to discover a comfortable yet potent path towards your weight loss goals!
The Underrated Power of Chair Exercises for Weight Loss
For many, the image of weight loss involves strenuous gym sessions or long runs. While these activities certainly play a role, they aren’t the only avenues to shedding those extra pounds. Chair exercises offer a fantastic alternative, particularly for individuals who:
- Experience joint pain or mobility issues: Conditions like arthritis or injuries can make standing exercises difficult or painful. Chair exercises eliminate the stress on weight-bearing joints, allowing for a comfortable and effective workout.
- Have limited space: You don’t need a large home gym to perform these exercises. A simple chair is all the equipment you’ll need.
- Have busy schedules: Chair exercise for weight loss can be easily integrated into short breaks throughout your workday or while watching your favorite TV show. No need to carve out large chunks of time for a dedicated workout.
- Are new to exercise: Chair exercises provide a gentle and accessible entry point into the world of fitness, building a foundation for more intense activities if desired.
But how can sitting down help you lose weight? The key lies in engaging your muscles. Even while seated, you can perform movements that elevate your heart rate, burn calories, and build lean muscle mass. Muscle tissue is more metabolically active than fat tissue, meaning that the more muscle you have, the more calories your body burns at rest. By consistently engaging your muscles through chair exercises, you can gradually increase your metabolism and facilitate weight loss.
Your Comprehensive Chair Exercise Routine for Weight Loss
This routine incorporates a variety of movements targeting different muscle groups to ensure a well-rounded workout. Remember to listen to your body and modify exercises as needed. Aim to perform this routine 3-4 times per week, with rest days in between.
Warm-up (5 minutes):

- Seated Torso Twists (1 minute): Sit tall with your feet flat on the floor. Gently twist your torso to the right, placing your right hand on the back of your chair and your left hand on your right knee. Hold for a few seconds and then twist to the left. Repeat slowly and controlled.
- Shoulder Rolls (1 minute): Sit upright with your arms relaxed at your sides. Roll your shoulders forward in a circular motion for 30 seconds, then reverse the direction for another 30 seconds.
- Ankle Pumps and Circles (1 minute): Sit with your feet flat on the floor. Lift your toes towards your shins, then point them down. Repeat this pumping motion. Next, make gentle circles with your ankles in one direction for 30 seconds, then switch directions.
- Neck Stretches (2 minutes): Gently tilt your head towards your right shoulder, feeling a stretch on the left side of your neck. Hold for 15-20 seconds. Repeat on the left side. Next, gently drop your chin towards your chest and hold. Finally, slowly turn your head to look over your right shoulder, then to the left. Avoid any jerky movements or forcing the stretch.
Workout (25-30 minutes):
Perform each exercise for the recommended number of repetitions or duration. Rest for 30 seconds between each exercise. Repeat the entire circuit 2-3 times.
- Seated Marches (2 minutes): Sit tall and engage your core. Lift one knee towards your chest, then lower it and repeat with the other leg. Pump your arms as if you were walking. Focus on lifting your knees as high as comfortably possible.
- Bicep Curls (10-12 repetitions per arm): Hold light dumbbells (1-5 pounds) in each hand, palms facing upwards. Keeping your elbows tucked close to your sides, bend your elbows and bring the dumbbells towards your shoulders. Slowly lower the dumbbells back down. If you don’t have dumbbells, you can use resistance bands or even just focus on the movement, engaging your bicep muscles.
- Overhead Press (10-12 repetitions): Holding the dumbbells (or resistance band handles) with your palms facing forward, start with your elbows bent at a 90-degree angle. Extend your arms straight overhead, then slowly lower them back to the starting position.
- Triceps Extensions (10-12 repetitions per arm): Hold one dumbbell with both hands overhead. Keeping your elbows close to your head, slowly lower the dumbbell behind your head by bending your elbows. Extend your arms back to the starting position. Alternatively, use a resistance band held with both hands overhead, pulling down behind your head.
- Seated Leg Extensions (10-12 repetitions per leg): Sit tall with your feet flat on the floor. Extend one leg straight out in front of you, parallel to the floor. Hold for a second, then slowly lower it back down. Repeat with the other leg. You can add ankle weights for an extra challenge.
- Calf Raises (15-20 repetitions): Sit with your feet flat on the floor. Keeping your heels on the ground, lift the balls of your feet as high as you can. Hold for a second, then lower back down.
- Oblique Twists (15-20 repetitions per side): Sit tall with your feet flat on the floor and your hands lightly placed behind your head (avoid pulling on your neck). Engage your core and twist your torso to the right, bringing your left elbow towards your right knee (or as close as comfortable). Return to the center and repeat on the left side.
- Seated Bicycle Crunches (1 minute): Sit with your hands lightly behind your head. Bring one knee towards your chest while simultaneously twisting your opposite elbow towards that knee. Alternate sides in a pedaling motion, engaging your abdominal muscles.
- Buttocks Squeezes (hold for 5 seconds, 15-20 repetitions): Sit tall in your chair. Squeeze your gluteal muscles (buttocks) tightly and hold for 5 seconds. Release and repeat.
Cool-down (5 minutes):
- Seated Hamstring Stretch (30 seconds per leg): Extend one leg straight out in front of you with your heel on the floor and toes pointed upwards. Lean forward slightly from your hips, feeling a stretch in the back of your thigh. Hold, then switch legs.
- Seated Quadriceps Stretch (30 seconds per leg): Sit with your feet flat on the floor. Reach back and gently grasp your right ankle (you may need to scoot forward slightly). Pull your heel towards your buttock, feeling a stretch in the front of your thigh. Hold, then switch legs. If you can’t reach your ankle, focus on gently extending your leg backward as far as comfortable.
- Upper Body Stretch (1 minute): Clasp your hands together in front of you and extend your arms straight out, rounding your upper back. Then, clasp your hands behind your back and gently straighten your arms, opening your chest.
- Deep Breathing (1-2 minutes): Sit comfortably and close your eyes. Take slow, deep breaths in through your nose, filling your abdomen with air. Exhale slowly through your mouth. Focus on relaxing your body with each exhale.
Maximizing Your Weight Loss with Chair Exercises
While chair exercises are a fantastic tool, combining them with healthy lifestyle choices will significantly enhance your weight loss journey. Here are some key tips for our USA community:
- Focus on a Balanced Diet: Nourishing your body with whole, unprocessed foods is crucial for weight loss. Prioritize fruits, vegetables, lean proteins, and whole grains. Be mindful of portion sizes and limit sugary drinks and processed snacks.
- Stay Hydrated: Drinking plenty of water throughout the day is essential for metabolism, energy levels, and overall health.
- Be Consistent: Regularity is key to seeing results. Aim for consistency with your chair exercise routine and healthy eating habits.
- Listen to Your Body: Don’t push yourself too hard, especially when starting. Modify exercises as needed and take breaks when you feel tired.
- Incorporate Movement Throughout Your Day: Even if you’re primarily doing chair exercises, try to incorporate small bursts of movement into your day, such as standing up to stretch every 30 minutes.
- Consider Combining with Other Activities: If your mobility allows, consider adding short walks or other gentle forms of exercise to complement your chair workout.
- Track Your Progress: Keeping a journal of your workouts and any changes you notice can be motivating and help you stay on track.
- Celebrate Your Successes: Acknowledge and celebrate the milestones you achieve, no matter how small. This will help you stay positive and motivated.
- Consult Your Doctor: Before starting any new exercise program, especially if you have any underlying health conditions, it’s always wise to consult with your doctor.
Embracing a Healthier You with WeightFine
At WeightFine, we believe that everyone deserves to feel their best. Chair exercises offer a valuable and accessible pathway to weight loss and improved well-being for individuals of all fitness levels and abilities within our USA community. By incorporating this routine into your life and embracing healthy habits, you can take significant steps towards achieving your weight loss goals. Remember to be patient with yourself, celebrate your progress, and enjoy the journey towards a healthier and happier you!
We encourage you to try this chair exercise routine and share your experiences with us. We’re here to support you every step of the way on your WeightFine journey!
Author

Living with constant pain near the lower back can be exhausting. It can affect your daily routine, your work, and even your sleep. If you notice swelling, discomfort, or unusual discharge near the tailbone, you may be dealing with a pilonidal sinus. This condition needs timely medical attention to prevent it from becoming more severe. If you are looking for reliable Pilonidal Sinus Treatment in Thrissur, it is important to understand the condition clearly and explore modern treatment options. With advanced medical care and experienced specialists, long-term relief is now possible with minimal discomfort.
Understanding Pilonidal Sinus
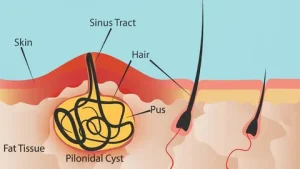
A pilonidal sinus is a small tunnel that forms under the skin near the tailbone. It usually develops when hair penetrates the skin and causes irritation or infection. Over time, this leads to the formation of a cyst or abscess.
This condition can start mildly but often becomes worse if ignored. In some cases, multiple sinus tracts may form, increasing pain and infection risk. Therefore, early diagnosis and treatment are very important.
Common Symptoms You Should Not Ignore
Pilonidal sinus symptoms usually become noticeable as the condition progresses. Some common signs include:
- Persistent pain near the lower spine
- Swelling or a small lump in the affected area
- Pus or blood discharge from a small opening in the skin
- Foul smell from the infected area
- Redness and tenderness around the tailbone
Why Early Medical Attention Matters
Expert Care by Dr. Raviram S.
Choosing the right specialist plays a major role in successful treatment. Dr. Raviram S. is a highly experienced Proctologist doctor in Thrissur with strong expertise in minimally invasive surgery.
He holds an MCh in Surgical Gastroenterology from the Government Medical College, Thiruvananthapuram. With over 16 years of surgical experience and thousands of successful procedures, he is widely trusted for treating complex proctology conditions.
In addition, his work has been recognized with several awards in laser proctology and surgical excellence. His approach focuses on accuracy, safety, and patient comfort, which makes him one of the preferred Pilonidal Sinus Surgeons in Thrissur.
Modern Pilonidal Sinus Surgery in Thrissur
Treatment methods have improved significantly over the years. Today, patients benefit from advanced and minimally invasive techniques that reduce pain and speed up recovery. At Thrissur Piles Clinic, modern laser-based procedures are commonly used. These techniques are designed to treat the sinus without large cuts or prolonged healing time.
Laser Treatment for Pilonidal Sinus (SiLaC)
Laser surgery is one of the most effective treatment options available today. In this procedure, a laser fiber is used to remove and close the infected tract from within.
This method offers several benefits:
- It causes minimal pain compared to traditional surgery
- It supports faster healing and early return to normal life
- It reduces the chances of visible scars
- It lowers the risk of recurrence
- It avoids large surgical wounds
Because of these advantages, many patients now prefer laser Pilonidal Sinus Treatment in Thrissur.
Flap Surgery for Complex Cases
In some advanced or recurring cases, flap surgery may be required. This technique involves removing the infected tissue and closing the area carefully using healthy skin. The main advantage of this method is better healing and reduced tension on the surgical site. As a result, the chances of the condition returning are significantly reduced. Dr. Raviram S. carefully evaluates each patient before recommending the most suitable option. This ensures that treatment is both effective and personalized.
What Happens During Your Visit
Understanding the treatment process can help reduce anxiety. At Thrissur Piles Clinic, every step is designed to ensure patient comfort. First, the doctor conducts a detailed physical examination to assess the condition. Next, he explains the diagnosis in simple terms so patients can clearly understand their situation. After that, the most suitable treatment plan is suggested. If surgery is required, the procedure is performed using advanced techniques that focus on safety and comfort. Finally, patients receive proper aftercare instructions to support smooth healing and recovery.
Why Choose Thrissur Piles Clinic
Thrissur Piles Clinic is known for its modern approach to proctology care. The clinic focuses on advanced treatment, patient comfort, and long-term results.
Key advantages include:
- High success rate in pilonidal sinus treatments
- Advanced laser technology for minimally invasive procedures
- Experienced surgical expertise under Dr. Raviram S.
- Hygienic and comfortable clinical environment
- Personalized care for every patient
Because of these strengths, the clinic has become a trusted center for Pilonidal Sinus Treatment in Thrissur.
Recovery and Aftercare
Recovery after laser surgery is usually quick. The majority of patients are able to resume light activities in a few days. However, proper care is important to ensure complete healing. Doctors usually recommend maintaining hygiene, avoiding prolonged sitting, and following all post-surgery instructions. Regular follow-ups also help monitor healing progress and prevent recurrence. With proper treatment, patients can attain enduring relief and enhanced well-being.
Final Thoughts
Pilonidal sinus can be painful and disruptive, but it is treatable with the right approach. Modern medical advancements have made treatment safer, faster, and more comfortable than ever before. If you are suffering from symptoms, do not delay seeking help. Early diagnosis and expert care can prevent complications and ensure better results. With experienced specialists like Dr. Raviram S. and advanced laser techniques, patients can now look forward to effective and lasting relief. Choosing the right clinic is the first step toward a healthier and pain-free life.
Author
Cosmetic surgery is often surrounded by misconceptions, and tummy tuck procedures are no exception. Many people hesitate to explore this option due to myths that create confusion or unrealistic expectations. If you are considering a Tummy Tuck in Islamabad, it’s important to separate fact from fiction so you can make an informed decision.
In this blog, we’ll debunk common myths and present the real facts about tummy tuck surgery to help you better understand the procedure.
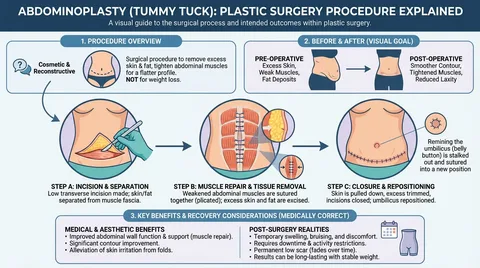
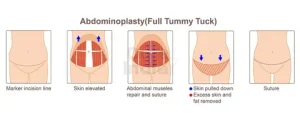
What is a Tummy Tuck?
Why Do Myths Exist?
Misinformation about cosmetic procedures often spreads through social media, word of mouth, or outdated information. These myths can lead to fear, unrealistic expectations, or poor decision-making. Understanding the truth helps you approach the procedure with clarity and confidence.
Common Myths and Facts
Myth 1: A Tummy Tuck is a Weight Loss Procedure
Fact:
A tummy tuck is not meant for weight loss. It is a body contouring procedure designed to remove excess skin and improve abdominal shape.
Myth 2: Results Are Instant and Require No Recovery
Fact:
While results are noticeable after surgery, full results take time as swelling subsides. Recovery is an essential part of the process and requires patience.
Myth 3: Only Women Get Tummy Tucks
Fact:
Men can also benefit from tummy tuck procedures. Many male patients opt for this surgery to achieve a more defined abdominal profile.
Myth 4: The Results Are Not Long-Lasting
Fact:
Results can last for many years if you maintain a stable weight and healthy lifestyle.
Myth 5: Tummy Tuck Leaves Highly Visible Scars
Fact:
Scars are usually placed below the bikini line and fade over time with proper care.
Myth 6: It’s an Extremely Risky Procedure
Fact:
When performed by qualified surgeons in reputable clinics, tummy tuck surgery is generally safe with minimal risks.
Myth 7: You Can Skip Exercise After Surgery
Fact:
A tummy tuck is not a substitute for a healthy lifestyle. Regular exercise and a balanced diet are essential to maintain results.
Myths vs Facts Overview
| Myth | Fact |
|---|---|
| It’s a weight-loss surgery | It’s a body contouring procedure |
| No recovery needed | Recovery is essential |
| Only for women | Suitable for both men and women |
| Results are temporary | Long-lasting with proper care |
| Scars are very noticeable | Scars fade and are strategically placed |
| Highly risky | Safe with experienced surgeons |
| No need for lifestyle changes | Healthy habits are still required |
Benefits of Knowing the Facts
Understanding the truth about tummy tuck procedures helps you:
- Make informed decisions
- Set realistic expectations
- Reduce unnecessary fear
- Choose the right surgeon and clinic
- Achieve better overall results
Who Should Consider a Tummy Tuck?
You may be a good candidate if you:
- Have loose or sagging abdominal skin
- Have undergone significant weight loss
- Experience muscle separation after pregnancy
- Are in good overall health
- Have realistic expectations
Tips to Avoid Misinformation
- Always consult a qualified surgeon
- Rely on trusted medical sources
- Avoid believing everything on social media
- Ask questions during consultations
Why Islamabad is a Reliable Choice
Islamabad has become a popular destination for cosmetic procedures due to:
- Skilled and experienced surgeons
- Modern medical facilities
- Affordable treatment options
- High standards of patient care
These factors contribute to safer procedures and better outcomes.
Final Thoughts
Their expert team provides personalized treatments, ensuring safety, comfort, and outstanding outcomes for every patient. In addition, they focus on understanding each patient’s unique needs and medical history before recommending any procedure. This patient-centered approach helps in creating treatment plans that are both effective and realistic. The clinic also uses advanced techniques and modern medical equipment to enhance precision and minimize risks during surgery. Post-procedure care is given equal importance, with detailed follow-up sessions to ensure proper healing and recovery. Patients are guided throughout every stage of the process, from consultation to final results. This commitment to excellence builds trust and ensures long-term satisfaction for individuals seeking cosmetic enhancement procedures.
FAQs
1. Is a tummy tuck painful?
Some discomfort is expected during recovery, but it is manageable with medication.
2. How long do results last?
Results can last for many years with proper lifestyle maintenance.
3. Can I lose weight with a tummy tuck?
No, it is not a weight-loss procedure.
4. Will I have scars?
Yes, but they are placed discreetly and fade over time.
5. Is it safe to undergo the procedure?
Yes, when performed by qualified professionals in a reputable clinic.
6. Can men get a tummy tuck?
Yes, the procedure is suitable for both men and women.
Author
Dealing with constant pain, physical discomfort, or unusual wetness in your private areas can make life very difficult. It affects your daily office work, your family time, and your mental peace. Among various painful problems, an anal fistula is quite complex. It is a condition that almost never heals by itself with simple creams or home remedies. If you are looking for a permanent solution, getting timely and professional medical care is highly important. For anyone living in Kerala, finding the right center for modern Fistula Treatment in Thrissur is the first step toward living a happy, pain-free life.
What is an Anal Fistula Treatment?
To understand why professional medical care is necessary, it helps to understand what an anal fistula actually is. In simple terms, an anal fistula is a small, abnormal tunnel or track under the skin. It forms a link between an infected gland inside your anal canal and the external skin surrounding your anus.
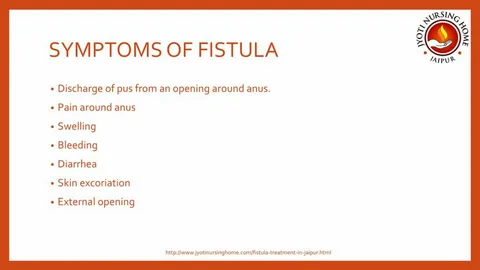
Critical Symptoms You Should Never Ignore
An anal fistula shows very clear warning signs. You should instantly seek a consultation if you notice any of these problems:
- Constant, Throbbing Pain: You feel a deep, continuous ache around your anal area. This pain usually gets much worse when you sit down, walk around, or try to pass stools.
- Foul-Smelling Discharge: You notice white pus, watery fluid, or sometimes drops of blood staining your undergarments. This fluid leaks out from a tiny boil or opening on the skin.
- Swelling and Tenderness: The skin near the anal opening looks red, feels warm, and hurts badly when touched.
- Skin Irritation: The continuous drainage of fluid keeps the surrounding skin wet, leading to severe itching, rashes, and skin burning.
- Recurrent Fever: If a pocket of pus (an abscess) builds up inside and cannot drain out properly, it can cause a high fever, body chills, and fatigue.
Expert Care Matters for Fistula Treatment
An anal fistula is not a simple skin boil. It is a complex anatomical problem because the tunnel frequently travels through or runs very close to your anal sphincter muscles. These are the highly important circular muscles that allow you to control your bowel movements.
If an inexperienced doctor performs a traditional surgery incorrectly, it can accidentally damage these delicate sphincter muscles. Such damage can lead to a lifetime problem called fecal incontinence, where a patient completely loses the power to control gas or stool movements.
Fistula Treatment vs. Old Surgical Methods
In the past, traditional open surgery (known as a fistulotomy) was the only treatment available. In an open surgery, doctors cut open the entire skin and muscle layer over the tunnel to turn it into an open groove that heals from the bottom up. For very deep or complex tunnels, doctors had to place a thick surgical thread (called a seton) inside the track to drain out the pus over several long months.
While those old surgeries worked, they came with major downsides:
- Large, deep open wounds that took months to heal completely.
- Severe post-surgery pain that required strong painkillers.
- The need for painful daily wound dressings and cleanings.
- Extended bed rest and a long break from office work.
- A higher risk of accidental muscle damage and recurrence.

The Benefits of Modern Laser Surgery
Minimal Post-Operative Pain:
Because there are no deep cuts, stitches, or open wounds created on your skin, the post-surgery pain is incredibly low.
Total Muscle Protection:
The advanced laser beam targets only the infected track. It does not cut or damage your crucial anal sphincter muscles, ensuring your bowel control remains completely safe.
Convenient Daycare Procedure:
The entire process takes very little time. Patients can get admitted in the morning, complete the laser procedure, and comfortably walk back home the very same day.
Rapid Recovery:
You do not need to take weeks of sick leave from your job. Most patients can stand up, sit comfortably, and return to their regular light office work within 2 to 3 days.
No Painful Daily Dressings:
Since there is no large open wound left behind, you are saved from the agony of painful daily wound packings and dressings.
Negligible Blood Loss:
The gentle heat of the laser naturally seals up small blood vessels during the procedure, making it a virtually bloodless experience.
What to Expect at Your First Consultation
We understand that speaking about or getting checked for anal issues can cause an emotional mix of anxiety, worry, or embarrassment. However, at Thrissur Piles Clinic, the entire staff follows strict guidelines to ensure your absolute comfort, dignity, and personal privacy.
1. Compassionate and Detailed Discussion
During your initial private meeting, Dr. Raviram S. will listen to your symptoms calmly. He will ask details about how your pain started, the nature of any fluid discharge, your daily eating habits, your lifestyle, and any previous medications or treatments you might have tried.
2. A Painless and Gentle Checkup
A physical examination is conducted inside a highly private, clean, and comfortable examination room. To map out the condition clearly without causing you pain, the doctor performs a very gentle and quick visual test. If required, a painless checkup using a tiny, lubricated scope (called an anoscopy) is used to inspect the internal health of the anal canal for any hidden piles, tears, or internal fistula openings.
3. Creating a Transparent Treatment Plan
If an anal fistula is found, Dr. Raviram S. will take the time to explain the structure of your condition using simple, non-medical terms. He will discuss the best modern approach, explain exactly how the laser procedure will seal your specific track, and build a customized treatment plan so you can move ahead with absolute clarity and peace of mind.
Conclusion
An anal fistula can cause a lot of daily physical pain, mental stress, and trouble in your normal life. But you do not have to live with this discomfort forever. If you try to ignore your symptoms or keep using temporary local creams, the problem will only get worse. The tunnel can grow deeper, form complicated new branches, or create painful new pus collections under your skin.
With modern, minimally invasive laser technology and specialized medical care, getting permanent relief has now become simple, safe, and nearly painless. By placing your trust in an award-winning Fistula Specialist in Thrissur like Dr. Raviram S., you are putting your health in highly experienced, trusted hands.
Author


Columbus College Websites: Fix Design & Reclaim Lost Enrollment

Columbus College Websites: Fix Poor Design & Boost Enrollment

Bendigo New Apartments: Heritage, Culture & Modern Living

Joshua Jamal Shorts: Style on a Budget in 2026

TN Patta Chitta: Check Land Records & Pay House Tax Online

Common Projects Sneakers: Design, Style, and Authenticity Tips

Partnership Accounting: Trust, Track Equity, and Maximize Profit

Darwin Apartments: The New Wave of Tropical Urban Living

Darwin’s New Apartment: Tropical Living Meets Urban Growth

On Cloud Shoes: Comfort, Performance, and Everyday Style

Cybersecurity Consulting Company SequelNet Provides Critical IT Support Services to Medical Billing Firm, Medical Optimum

Team Communication Software Transforms Operations at Finance Innovate

Project Management Tool Transforms Long Island Business

How Alleviate Poverty Utilized IPPBX’s All-in-One Solution to Transform Lives in New York City

Breast Cancer: The Imperative Role of Mammograms in Screening and Early Detection

Unstoppable Collaboration: D.C.’s Citi Open and Silicon Valley Classic Unite to Propel Women’s Tennis to New Heights

Embracing Renewal: Sizdabedar Celebrations Unite Iranians in New York’s Eisenhower Park

The Benefits of Starting a Side Hustle for Financial Freedom

New Blood Donation Screening Questions What You Need to Know

Stylishly Timeless: The 5 Types of Sandals You Need in Your Closet
-

 Business3 years ago
Cybersecurity Consulting Company SequelNet Provides Critical IT Support Services to Medical Billing Firm, Medical Optimum
-
Business3 years ago
Team Communication Software Transforms Operations at Finance Innovate
-
Business3 years ago
Project Management Tool Transforms Long Island Business
-
Business3 years ago
How Alleviate Poverty Utilized IPPBX’s All-in-One Solution to Transform Lives in New York City
-
health3 years ago
Breast Cancer: The Imperative Role of Mammograms in Screening and Early Detection
-
Sports3 years ago
Unstoppable Collaboration: D.C.’s Citi Open and Silicon Valley Classic Unite to Propel Women’s Tennis to New Heights
-
Art /Entertainment3 years ago
Embracing Renewal: Sizdabedar Celebrations Unite Iranians in New York’s Eisenhower Park
-
Finance3 years ago
The Benefits of Starting a Side Hustle for Financial Freedom


