
Home Garden
Chili Love Savor Wholesome Turkey Delights

Introduction:
Welcome to the delightful world of chili, where every spoonful warms the heart and tickles the taste buds. we’re diving deep into the art of making turkey chili, a flavorful and healthier twist on a beloved classic. Join us as we explore advanced techniques, tips, and in-depth insights provided by a seasoned cooking school instructor. With their expertise, Turkey is the unsung hero of chili, offering a lean and flavorful alternative to beef. Our expert, the cooking school instructor, emphasizes that turkey brings out the best of both worlds – rich taste and a healthier choice. When it comes to choosing the star of your chili, many enthusiasts have traditionally turned to beef for its robust flavor. However, if you’re looking for a leaner, healthier option that doesn’t compromise on taste, turkey should be your go-to choose. Our seasoned cooking school instructor, with years of culinary wisdom under their belt, is here to guide you through the art of crafting a memorable turkey chili. Turkey is renowned for its leanness, making it an ideal choice for those seeking a healthy alternative. It’s lower in saturated fat and calories than beef, making it a heart-healthy option. Moreover, turkey doesn’t skimp on flavor. When seasoned and prepared correctly, it becomes a delectable canvas for the spices and aromatics that make chili an all-time favorite.

image by https://garnishedplate.com
Spice Blending
To achieve chili perfection, it’s all about the spices. Our expert guides us through the intricate world of chili spices and shares the magic of blending – a crucial step in crafting a memorable turkey chili. Now that we’ve established turkey as the star of our chili, it’s time to delve into the heart of the matter – the spices. It’s the blend of spices and seasonings that imparts the distinct flavor that chili is known for. Our expert instructor shares their wisdom on the art of spice blending. The right combination of spices, such as chili powder, cumin, paprika, and oregano, can elevate your turkey chili to new heights. The key is balance, as each spice contributes its unique character to the dish. You’ll learn how to adjust the spice blend to suit your palate, creating a chili that’s uniquely yours.
Mastering the Texture
Texture plays a vital role in your chili experience. Some prefer their chili to be thick and chunky, while others lean toward a smoother, soupier consistency. Our expert shares insights into achieving the perfect texture for your turkey chili. One common method is using ground turkey, which disperses evenly in the chili, creating a consistent texture. If you’re a fan of a heartier chili, consider using ground turkey with a higher fat content for added richness. For those who prefer chunky chili, cubed turkey can be the way to go. It provides distinct bites of tender turkey amidst the chili’s flavorsome embrace. By adjusting the size of your turkey pieces, you can cater to your personal preference.
Simmering for Perfection
Patience is key in chili making. Discover the art of slow cooking, the secret to developing rich, complex flavors, and transforming your turkey chili into a culinary masterpiece. The art of slow cooking is what takes your chili from good to extraordinary. Our expert emphasizes that patience in simmering is crucial to developing rich, complex flavors. A well-simmered chili allows the spices, turkey, and other ingredients to meld together, creating a harmonious and flavorful dish. Set your chili on low heat and let it simmer for at least an hour. This slow-cooking process allows the flavors to marry, resulting in a deep and robust taste that’s synonymous with a perfect bowl of chili. Our expert also shares tips on adjusting the thickness of your chili during the simmering process. If your chili is too thick, you can add a bit of broth or water. On the other hand, if it’s too thin, let it simmer uncovered to reduce and thicken.
Creating Your Signature
Elevate your turkey chili experience with creative toppings and complementary sides. Our expert shares ideas to make your chili truly yours, from avocado to cornbread. Chili is a canvas for creativity, not just in its preparation but also in its serving. To make your turkey chili truly your own, consider the toppings and side dishes that accompany it. Our expert recommends an array of delicious toppings to enhance your chili experience. fresh contrast, while grated cheese provides a delightful melt-in-the-mouth sensation. Sour cream offers a cooling element, and chopped green onions add a burst of freshness. Don’t forget the crunch of tortilla chips for an exciting texture.

image by https://bykelseysmith.com
KeyPoint:
| Aspect | Turkey Chili | Beef Chili |
|---|---|---|
| Calories | Lower | Higher |
| Fat Content | Less saturated fat | More saturated fat |
| Protein | High | High |
| Cholesterol | Lower | Higher |
| Iron Content | Good source | good source |
| Flavor | Deliciously robust | Classic and hearty |
| Heart Health | Heart-friendly | Moderate |
Conclusion:
In your journey through this article, we’ve explored the delightful world of turkey chili, a twist on the classic that brings forth a harmonious blend of flavor and health. Thanks to the expert insights shared by our seasoned cooking school instructor, we emphasized the key aspects that make turkey chili a standout choice for those seeking a wholesome meal. Turkey, with its lean profile, offers a healthier alternative to beef without sacrificing flavor. It’s lower in saturated fat, calories, and cholesterol, making it a heart-friendly option. When prepared correctly, it transforms into a delectable canvas for the myriad of spices that characterize chili. Speaking of spices, our exploration of the intricate world of chili seasonings shed light on the magic of blending. By crafting a balanced spice blend, you’ll be able to customize your chili’s flavor, creating a dish that’s perfectly suited to your palate. Texture plays a vital role in the chili experience, provided insights into mastering this aspect. Whether you prefer ground turkey for an even, consistent texture or chunks of turkey for a heartier feel, the choice is yours. With the guidance of our expert, you can tailor your chili to match your unique preferences.
Author


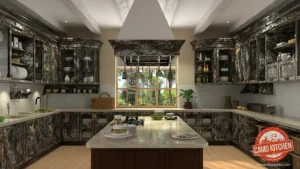
Modern interior design continues to evolve as homeowners and businesses search for affordable ways to refresh existing spaces. Among the many decorative surface solutions available today, camo wrap has emerged as a distinctive option that combines visual appeal with practical functionality. Whether applied to cabinets, countertops, furniture, or commercial interiors, camouflage-inspired vinyl films can dramatically transform surfaces without the expense of a full renovation.
As architectural film technology advances, today’s camouflage wraps offer impressive durability, realistic textures, and a wide range of design options that suit both residential and commercial environments.
What Is a Camo Wrap?
A camo wrap is a self-adhesive decorative vinyl film featuring camouflage-inspired patterns. Designed to cover existing surfaces, it provides an alternative to painting, resurfacing, or replacing fixtures and furniture.
Manufacturers create these wraps using advanced vinyl materials that adhere securely to smooth surfaces while maintaining flexibility during installation. Many modern products include protective coatings that resist scratches, moisture, stains, and everyday wear.
Understanding Camouflage Vinyl Films
Camouflage wraps are available in various colors, textures, and styles. While traditional military-inspired patterns remain popular, designers now produce modern interpretations featuring urban, woodland, desert, digital, and abstract camouflage themes.
These films often replicate premium finishes while adding a bold visual statement. Their versatility makes them suitable for both decorative and functional applications.
Where Wraps Are Commonly Used
- Kitchen cabinets
- Countertops
- Furniture surfaces
- Retail displays
- Reception desks
- Feature walls
- Doors and panels
- Commercial fixtures
The adaptability of these films allows designers to create personalized spaces without extensive construction work.
Camo Wrap Is Growing in Popularity
Several factors contribute to the increasing demand for camouflage vinyl wraps. Consumers are becoming more conscious of renovation costs, project timelines, and sustainability considerations.
Unique Visual Appeal
Unlike traditional solid-color finishes, camouflage patterns create depth, texture, and character. A carefully selected camo design can transform an ordinary surface into a focal point within a room.
Modern interior trends increasingly embrace personalized design elements. Camouflage wraps help property owners express individuality while maintaining a contemporary appearance.
Affordable Alternative to Renovation
Replacing cabinets, countertops, and furniture can require substantial investment. A high-quality vinyl wrap provides a cost-effective alternative that delivers a fresh appearance at a fraction of the cost.
Many renovation projects also involve labor expenses, demolition, and disposal fees. Wrapping existing surfaces minimizes disruption while extending the life of current fixtures.
Key Benefits of Using Wrap
The popularity of camouflage wraps stems from several practical advantages beyond aesthetics.
Cost Efficiency
Wrapping existing surfaces typically costs significantly less than complete replacement. This affordability makes camo wrap attractive for both homeowners and businesses working within budget constraints.
Easy Installation
Durability and Protection
Modern architectural films are engineered to withstand everyday use. Quality wraps resist:
- Scratches
- Moisture
- UV exposure
- Stains
- Surface abrasion
These protective properties help preserve underlying materials while maintaining appearance over time. For example, a retail counter exposed to constant customer interaction may experience less visible wear when protected by a durable vinyl film.
Design Flexibility
One of the strongest advantages of camouflage wraps is design versatility. Property owners can choose from numerous patterns, colors, and finishes to complement existing décor. Some manufacturers even offer custom printing services, allowing businesses to incorporate branding elements into camouflage-inspired designs.
This flexibility supports creative projects ranging from subtle accents to complete room transformations.
Types of Wrap Designs
The market now offers an extensive selection of camouflage styles tailored to different aesthetic preferences.
Traditional Military Camouflage
Traditional camouflage remains a classic choice. These designs typically feature green, brown, black, and tan tones inspired by military uniforms and outdoor environments. They work particularly well in rustic, industrial, and outdoor-themed spaces.
Modern Urban Camouflage
Urban camouflage introduces contemporary color palettes such as gray, charcoal, white, and black. Digital patterns often create a sleek, modern appearance suitable for commercial interiors and contemporary homes. This style appeals to individuals seeking a sophisticated interpretation of traditional camouflage.
Custom Printed Camouflage Patterns
Advances in digital printing technology allow manufacturers to create fully customized designs. Property owners can combine camouflage elements with logos, brand colors, graphics, or unique artistic concepts. Custom solutions are especially valuable for businesses looking to strengthen visual identity through interior design.
Installation Process and Practices
Proper installation plays a significant role in achieving professional results.
Surface Preparation
Before applying any wrap, installers should thoroughly clean the surface to remove dust, grease, and contaminants. Smooth, dry surfaces typically produce the best adhesion and finish quality. Repairing chips, cracks, or imperfections beforehand helps prevent visible defects after installation.
Application Techniques
Professional installers often use heat guns and specialized tools to conform vinyl around edges and corners. Careful alignment prevents wrinkles, bubbles, and stretching issues. Large projects generally benefit from professional installation, particularly when complex shapes or extensive surface areas are involved.
Maintenance Tips
Maintaining a camo wrap is relatively simple.
Recommended practices include:
- Cleaning with mild soap and water
- Avoiding abrasive cleaning products
- Wiping spills promptly
- Inspecting edges periodically
With proper care, many high-quality wraps maintain their appearance for years.
Choosing the Right Camo Wrap
Selecting the ideal camouflage wrap requires consideration of several factors. Surface type, environmental conditions, design objectives, and expected durability all influence product selection. For kitchens and high-traffic commercial spaces, prioritize wraps with strong scratch resistance and moisture protection. For decorative accent applications, focus on color harmony and visual impact.
Working with reputable architectural film suppliers helps ensure product quality, performance, and long-term satisfaction. Reviewing installation specifications and warranty information before purchase can also prevent costly mistakes.
Author
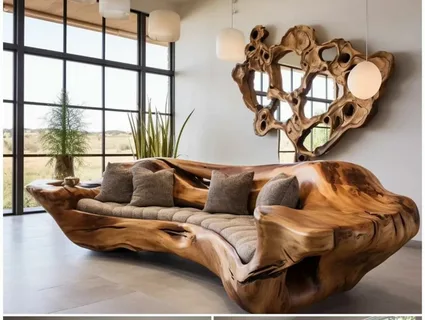
Handcrafted Interior Design today is shaped by a blend of craftsmanship, comfort, and visual storytelling. Homes are no longer styled purely for appearance; instead, they reflect personality, lifestyle, and a deeper appreciation for materials that carry meaning. Every object within a space contributes to its overall atmosphere, from furniture and lighting to the subtle textures underfoot.
A well-balanced interior often relies on layering. Smooth surfaces are combined with textured materials, simple designs are enhanced with artisan details, and neutral shades are enriched with thoughtfully selected highlights. This method fosters balance while enabling individual components to shine distinctly.
Role of Craft in Interior Aesthetics
Craftsmanship has always held a special place in design, but its importance has grown significantly in modern interiors. People are increasingly drawn to pieces that showcase human effort, tradition, and attention to detail. Unlike mass-produced items, Handcrafted Interior Design carry subtle variations that make them unique and personal.
These variations are not imperfections; they are signatures of authenticity. They reflect the time, skill, and dedication invested in each creation, making every piece a story in itself.
Floor Styling as a Design Foundation
Floor décor plays a crucial role in defining the character of a room. It anchors furniture arrangements, introduces warmth, and helps create visual boundaries within open spaces. Without thoughtful floor styling, even well-furnished rooms can feel incomplete or disconnected.
Within this context, High Quality Handmade Rugs bring a distinct sense of refinement and individuality. They are more than functional accessories; they are artistic foundations that unify a space. Their intricate patterns, detailed weaving techniques, and tactile richness help transform interiors into cohesive, inviting environments.
Craftsmanship and Traditional Techniques
Handwoven design traditions have been passed down through generations, preserving cultural heritage while adapting to modern needs. Techniques such as knotting, weaving, and dyeing require patience and precision, resulting in durable pieces that stand the test of time.
Exploring traditional weaving craftsmanship methods reveals how artisans combine skill with creativity to produce designs that are both functional and expressive. Each stage of production contributes to the final outcome, from selecting raw materials to completing intricate patterns by hand.
This dedication ensures that every finished piece carries a sense of identity, making it more than just a decorative object.
Blending Tradition With Contemporary Living
Neutral interiors especially benefit from such additions, as texture becomes the primary source of depth. Whether placed in a living room, bedroom, or hallway, these elements help define spaces while maintaining flow and openness.
Sustainability and Conscious Design Choices
As awareness around sustainability grows, homeowners are becoming more mindful of the materials they choose. Natural fibers, ethical production methods, and long-lasting craftsmanship are now key considerations in interior design decisions. Handmade pieces often align with these values, as they typically involve lower environmental impact and greater material efficiency.
This shift has encouraged a return to slow design principles, where quality is prioritized over quantity. Instead of frequent replacements, people are investing in fewer, more meaningful pieces that last longer and age gracefully.
Textural Harmony and Emotional Comfort
Texture has a direct impact on how a space feels emotionally. Soft, layered surfaces create comfort and relaxation, while rough or structured textures add contrast and definition. Balancing these elements helps create environments that feel both engaging and soothing.
Handcrafted floor elements play a central role in achieving this balance. Their tactile richness adds depth underfoot while enhancing the overall sensory experience of a room.
Global Inspiration and Evolving Trends
Interior design continues to evolve through global influence and cultural exchange. Traditional techniques are being reinterpreted in modern ways, resulting in designs that feel both timeless and contemporary. This fusion allows homeowners to enjoy heritage-inspired aesthetics without sacrificing modern functionality.
Publications like Architectural Design Inspiration Archives often highlight how artisans and designers are blending old-world techniques with new-age styling, offering fresh perspectives on interior creativity.
Conclusion
A well-designed home is built on more than furniture placement or color selection. It is shaped by intention, craftsmanship, and attention to detail. Handcrafted elements bring authenticity into modern interiors, turning ordinary spaces into expressive environments. When carefully chosen, these pieces become more than décor—they become part of the home’s identity.
Through thoughtful integration of texture, tradition, and design, interiors can achieve a timeless balance of comfort, beauty, and individuality. Handcrafted Interior Design plays a central role in this transformation by bringing human touch and artistic expression into modern living spaces. It allows designers and homeowners to move beyond plain, mass-produced aesthetics and embrace pieces that carry character, depth, and meaning.
When handcrafted elements are introduced into a room, they immediately create a focal point that feels warm and inviting. Every texture, weave, and finish tells a story of skilled craftsmanship and careful attention to detail. As a result, interiors feel more personal and emotionally connected rather than purely decorative.
Moreover, Handcrafted Interior Design encourages a slower and more intentional approach to decorating spaces. Instead of filling rooms quickly, people choose fewer but more meaningful pieces that enhance long-term satisfaction. This approach also improves visual harmony, as handcrafted items naturally blend with different styles, whether modern, rustic, or minimalist.
Ultimately, this design philosophy elevates interiors by combining authenticity with creativity, ensuring that every space feels unique, balanced, and truly lived in.
Author
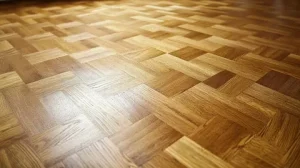
Are you planning to upgrade your home or office flooring? If yes, parquet flooring is one of the most elegant and practical options you can choose. It instantly adds warmth, beauty, and sophistication to any space. Whether you reside in a small apartment or a high-end villa in Dubai, parquet flooring complements all interior designs flawlessly.
Today, many homeowners and designers prefer parquet flooring because it offers both style and durability. It is not just a flooring material; it is a long-term investment in comfort and aesthetics. At Fixing Dubai, we focus on delivering high-quality parquet flooring made from premium natural wood. Our flooring solutions are designed to handle Dubai’s unique climate while maintaining their beauty for years.
Parquet Flooring Is a Popular Choice
Parquet flooring has gained huge popularity in recent years. The reason is simple—it combines luxury with practicality. Unlike ordinary flooring, it gives your space a premium look without requiring complicated maintenance.
In addition, parquet flooring works well in both residential and commercial interiors. From living rooms to offices, it enhances the overall environment and creates a welcoming atmosphere.
Let’s explore why so many people prefer it.
1. Crafted from High-Quality Natural Wood
One of the biggest advantages of parquet flooring is its natural wood composition. It is made using carefully selected hardwood that ensures strength and beauty. Different wood options allow you to choose a style that matches your interior: Oak and walnut provide a luxurious and timeless look, perfect for sophisticated environments.
Maple and cherry brighten rooms and make them feel more open and spacious. Bamboo provides an eco-friendly option for homeowners who prefer sustainable materials. Because of these choices, you can easily customize your flooring based on your taste and interior design.
2. Strong, Durable, and Long-Lasting
Durability is one of the strongest features of parquet flooring. It is crafted to endure everyday usage without sacrificing its appeal. Even in high-traffic areas like hallways, living rooms, and office spaces, parquet flooring remains stable and attractive. It does not crack or weaken easily when maintained properly.
Moreover, its solid structure ensures long-term performance, making it a smart investment for both homes and commercial properties.
3. UV Protection for Dubai’s Climate
Dubai’s intense sunlight can be harsh on regular wooden floors. Over time, exposure to sunlight may cause fading or discoloration. To solve this problem, high-quality parquet flooring comes with a UV-resistant coating. This protective layer helps preserve the natural color and shine of the wood. As a result, your floor continues to look fresh and vibrant even after years of sunlight exposure. This makes parquet flooring especially suitable for homes in the UAE.
4. Elegant Patterns That Stand Out
Parquet flooring is known for its beautiful geometric designs. In contrast to conventional straight wooden boards, it employs small wood fragments organized in creative designs. Well-liked patterns such as herringbone and chevron produce a striking visual appeal. These designs enhance the richness and personality of any space.
Furthermore, parquet flooring turns a simple floor into a design feature. It becomes a focal point that enhances the overall interior look without extra decoration.
5. Comfortable and Noise-Reducing
Comfort plays a major role in choosing flooring. Parquet flooring offers a soft and warm feel underfoot, making your space more comfortable to live in. In addition, it helps reduce noise levels inside the room. Footsteps and movement sound much quieter compared to tile or marble floors. This makes it an excellent choice for families, apartments, and office environments where peace and comfort are important.
6. Easy Maintenance and Cleaning
One of the most attractive benefits of parquet flooring is its easy maintenance. You don’t need special cleaning products or complicated routines. Simple daily care is enough to keep it in excellent condition.
Regular sweeping or vacuuming removes dust and dirt effectively. If there are spills, a slightly damp cloth is enough to clean the surface. Because of its stain-resistant finish, parquet flooring stays clean and polished with minimal effort.
Choose Fixing Dubai for Parquet Flooring
Choosing the right supplier is just as important as choosing the flooring itself. At Fixing Dubai, we bring experience, quality, and professional service together. We have been working in the flooring industry for more than 15 years, helping customers across Dubai and the UAE create beautiful interiors.
Here is what makes us different:
- We offer free sample delivery so you can check materials at your home before deciding.
- We offer professional advice to assist you in selecting the ideal design and wood species.
- Our professional installation team ensures perfect fitting without gaps or uneven surfaces.
- We deliver quickly across Dubai and other Emirates for your convenience.
- With us, you get a complete flooring solution from selection to installation.
Simple Tips to Maintain
Taking care of flooring is easy, but a few simple habits can extend its life even more.
- Avoid using excess water during cleaning, as moisture can damage wood over time.
- Use protective pads under furniture legs to prevent scratches and marks.
- Clean dust regularly so that small particles do not damage the surface finish.
These small steps help maintain the beauty and durability of your flooring for years.
Final Thoughts
Parquet flooring is more than just a design choice—it is a lifestyle upgrade. It brings together elegance, durability, and comfort in one solution. Whether you want to enhance your home or improve your office space, flooring delivers long-lasting value.
With its natural wooden texture, beautiful patterns, and easy maintenance, it remains one of the best flooring options available today. If you are looking for a stylish yet practical flooring solution in Dubai, parquet flooring is definitely worth considering.
Author


Essentials Hoodie Australia: Summer Sale & Style Guide

Stussy Streetwear: Origins, Iconic Hoodies & Cultural Legacy

New IPO Guide: Trends, Risks and Investment Insights India

Grand Watches: Heritage, Craftsmanship & Mechanical Mastery

Fear of God Essentials Hoodie: Luxury Streetwear Guide

Chrome Hearts Clothing, Jewelry & Luxury Fashion Guide

Spirit Airlines IAD Terminal Guide: Terminal 1 Services & Tips

Labubu Original: Unique Fashion & Beauty Online Store

Kaftan Sets for Women: Stylish and Comfortable Summer Fashion

Korean Co Ord Sets: Celebrity-Inspired Fashion Trends Guide

Cybersecurity Consulting Company SequelNet Provides Critical IT Support Services to Medical Billing Firm, Medical Optimum

Team Communication Software Transforms Operations at Finance Innovate

Project Management Tool Transforms Long Island Business

How Alleviate Poverty Utilized IPPBX’s All-in-One Solution to Transform Lives in New York City

Breast Cancer: The Imperative Role of Mammograms in Screening and Early Detection

Unstoppable Collaboration: D.C.’s Citi Open and Silicon Valley Classic Unite to Propel Women’s Tennis to New Heights

Embracing Renewal: Sizdabedar Celebrations Unite Iranians in New York’s Eisenhower Park

The Benefits of Starting a Side Hustle for Financial Freedom

New Blood Donation Screening Questions What You Need to Know

Stylishly Timeless: The 5 Types of Sandals You Need in Your Closet
-

 Business3 years ago
Cybersecurity Consulting Company SequelNet Provides Critical IT Support Services to Medical Billing Firm, Medical Optimum
-
Business3 years ago
Team Communication Software Transforms Operations at Finance Innovate
-
Business3 years ago
Project Management Tool Transforms Long Island Business
-
Business3 years ago
How Alleviate Poverty Utilized IPPBX’s All-in-One Solution to Transform Lives in New York City
-
health3 years ago
Breast Cancer: The Imperative Role of Mammograms in Screening and Early Detection
-
Sports3 years ago
Unstoppable Collaboration: D.C.’s Citi Open and Silicon Valley Classic Unite to Propel Women’s Tennis to New Heights
-
Art /Entertainment3 years ago
Embracing Renewal: Sizdabedar Celebrations Unite Iranians in New York’s Eisenhower Park
-
Finance3 years ago
The Benefits of Starting a Side Hustle for Financial Freedom


